Working with moving lights on Express consoles
Moving lights displays
Moving lights and conventional lights use the same Blind and Stage displays. Each moving light, however, is distinguished in these displays by a gray bar surrounding the numbers of all channels in the fixture. Also, channels that carry the low order bits of 16-bit attributes have dimmed channel numbers.
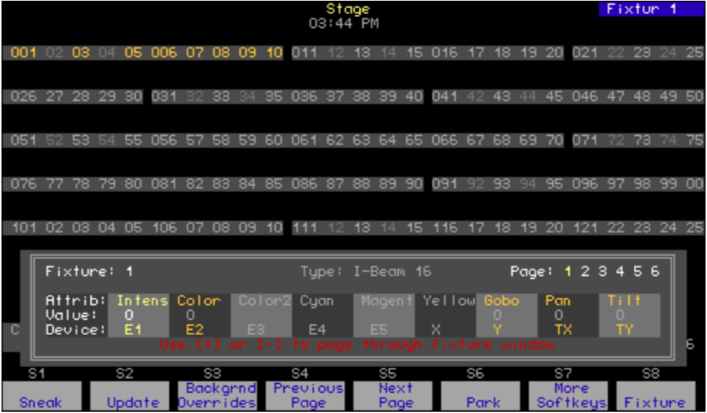
Levels are set for the channels of moving light fixtures in a Fixture Box window that pops up in Blind and Stage displays when a fixture is selected.40 The list under the screen shot below identifies the contents of the Fixture Box window.
Go to the Fixture Box window
- Press the [Stage] or [Blind] key.
- Press [S8], Fixture.
- Enter a fixture number(s). The fixture box appears.
Following are features of the Fixture Box.
- The fixture is identified by number, label (if assigned) and personality.
- Page numbers are shown in white if any of the fixture’s attributes are on that page. The current encoder page is identified in yellow.
- The fixture’s attributes on the current page are identified in gold.
- The level assigned to each identified attribute is identified in the “Value” line. For 8-bit data types, the level is given as a percentage. For 16-bit data types, the level is given as a value in the range 0-65535.
- The level setting device assigned to each identified attribute is identified, where TX and TY are the axes of the trackpad.41
40 When a range of fixtures is selected, the Fixture Box contains information pertaining only to the last fixture in the range.
41 E1-E5 are for encoders; X and Y are for wheels. These settings are inapplicable to Express consoles which have neither encoders nor wheels.
Working with fixtures
Following are some principles to keep in mind when setting fixture attribute levels.
- If a fixture has a strobe attribute, that attribute must be set above zero so that the light can be seen.
- The intensity attribute is selected by default unless you select an attribute. Use this as a shortcut method to set fixture intensities. For example, set the intensity of three moving lights on stage by pressing [Stage] [S8], Fixture, [1] [thru] [3] [Full].
- If you wish, you can assign attribute levels without using the Fixture Box. For instance, if a fixture is patched to channels 1 through 20, you can set the levels of channels 7 and 8 as follows: press [Stage] [Channel] [7] [And] [8] [At] [5] [Enter].
- If you are working with fixtures directly but don’t want the Fixture Box on the screen, press [Clear] to remove it. The encoders remain active when the Fixture Box is cleared. You can clear away the Fixture Box even in the midst of a lengthy command sequence without altering the results. For instance, set the intensity of fixtures 1 through 3 to full and clear away the Fixture Box in one command sequence as follows: press [Blind] [S8], Fixture, [1] [thru] [3] [Clear] [Full].
Setting levels in the Fixture Box
Use the procedure below this Navigation and Feedback table to set attribute levels in the fixture box.
Navigation and Feedback - Fixture Box display |
||||
|---|---|---|---|---|
| Select fixture |  |
|
||
| Select page | |
|||
| Select attribute | |
|||
| Page highlighted white | Fixture attributes exist on page | |||
| Page highlighted yellow | Selected page | |||
| Attribute gold | Attribute of selected fixture | |||
| Attribute highlighted yellow | Selected attribute | |||
- With a fixture in the Fixture Box, press the up/down arrows to select a page.
- Select an attribute with the left/right arrows.
- Adjust the level of the selected attribute with the trackpad.42
- If there are other fixture attributes on the same page that you wish to set, repeat steps 2 and 3 above. Continue until finished with all attributes on that page.
- If attributes of this fixture are on a different page, repeat steps 1 through 4 above. Continue for all pages on which the fixture’s attributes are located.
- To set the channel levels of another fixture, select the fixture with the [+] or [–] keys.
- Repeat steps 1 through 6 until finished with all fixtures.
42 Pan and tilt are always selected together when either is selected. Whichever of these two attributes is selected is placed on one axis of the trackpad and the other of the two is placed on the second axis.
Fixture focus with Solo
Solo provides a convenient way to point or otherwise adjust a selected moving light without the interference of others. Even better, you can increment through fixtures one at a time, adjusting as you go, with a single execution of the solo function.
There is no reason to use solo in Blind because the Fixture Box has a similar incrementing feature. If you do use it in Blind, however, be aware that solo leaves the levels for the selected fixture set and all the rest at zero.
Example:
| 1. Patch Fixtures 1-10 | |
| 2. Press [Stage]. | |
| 3. Select fixtures 1-10 and set levels. | |
| 4. Press [S8], Fixture, [1] [S7], More Softkeys, [S5], Solo. | Brightens fixture 1 and darkens all other lights. |
| 5. Adjust the fixture. | |
| 6. Press the + or – keys to solo the next fixture. | |
| 7. Repeat steps 4 and 5 until finished. | Increment through all fixtures. |
| 8. Press [S5], Solo. | Return to the complete look on stage. |