SmartPack Advanced Menu Structure
Enter the Advanced menu from the Normal Menu:
The Advanced menu provides all access to the menu and configuration settings for the SmartPack.
Step 1: Scroll to General Settings, press  .
.
Step 2: Scroll to Menu Mode, press .
Step 3: Scroll to Advanced Menu, press and hold for 5 seconds. The display will return to the main menu when the Advanced Menu has been accessed.
-
If the
is released prematurely the menu will remain in Normal Menu mode.
DMX
DMX Start Address
The start address range is determined by the size of your SmartPack. When a DMX Start Address is selected as the active DMX Mode, the DMX range will be displayed on the LCD.
DMX Start Address range
- A three channel unit allows a start address range of 001-510.
- A six channel unit allows a start address range of 001-507.
- A twelve channel unit allows a start address range of 001-501.
Step 1: Scroll to DMX, press .
Step 2: Scroll to DMX Start Address, press .
Step 3: Use + or - to increment or decrement the Start Address range. Press to set the address and return to the previous menu.
Step 4: Press < to return to the previous menu or press << to return to the main menu.
The specified DMX range will display on the LCD.
The start address range is determined by the size of your SmartPack. When a DMX Start Address is selected as the active DMX Mode, the DMX range will be displayed on the LCD.
DMX Patch
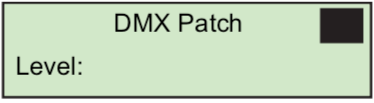
DMX Patch allows the user to patch different DMX numbers to selected dimmers. This menu is to be used when setting the DMX Start Address is not sufficient. When DMX Patch is selected as the active DMX Mode, “DMX Patch” will be displayed on the LCD.
Step 1: Scroll to DMX, press .
Step 2: Scroll to DMX Patch, press .
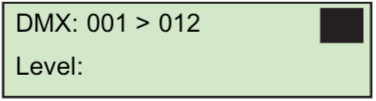
Step 3: Use + or - to increase dimmer channel. Dimmers will be numbered 1-6 or 1-12 depending on the SmartPack channel count. Initially the DMX address will patch consecutively with the dimmer channel. If the DMX address should differ from the channel number, press .
Step 4: Dim ## > DMX [###] will display. Press + or - to change the DMX address.
Step 5: Press to return to the dimmer channel selection. Continue with steps 3 and 4 until all dimmers are patched to the required DMX Address.
Step 6: Press < to return to the previous menu or press << to return to the main menu. “DMX Patch” will display on the LCD.
DMX Loss Behavior
DMX Loss Behavior may be set to either Hold Last Look, Fade to Preset, or Wait and Fade Out.
- Hold Last Look - holds any active dimmers at whatever levels they were receiving when the data was lost. The dimmers will remain on until data is restored or the SmartPack is reset.
- Wait and Fade - holds any active dimmers at whatever levels they were receiving when the data was lost for a user-defined amount of time and then fade those dimmers to zero in a user-defined fade time. The maximum wait and fade time is 59min:59sec.
- Fade to Preset - plays a user-defined preset when data is lost.
Step 1: Scroll to DMX, press .
Step 2: Scroll to DMX Loss Behavior, press .
Step 3: Use + or - to select the desired Loss Behavior, press . Step 4: Use + or - to set the values as required, press .
Step 5: Press < to return to the previous menu or press << to return to the main menu.
DMX Mode
DMX Mode is provided as a shortcut for switching between DMX Start Address and DMX Patch. The LCD will either display the DMX address range or “DMX Patch”, depending on the mode selected.
Presets
SmartPack features up to 32 built-in presets which can be recalled without the need of any external control system. For SmartLink enabled systems with a LinkPower supply installed, up to four 5 or 10 button preset stations may be used for remote recall of the built in presets and sequence. See “Stations”.
Note: In addition these 32 presets are available for use in the built-in sequencer. See “Sequencer” . For best results, presets should be recorded sequentially as they would be recalled in a sequence.
When you record a preset, SmartPack will snapshot any level whether set in the test menu or by a DMX input. If both levels are present it will record all levels. When a new preset is recorded using the same preset number, SmartPack will record over the previous levels. Unless preset timing is configured otherwise, presets are activated in the default fade up and fade down time of 3 seconds.
Record a Preset (snapshot)
Step 1: Set dimmer levels with an external DMX source and/or set test levels.
Step 2: Scroll to Presets menu, press .
Step 3: Scroll to Record Preset, press .
Step 4: Press + or - to select the desired preset number then press . Preset record will briefly display.
Setup Preset Timing
Step 1: Scroll to Presets menu, press .
Step 2: Scroll to Setup Timing, press . Setup Timing, Preset / Step: [##] will display.
Step 3: Press + or - to scroll the presets list. Press , Fade Up [min]:03 will display.
Step 4: Press + or - to increase or decrease the Fade Up minutes. Press . The selection will change to the seconds field.
Step 5: Press + or - to increase or decrease the Fade Up seconds. Press . Fade Down [min]:03 will display.
Step 6: Repeat steps 4 and 5 for Fade Down. Press . Hold Time [min]:00 will display.
Step 7: Repeat steps 4 and 5 for Hold Time. Press when done.
Activate a Preset
Step 1: Scroll to Presets menu, press .
Step 2: Scroll to Activate Preset and press , Number [##] will display.
Step 3: Press + or - to scroll the list of presets. Press to select a preset.
Step 4: “Preset ## Run Instant?” will display briefly.
- To run the preset with its programmed Fade Up and Fade Down times, ignore the “Run Instant?” message. The display will return to the previous menu after a few seconds of display.
- Press to complete the preset in the default time of 3 seconds. The display will default to the previous menu.
Deactivate a Preset
If a Preset is active, the control symbol located in the top right corner of the LCD will display the preset number and the P symbol. To deactivate the preset:
Step 1: Scroll to Presets menu, press .
Step 2: Scroll to Deactivate Preset and press . “Preset Deactivated” will display briefly then returns to the previous menu.
Sequencer
The built in sequencer in SmartPack plays a series of recorded presets sequentially. The order of execution is based on the first preset and the length is determined by the number if steps configured for the sequence. Fade Up, Fade Down and Hold Times are determined in the preset menu and may be different for each preset. The sequence can be set to loop continuously or stop after only one occurrence.
Setup a Sequence
Step 1: Scroll to Sequencer, press .
Step 2: Scroll to Setup Sequence, press .
Step 3: Use + or - to select the number of steps to be included in the sequence (up to 32). The Sequencer will play the steps in series with preset one as step one always. Press , Loop: [NO] will display.
Step 4: Scroll to select [Yes] to continuously loop the sequence or [No] to play the sequence only once and then stop. Press .
Start / Stop a Sequence
Step 1: Scroll to Sequencer, press .
-
Start the sequence, scroll to Start Sequence and press
. Sequence Started will briefly display and the control symbol on the LCD will display the “S”.
Note: The sequence will start at preset 1 and run for a user configured number of steps. If the sequence is not configured to loop, the sequence will stop. If the sequence is set to loop, the sequence will continue looping until the sequence is deactivated.
-
Stop the sequence, scroll to Stop Sequence and press
. Sequence Stopped with briefly display and the control symbol on the LCD will no longer display the “S”.
Curves
SmartPack is capable of dimming or switching multiple load types including incandescent, low voltage and 2-wire fluorescent. SmartPack provides five user-selectable dimmer output curves to choose:
- IES modified square law
- Linear
- Switched (50% threshold, non-regulated)
- Fluorescent with adjustable cut-off
- Adjustable pre-heat
Set Dimmer Curve
Step 1: Scroll to Dimmer Curves, press .
Step 2: Use + or - to select the specific dimmer number (or ALL) to be modified. Press .
Step 3: Use + or - to scroll through the five options, press to select the output curve of choice.
- If Fluorescent output curve is selected you must specify the Start Voltage.
- Fluorescent circuits provide a dimmable output in the 5% to 100% control range. Trim the minimum RMS output voltage to match your specific ballast.
- The default voltage is 47% of your mains voltage. Use + or - to increase or decrease the Start Voltage value.
- Consult the ballast manufacturer’s documentation for the appropriate minimum start voltage.
- If Preheat output curve us selected you must specify the preheat level (allowable 0% - 20% range).
Emergency
SmartPack is provided with a emergency contact input. When an active emergency contact is received all non-emergency dimmers in the SmartPack are forced off while all user- selected emergency dimmers energize to full.
During an emergency the LCD will display a message advising the “Emergency Input Is Active” and the menu will lock-out all ability to access the system. After normal power is restored, the SmartPack will restore to the configured DMX Loss Behavior mode. See “DMX Loss Behavior”.
Assign Dimmers as Emergency Loads
Step 1: Scroll to Emergency, press . Step 2: Scroll to [Assign Dimmer], press .
Step 3: Use + or - to scroll the dimmer list. Press to select a dimmer.
Step 4: Use + or - to scroll “In Emergency” [Yes] or [No], press .
Step 5: Press < to return to the previous menu or << to return to the main menu.
Stations
A SmartPack dimming pack, with a SmartLink LinkPower supply (S-LPS) installed or an external SmartLink Station Power Supply, facilitates the communication of host messages (reference host messages) between SmartPack dimmer packs and the use of SmartLink stations. See “Stations”.
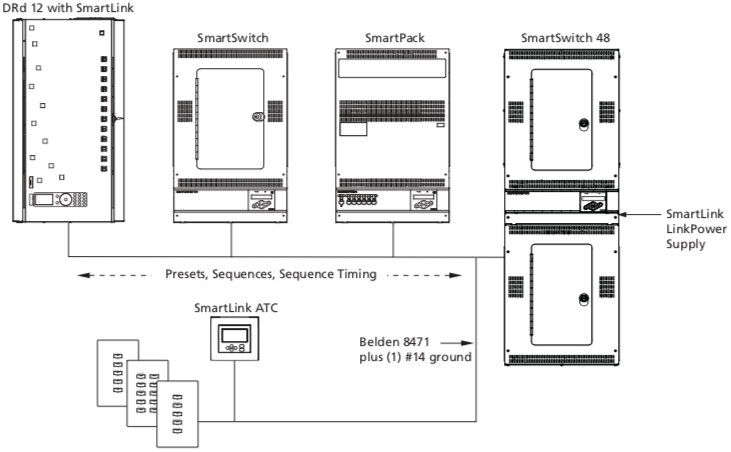
Note: A SmartLink LinkPower supply is limited to four SmartLink stations. Alternatively, you may have up to 16 SmartLink stations when using a SmartLink Station Power Module (S-SPM). You are limited to four SmartLink host products in a SmartLink system.
One SmartLink host product (SmartPack, SmartSwitch, Unison DRd with SmartLink or Sensor + with SmartLink) in the system must have a LinkPower Supply or Station Power Module installed for wall station power.
Assign Station Master
One SmartPack in a system with wall stations installed should be configured as the “Station Master”. The station master tracks and updates button LED states for connected wall stations when preset or sequence changes occur. In addition the station master sends host messages to other SmartLink enabled SmartPack dimmer packs in the system.
Note: ETC recommends configuring the SmartPack with the LinkPower supply installed and wall stations connected as the “Station Master”.
For systems without wall stations, there is no requirement to configure a station master. Default functionality for pack to pack synchronization is that the last SmartPack or SmartSwitch updated in the system acts as the station master and send its host messages to the other products in the system.
Step 1: Scroll to [Stations] and press .
Step 2: Scroll to [Station Master] and press .
- If the SmartPack you are configuring is to be the Station Master, scroll to [Enable] and press .
- If the SmartPack you are configuring is not the Station Master, scroll to [Disable] and press .
Remote Record
Enable “Remote Record” within the station master for user ability to record presets from SmartLink wall stations.
Disable “Remote Record” within the station master to lock-out the ability to record presets from SmartLink wall stations.
Step 1: From the face panel of the station master, scroll to [Stations], press .
Step 2: Scroll to [Remote Record], press .
Step 3: For the ability to record a preset from a SmartLink wall station scroll to [Enable] and press .
- After enabling “Remote Record”, the user has the option to set dimmer levels to a desired look (via the test menu or other DMX control device) and record that look to a specific preset via the wall station. See “Record a Preset from a SmartLink Wall Station”.
Step 4: If the ability to record a preset from a wall station is not desired scroll to [Disable] and press .
- If disabled, preset recording must be accomplished from the face panel of the station master. See “Presets”.
General Settings
The General Settings menu is used to configure standard features of your SmartPack dimmer pack including:
Set Language
Multiple language options to choose from:
- English
- Francais
- Deutsch
- Espanol
LCD BackLight
User-selectable LCD backLight performance:
- Auto - LCD dims when not in use for period of time
- On - always on
- Off - always off
Menu Mode
User-selectable Normal Menu or Advanced Menu:
- Normal - limited menu options allowing users only to change the DMX Start Address from the DMX menu, view the Software Version and change menu mode from the General Settings menu.
- To enter Normal mode from the Advanced menu, scroll to [Normal] and press . The SmartPack will request confirmation that you want to exit the Advanced menu, scroll to [Yes] and press .
- Advanced - all menu access.
- To enter Advanced mode from the Normal menu, scroll to [Advanced] and press and hold for 5 seconds. The menu will adjust back to the main menu automatically, without further prompt.
Reset To Defaults
Resets the following attributes to default status:
- Dimmer Curves - set to >Mod SQR Law<
- DMX Start Address - set to start address >1-3, 1-6, or 1-12<
- DMX Loss Behavior - resets to >Hold Last Look<
Deep Clear System
Resets the unit as if it were new, out of the box including the following attributes:
- Resets same defaults as indicated in Reset to Defaults
- Clears presets and preset timing values to default values
- Resets Language and prompts the user for language selection
Software Version
Displays current software version
Power Up Behavior
Choose between Normal or Previous State:
- Normal - the SmartPack powers up with both presets and the sequencer de-activated.
- Previous State - powers up the SmartPack with the preset or the sequence active that was running during the previous session. This feature allows unattended operation through power blackouts. This state will not restore Test levels.
Diagnostics
The diagnostics menu provides feedback of line errors and temperature readings for each line. The initial display shows the temperature reading in °C, press the - button for °F readings.