Manually Update the High Speed I/O Card
Manually Updating Cobalt Firmware
Firmware updates were required on Cobalt 20 and Cobalt 10 consoles with version 7.2.0 - if the firmware is not updated on all modules of these consoles, their facepanels will not operate properly.
Additionally, some components may have additional firmware updates available that improve the performance of the components. Please check to be sure that the components of your system are up to date before proceeding with the use of Cobalt Version 8.x. Follow the procedures below to update any component that is not at the appropriate version.
Current Component Firmware Versions by Console
Cobalt 10/20
|
Component |
Firmware Version |
|
Keyboard Master |
1.1.0.9.0.0 |
|
Fader Display Unit |
1.0.4.9.0.16 / 1.0.5.0.16* |
|
Independent Master |
1.0.1.9.0.5 / 1.0.2.9.0.6* |
|
Playback Master |
1.0.3.9.0.8 / 1.0.4.9.0.9* |
|
Full Speed I/O Card (with Phone Remote) |
1.4.2.9.0.5 |
|
High Speed I/O Card (without Phone Remote) |
1.1.0.9.0.4 / 1.1.1.9.0.5* |
*Version Available when Updated by ETC Service Center Only
Cobalt Programming Wing
|
Component |
Firmware Version |
|
Programming Wing |
1.1.0.9.0.0 |
|
Encoder Board |
1.0.1.9.0.9 / 1.0.2.9.0.10* |
|
Playback Master |
1.0.3.9.0.8 / 1.0.4.9.0.9* |
|
Full Speed I/O Card |
1.4.2.9.0.5 |
|
High Speed I/O Card |
1.1.0.9.0.4 / 1.1.1.9.0.5* |
*Version Available when Updated by ETC Service Center Only
Cobalt Motorized Fader Wing
|
Component |
Firmware Version |
|
Fader Wing |
1.0.4.9.0.21 / 1.0.5.9.0.22* |
*Version Available when Updated by ETC Service Center Only
Cobalt Light Server
|
Component |
Firmware Version |
|
Light Server 10x2 Button |
1.1.0.9.0.1 |
|
Full Speed I/O Card (with Phone Remote) |
1.4.2.9.0.5 |
|
High Speed I/O Card (without Phone Remote) |
1.1.0.9.0.4 / 1.1.1.9.0.5* |
*Version Available when Updated by ETC Service Center Only
Congo Jr / Congo Kid / Congo Light Server
|
Component |
Firmware Version |
|
Facepanel |
1.9 |
|
Full Speed I/O Card (with Phone Remote) |
1.4.2.9.0.5 |
|
High Speed I/O Card (without Phone Remote) |
1.1.0.9.0.4 / 1.1.1.9.0.5* |
*Version Available when Updated by ETC Service Center Only
General Update Requirements:
You will need to have a USB keyboard and mouse attached to the Console or ETCnomad Windows Computer you are using to update components.
Firmware updates are not available on ETCnomad Mac Computers
It is strongly advised that when updating firmware on a console running v7.x, temporarily disable using “Bypass startup screen and start up with specific play” for the duration of the update process. This setting is located on the Backup tab in System Settings and should be set to “[None]”

Only one component may be updated at a time. Attempting to update multiple components at a time may result in non-working components.
Updating the High Speed I/O card requires a #2 Philips head screwdriver. Congo Jr consoles may also require a #1 Philips head screwdriver.
Manually Updating the High Speed I/O Card (Cobalt Programming Wing)
The information in this post is provided to assist in troubleshooting. Perform work at your own risk. ENSURE ANY POWER FROM DEVICES HAS BEEN DISCONNECTED BEFORE SERVICING ANY EQUIPMENT. If you do not feel comfortable performing the work, please contact us or your local service center. Be aware that ETC and its Affiliates are not responsible for any damage or injury caused by service of our products by anyone other than us or our authorized service providers, and such damage is excluded from the product’s warranty.
This process is only for the High Speed I/O card. Full Speed I/O cards should be updated following the procedure for Updating Full Speed I/O Cards.
With the exception of the Cobalt Programming Wing, the Full Speed I/O card can be identified by the presence of a Phone Remote (RJ11) port. All Cobalt Programming Wings shipped without a Phone Remote port.
Step 1: Exit Cobalt and power off the Programming Wing.
When powering off the Programming Wing, it is easier to remove power from the IEC cord to the adapter than disconnecting and reconnecting the locking barrel connector.
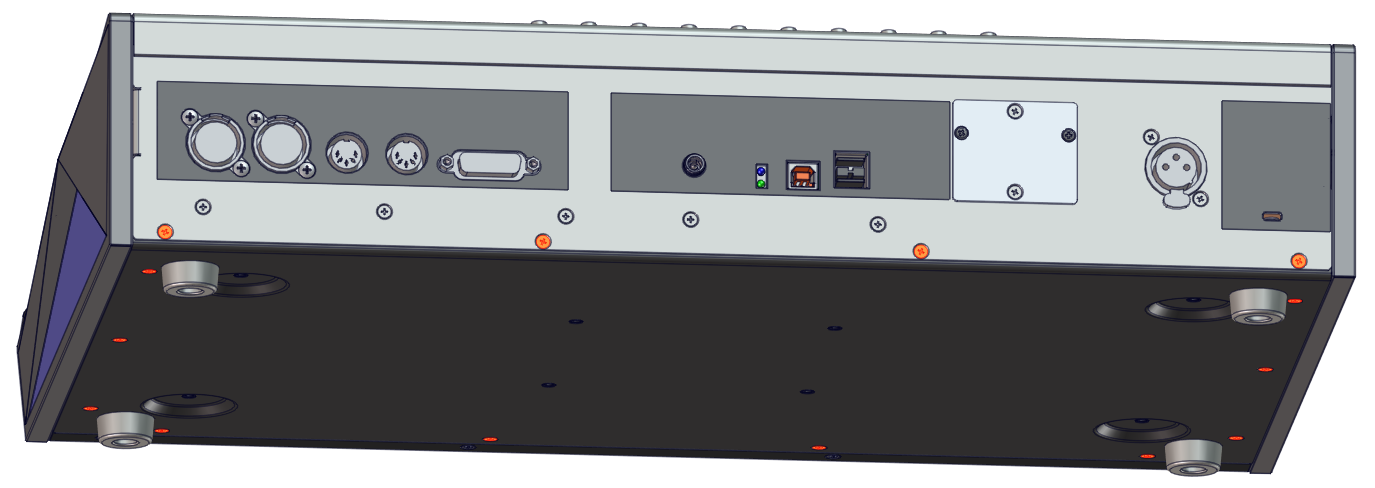
Step 2: Remove the bottom panel of the Programming Wing by removing the highlighted 14 screws.
Step 3: Remove the I/O card from the Programming Wing by removing the 7 highlighted screws.
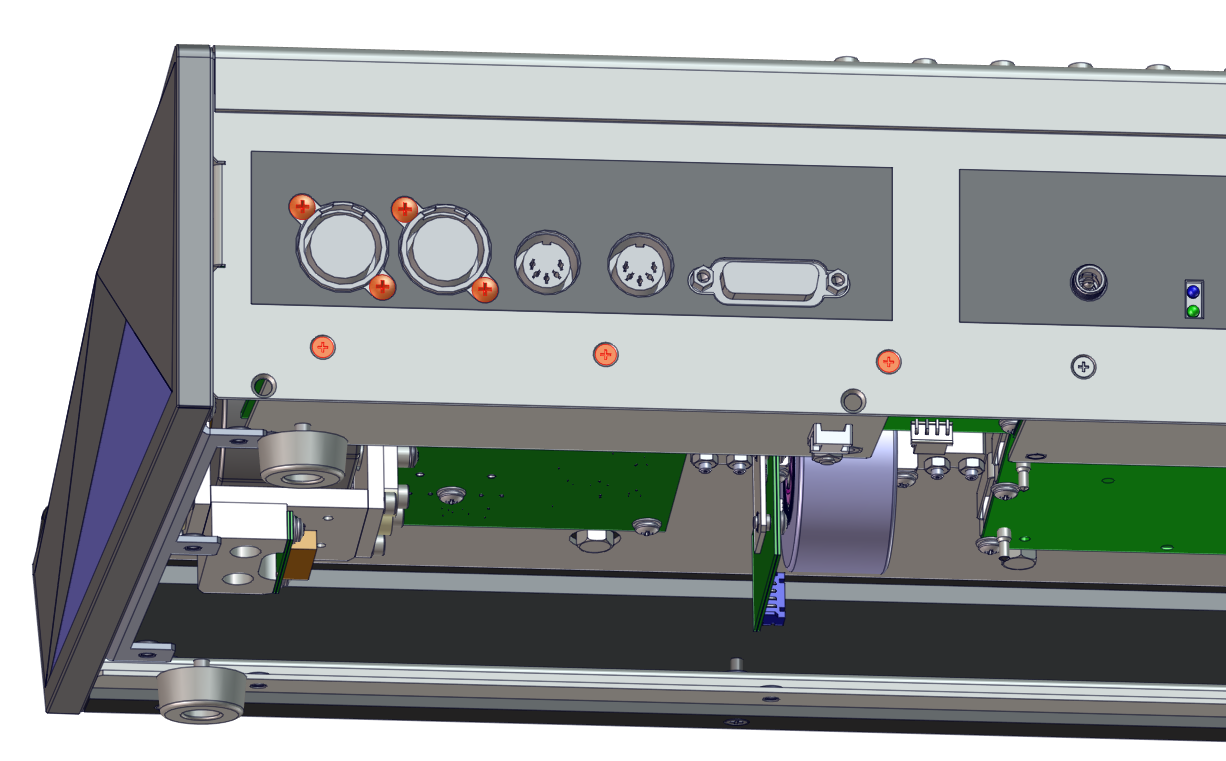
Do not disconnect the cables connecting the I/O Card to the Programming Wing
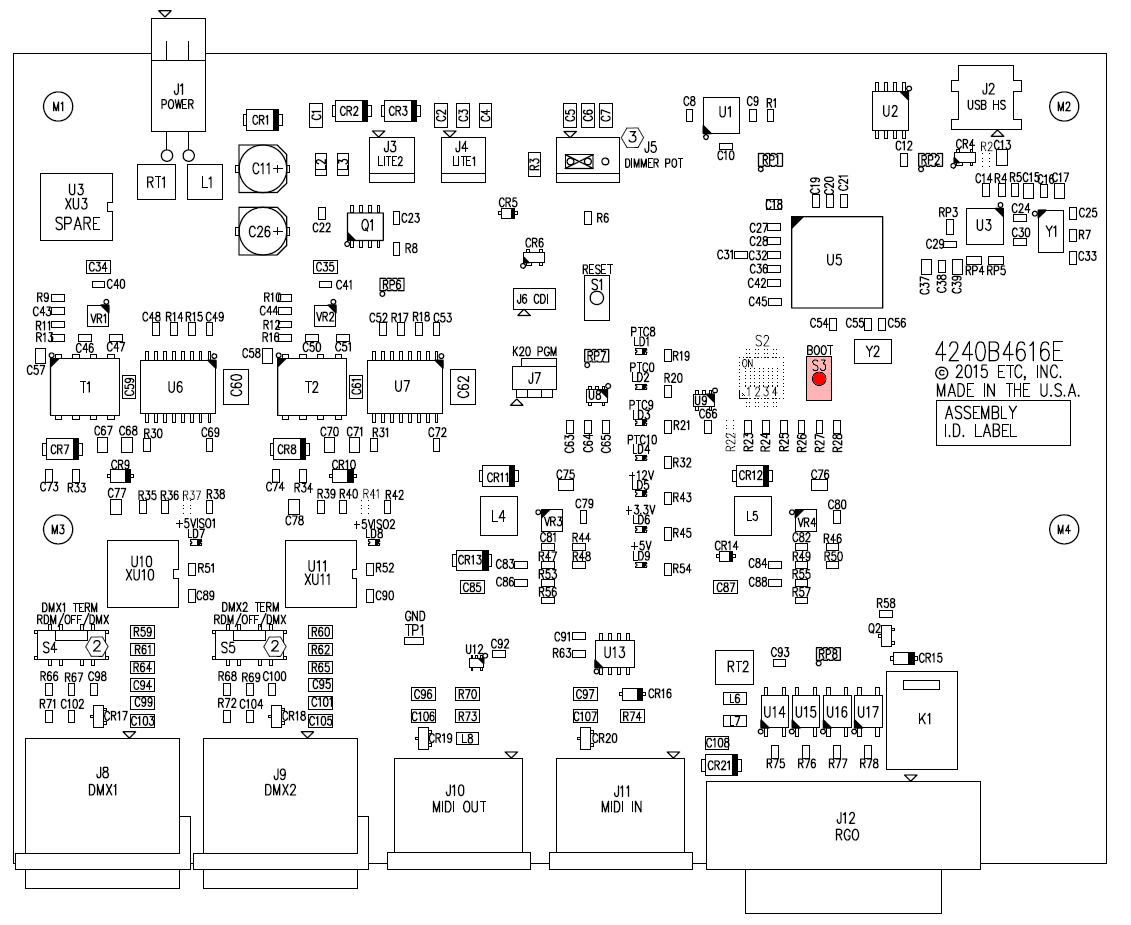
Step 4: Fold the I/O card back so that the top is visible and then press and hold the Boot button as power is turned back on.
Step 5 (Console Users Only – Computer Users skip to Step 9): Using the external Mouse, Select System Settings from the Welcome Screen.
![]()
Step 6 (Console Users Only – Computer Users skip to Step 9): Press [Alt]+[F11] on the external keyboard to launch Process Explorer
Process Explorer may start minimized on the main screen. If so, choose the restore button to view Process Explorer.
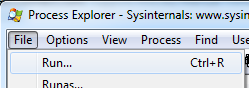
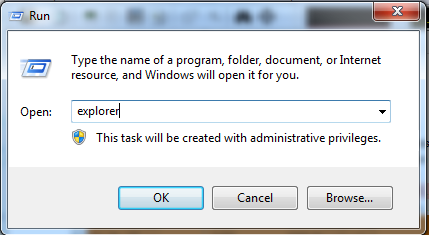
Step 7 (Console Users Only – Computer Users skip to Step 9): In Process Explorer, navigate to the File menu and choose Run…
Step 8 (Console Users Only – Computer Users skip to Step 9): Type explorer in the Open: field and click {OK} or press Enter.
Step 9: Using the Windows Explorer window, navigate to C:\etc\nodesbin
Step 10: Right click on the following file name and choose copy
|
14d5.0113_IO_Kinetis_v1.1.0.9.0.4.S19 |
Step 11: Using the Windows Explorer window, navigate to the drive labeled BOOTLOADER, right click and choose Paste to copy the firmware to the component.
If you see more than one drive labeled BOOTLOADER, abort this update attempt and restart the console/computer. If you continue to see multiple drives labeled BOOTLOADER, contact ETC Technical Services.
Step 12: Close all open windows including Windows Explorer and Process Explorer. Click {OK} in System Settings (Console Users Only) and power off the console/Programming Wing.
Step 13: Restore the I/O Card back to its original position and secure using the screws removed in Step 3.
Step 14: Replace the bottom cover and secure using the 14 screws removed in Step 2.
Step 15: This component is now ready for use on the next normal power up.