Enabling DHCP on Cobalt Family Consoles
DHCP, or Dynamic Host Configuration Protocol, is a service that can be started on your Eos or Cobalt Family consoles that will dynamically assign IP addresses to devices on your network.
This service will only assign IP addresses to devices that are set to be a DHCP client (essentially a DHCP “listener”). Devices that are statically assigned (that is, where the IP address was manually entered) will not be affected by a DHCP server.
To turn on DHCP:
- Exit to the Eos Configuration Utility (ECU), also known as the “Shell” by pressing [Displays] and choosing {Exit} from the Browser. If you are using a Cobalt device, exit by pressing [Browser] and choosing {File} -> {Exit to System Settings}. Cobalt users should skip to step 3.
- After a few seconds, the {Settings} button will turn yellow. Click on it.
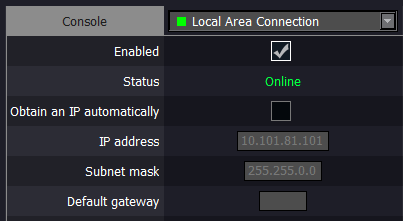
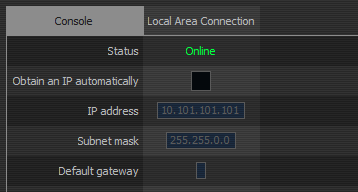
- Navigate to the {Network} tab. Locate the device’s IP address. If you are on a console that has multiple network interfaces, be sure you are configuring the correct network where you would like DHCP services running. Both Eos and Cobalt interfaces are shown below.
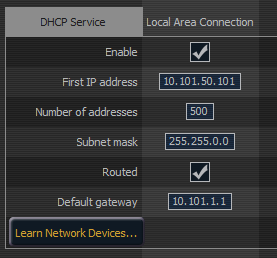
- Next, scroll to the section labelled “Address Service”.
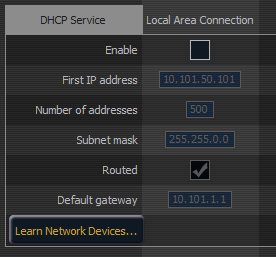
- Compare the IP address from above and the “First Address” in this section to ensure they are compatible. For a typical ETC network with a subnet mask of 255.255.0.0, the first two numbers in the IP address need to match, while the second two numbers can differ.
- Example: an IP address of 10.101.100.101 and DHCP First Address of 10.101.50.101 would be compatible.
- Example: an IP address of 10.102.100.101 and DHCP First Address of 10.101.50.101 would not be compatible, as the second number in the IP address differs.
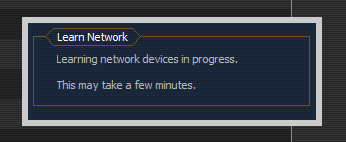
- Before enabling DHCP, click on the Learn Network Devices button. This function prevents the console from giving out an IP address that is already in use by another network device, which would cause an IP address conflict.
- Once this process is complete, check the “Enable Address (DHCP) Server” box and click Apply Changes.
- The consoles will likely request a reboot. Press {Yes} to reboot.
Once restarted, the console will now begin dynamically assigning addresses on the network.