Manually Update the Cobalt Light Server Facepanel
- Last updated
- Save as PDF
Manually Updating Cobalt Firmware
Firmware updates were required on Cobalt 20 and Cobalt 10 consoles with version 7.2.0 - if the firmware is not updated on all modules of these consoles, their facepanels will not operate properly.
Additionally, some components may have additional firmware updates available that improve the performance of the components. Please check to be sure that the components of your system are up to date before proceeding with the use of Cobalt Version 8.x. Follow the procedures below to update any component that is not at the appropriate version.
Current Component Firmware Versions by Console
Cobalt 10/20
|
Component |
Firmware Version |
|
Keyboard Master |
1.1.0.9.0.0 |
|
Fader Display Unit |
1.0.4.9.0.16 / 1.0.5.0.16* |
|
Independent Master |
1.0.1.9.0.5 / 1.0.2.9.0.6* |
|
Playback Master |
1.0.3.9.0.8 / 1.0.4.9.0.9* |
|
Full Speed I/O Card (with Phone Remote) |
1.4.2.9.0.5 |
|
High Speed I/O Card (without Phone Remote) |
1.1.0.9.0.4 / 1.1.1.9.0.5* |
*Version Available when Updated by ETC Service Center Only
Cobalt Programming Wing
|
Component |
Firmware Version |
|
Programming Wing |
1.1.0.9.0.0 |
|
Encoder Board |
1.0.1.9.0.9 / 1.0.2.9.0.10* |
|
Playback Master |
1.0.3.9.0.8 / 1.0.4.9.0.9* |
|
Full Speed I/O Card |
1.4.2.9.0.5 |
|
High Speed I/O Card |
1.1.0.9.0.4 / 1.1.1.9.0.5* |
*Version Available when Updated by ETC Service Center Only
Cobalt Motorized Fader Wing
|
Component |
Firmware Version |
|
Fader Wing |
1.0.4.9.0.21 / 1.0.5.9.0.22* |
*Version Available when Updated by ETC Service Center Only
Cobalt Light Server
|
Component |
Firmware Version |
|
Light Server 10x2 Button |
1.1.0.9.0.1 |
|
Full Speed I/O Card (with Phone Remote) |
1.4.2.9.0.5 |
|
High Speed I/O Card (without Phone Remote) |
1.1.0.9.0.4 / 1.1.1.9.0.5* |
*Version Available when Updated by ETC Service Center Only
Congo Jr / Congo Kid / Congo Light Server
|
Component |
Firmware Version |
|
Facepanel |
1.9 |
|
Full Speed I/O Card (with Phone Remote) |
1.4.2.9.0.5 |
|
High Speed I/O Card (without Phone Remote) |
1.1.0.9.0.4 / 1.1.1.9.0.5* |
*Version Available when Updated by ETC Service Center Only
General Update Requirements:
You will need to have a USB keyboard and mouse attached to the Console or ETCnomad Windows Computer you are using to update components.
Firmware updates are not available on ETCnomad Mac Computers
It is strongly advised that when updating firmware on a console running v7.x, temporarily disable using “Bypass startup screen and start up with specific play” for the duration of the update process. This setting is located on the Backup tab in System Settings and should be set to “[None]”

Only one component may be updated at a time. Attempting to update multiple components at a time may result in non-working components.
Updating the High Speed I/O card requires a #2 Philips head screwdriver. Congo Jr consoles may also require a #1 Philips head screwdriver.
Manually Updating the Cobalt Light Server Facepanel (Cobalt Light Server)
Step 1: Exit Cobalt and power off the console.
Step 2: Press and hold the top and bottom left buttons on the Cobalt Light Server as power is turned back on.

Step 3: Using the external Mouse, Select System Settings from the Welcome Screen.
![]()
Step 4: Press [Alt]+[F11] on the external keyboard to launch Process Explorer
Process Explorer may start minimized on the main screen. If so, choose the restore button to view Process Explorer.
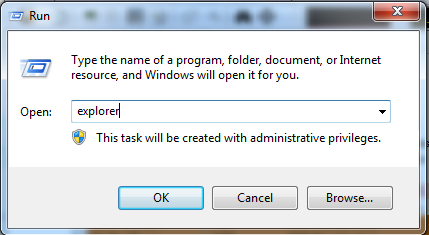
Step 5: In Process Explorer, navigate to the File menu and choose Run…

Step 6: Type explorer in the Open: field and click {OK} or press Enter.

Step 7: Using the Windows Explorer window, navigate to C:\etc\nodesbin
Step 8: Right click on the following file name and choose copy
|
14d5.0034_Rpu_1.1.0.9.0.1.sx |
Step 9: Using the Windows Explorer window, navigate to the drive labeled BOOTLOADER, right click and choose Paste to copy the firmware to the component.
If you see more than one drive labeled BOOTLOADER, abort this update attempt and restart the console. If you continue to see multiple drives labeled BOOTLOADER, contact ETC Technical Services.
Step 10: Close all open windows including Windows Explorer and Process Explorer. Click {OK} in System Settings and power off the console.
Step 11: This component is now ready for use on the next normal power up.
