Electronic Theatre Controls Inc

Windows 10 Console SSD Replacement

Overview

This article outlines how to replace the solid-state drive (SSD) in Eos family consoles running Windows 10.

If your console still boots, you can back up all of your data to external storage (such as a USB drive) and restore it onto the console once the replacement is complete. If your console does not boot, you will not be able to back up your data.

Along with the sheet linking to this page, you should have received:

  • Replacement solid-state drive (M8363)
  • Re-image USB drive for Windows 10 consoles

If you are missing either of these components, contact ETC technical services.

I – Back Up Your Data

Note-Icon.png

If your console does not boot, skip this section and head to II – Open the Console.

  1. Boot up your console and launch into {Primary}.
  2. Save your current show file.
    1. Double-tap the [Displays] key to open the Browser and navigate to File > Save.
  3. Exit out to the Shell.
    1. Within the already-open Browser, double-tap the line that says Exit.
    2. Tap {OK} when prompted.
clipboard_eb8c56db6eec60ff767657c18b41075ef.png
  1. Plug in the flash drive you want to backup your data to. This should be a different drive than the Re-Imaging Drive provided by ETC.
  2. Once in the Shell, tap on {Settings} and navigate to {Maintenance} on the right.
  3. Backup your show files to your flash drive.
    1. Tap {Backup Show Archive}.
    2. You will be prompted to choose the "Latest" show files or "Everything".
      1. Choosing {Everything} will backup all versions of each show while choosing {Latest} will only backup the most current version of each show.
    3. After making your selection, you will be prompted to choose which drive to export to. Be sure to select your flash drive and not the ETC Re-Imaging Drive. Tap {Save}.

clipboard_ed417c7b8faac03c7d8aa99aa8d1b1e09.png

  1. While saving, the console may appear unresponsive. Be patient and wait for the confirmation your files have been successfully processed. This may take several minutes.
  2. Tap {OK} once the files have been processed.
  1. Backup your system settings.
    1. Tap {Backup System Settings}.
    2. You will once again be prompted to choose which drive to export to. Be sure to select your flash drive and not the ETC Re-Imaging Drive. Tap {Accept}. Then tap {OK}.
clipboard_e900f65f6ae50e2503ea9da740a8b5798.png


II – Open the Console

Select your device from the list below and follow the link for instructions on opening the console.

III – Replace the Drive

Select your device from the list below and follow the link for instructions on replacing the drive.

IV – Re-Image the Console

Select your device from the list below and follow the link for re-image instructions.

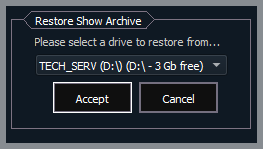
V – Restore Your Data

  1. Exit out to the Shell.
    1. Double-tap the [Displays] key to open the Browser and double-click the line that says Exit.
    2. Tap {OK} when prompted.
clipboard_e762421a4d28ef73e7f220b1f9b9a21b1.png
  1. Plug in the flash drive you originally used to back up your data.
  2. Once in the Shell, tap on {Settings} and navigate to {Maintenance} on the right.
  3. Restore your Show Archive from your flash drive.
    1. Tap {Restore Show Archive}.
    2. You will be prompted to choose which drive to import from. Be sure to select the flash drive you originally used to back up your data. Tap {Accept}.

clipboard_e46ea20fd29cff2f8a11b4335c9763669.png

  1. You will be prompted to choose the "Latest" show files or "Everything".
  2. Choosing {Everything} will restore all versions of each show from your flash drive while choosing {Latest} will only restore the most current version of each show.
  3. After making your selection, you will be presented with a prompt to select the shows you wish to restore. By default, all shows will be selected. Tap {Save}.
  4. You will be presented with a prompt explaining your files have been successfully processed. Tap {Ok}.
  1. Restore your system settings from your flash drive.
    1. Tap {Restore System Settings}.
    2. You will be prompted to select the .ini file you originally backed up to your flash drive. Once selected, tap {Ok}.
    3. You will be presented with a prompt explaining the system settings have been restored. Tap {Ok}.


clipboard_e907274c1ec731f3cfb3cd32673bf9a33.png


  • Was this article helpful?