Smartfade DMX Chip Replacement
Issue
How do I replace the DMX chips inside my Smartfade Console?
Explanation
DMX driver chips may fail when subjected to excessively high voltage. This can be caused by a power event such as a lightning strike. Replace this chip if any of the following conditions occur: not sending DMX to a known working device; while in backup mode, not receiving DMX from a known working device; failing the DMX self-test with a DMX loopback cable in place; burnt or damage looking chip, or flickering lights. If there has been damage, it may be necessary to replace the DMX Input, the DMX Output, or the Opto-Isolator chip.
Smartfade 12/48, 12/96, and 24/96 uses a different I/O board than the Smartfade ML. There have also been two different versions of the I/O board for the non-ML Smartfade variant, which can be determined by the color of the I/O board: green or blue.
Part Locations
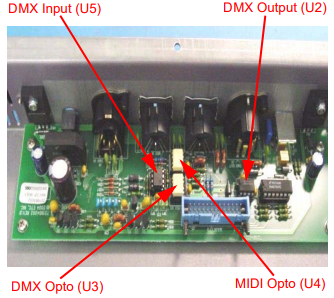
Smartfade 12/48, 12/96, and 24/96
| Green I/O Board (7219B5002) | Part Location | ETC Part Number |
| DMX In Transceiver | U5 | Z1458-F |
| DMX Out Transceiver | U2 | Z1458-F |
| DMX In Opto-Isolator | U3 | Z423-F |
| MIDI In Opto-Isolator | U4 | Z423-F |
| Blue I/O Board (7219B5609) | Part Location | ETC Part Number |
| DMX In Transceiver | U6 | Z1458-F |
| DMX Out Transceiver | U1 | Z1458-F |
| DMX In Opto-Isolator* | U5 | Z423-F |
| MIDI In Opto-Isolator* | U3 | Z423-F |
For both variants, the DMX transceivers are interchangeable with each other. If DMX In is not used, the chip can be used as a spare for DMX Out. The opto-isolators are also interchangeable with each other.
* The opto-isolators are hard-soldered on the blue I/O boards and are not user-serviceable
Smartfade ML
| I/O Board (7219B5607 and 7219B5610) | Part Location | ETC Part Number |
| DMX1 Out Transceiver | U1 | Z1458-F |
| DMX2 Out Transceiver | U3 | Z1458-F |
| MIDI In Opto-isolator* | U4 | Z423-F |
The DMX transceivers are interchangeable with each other and can act as a spare if one of the DMX ports is not used.
* The MIDI In Opto-isolator on the 7219B5610 variant is hard-soldered and is not user-serviceable
Fix/Solution
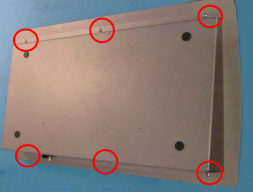
- Place your SmartFade console, face side down, on a clean, stable surface.
- With your screwdriver, remove the (6) circled screws.
- Identify which I/O board is in your Smartfade console and use the tables in the Part Locations section to assist in locating the correct chips
- Note that the pictures are for the old I/O board. The part locations are different for the blue variant of the I/O board, as well as the Smartfade ML I/O board
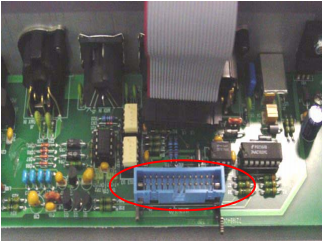
- Disconnect the circled connection.
- Locate the chip you would like to replace.
- With your chip puller, gently remove the DMX chip.
- Insert the replacement chip into the socket so that pin one (1) is in the correct location.
- Pin one is marked with a recessed circle.
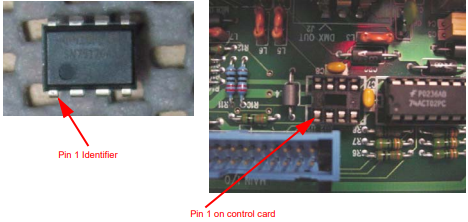
- Pin one is marked with a recessed circle.
- Reconnect the circled connection.
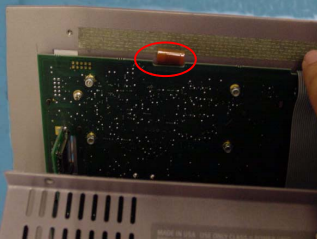
- Set the back cover in place but be sure not to catch the circled ribbon cable.
- Replace the circled screws.
- Test the unit to ensure that it is functioning correctly.
Related Links/References
- How to perform a Deep Clear And Self Tests On SmartFade Consoles <Click Here>
- DMX chip at shop.etcconnect.com