SmartPack User Interface
The SmartPack family user interface and menu structure provide users an intuitive easy setup with multiple language options built-in.
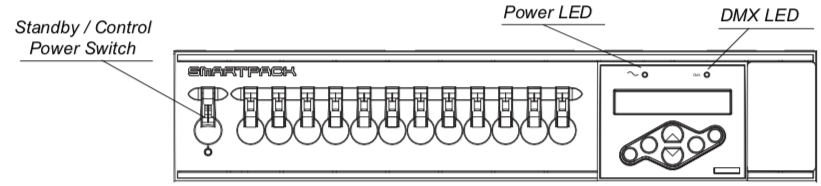
Use the Standby/Control power switch to start up and shut down operation of the SmartPack. When the breaker is in the “On” position, the blue Power LED is illuminated indicating the power is on.
WARNING: When the Standby/Control power switch is in the “Off” position, the unit is still connected to the power supply. When working on exposed load circuit wiring the load cables must be unplugged or the unit disconnected from the power supply.
The green DMX LED indicates a DMX signal. When no DMX signal is present, the green LED will flash. When a stable DMX control signal is present the green LED will illuminate fully.
LCD
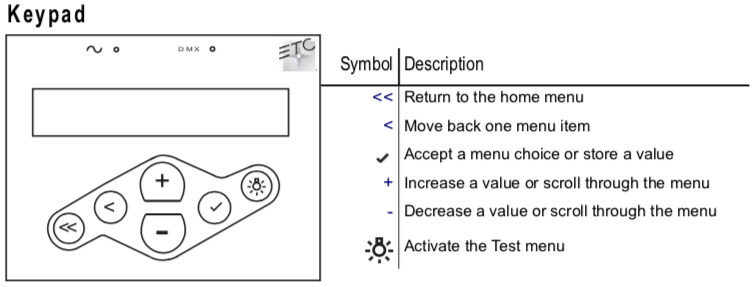
The display is a high contrast 20-character by two line backlit LCD. The control symbol, indicated in the top right corner of the LCD, indicates the current control source.
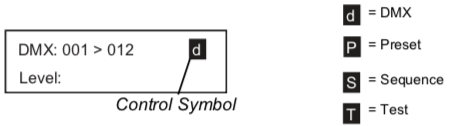
Note: If you discover a blinking “C” in the top corner of the LCD, one or more of the power cubes has exceeded the maximum operating temperature of 90° Celsius. When you have corrected the temperature problem, the error should clear. If the error persists, contact ETC Technical Services for assistance.
When configuring the SmartPack:
- Characters or [TEXT] in brackets indicate an item can be selected
- Characters or >Text< in angle brackets indicate an item is selected
Adjusting the Contrast of the LCD Display
Press and hold << and use the + and - buttons to adjust the contrast of the LCD display.
Initial Power Up Display
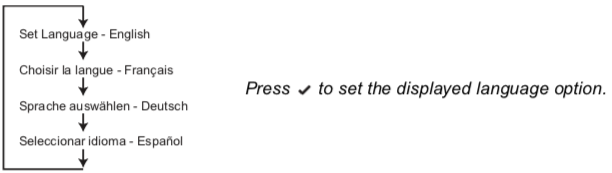
The first time you apply power to the SmartPack you will be asked to choose a language for the operating system. The language options will cycle through the following four options at three second intervals.
Menu Lockout
The menu lockout function restricts users from performing any changes to the current operation of the SmartPack from the facepanel. When lockout is enabled the emergency contact input, SmartLink station control, and incoming DMX levels will still affect change in the output level of the Smartpack dimmers. Set levels from the test menu prior to engaging lockout will be held until lockout has been disengaged.
To engage menu lockout:
Press and hold + and - buttons for a period of 5 seconds.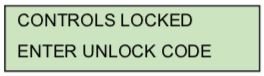
-
When lockout is on, all local controls are disabled. If a user interface button press is received, the unit will display a lockout dialog for three seconds then return to the main status display.
To disengage menu lockout:
Press and hold + and - buttons for a period of 5 seconds. The display returns to the main status display and all controls function normally.
Circuit Mode Selection Switches (for SmartPacks with ThruPower)
ThruPower Relay
Each circuit has a dedicated, three-position switch that sets the circuit to Dimmable, Relay, or Hot Power (constant circuit).
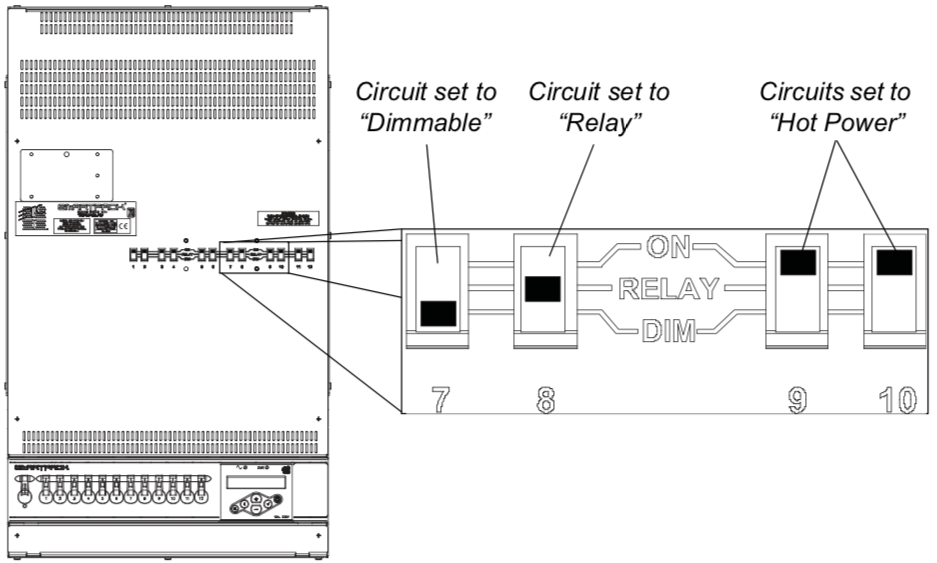
ThruPower Switch (CE only)
Each circuit has a dedicated, two-position switch that sets the circuit to Dimmable or Hot Power (constant circuit).