Displays on Hog 4-18 are loose
Symptoms/Issue
The displays on a Hog 4-18 or Hog 4 console are loose and will go down with little pressure.
Description/Explanation of Issue
The pneumatic cylinders can wear over time, and especially with frequent travel. Air travel can especially cause the seals to leak with major pressure changes.
Fix/Solution
The pneumatic cylinders will require replacement. Do not simply tighten the bolt, because the rubber grommet does not hold the panel up or increase tension as there is a nylon washer between the cylinder and the console frame that is designed to allow smooth travel. Do not tighten the cylinder bolt past 25in/lb as this may cause further damage.
Tools needed:
- 2.5mm and 4mm Allen/hex keys
- A long, 12-14" screwdriver or other such tool that's appropriate for propping up the display panel while operating on it.
- 8mm open-ended wrench
- 8mm socket
- Torque wrench set to 25in/lb (2.8 Nm). This isn't entirely necessary, but you will need to be careful not to over tighten.
Parts needed (2 of each):
- 80430154 - Gas spring
- 91160535 - M5x35mm bolt
- 90703116 - M5 nylock nut
Steps
- Shut down the console, turn off the power switch, and remove the power cable.

DO NOT operate on the console with power applied. You will be working over top of the power supply, and if power is applied, you WILL be electrocuted as some components are live!!!
- Open the back of the console using the 2.5mm Allen key.
- Prop up the display panel with a screwdriver or other suitable device. Most 12-14" screwdriver handles will fit in the cylinder pocket of the frame with the tip catching the upper lip of the display panel.
- Use the 4mm Allen key to remove the 4 bolts that allow you to remove both the front and rear decorative side panels on each side. This will expose a hole on the side which will allow you access to the nylock nut from the side.
- Use the 8mm wrenches/sockets to remove the cylinder bolt and nut as shown below.
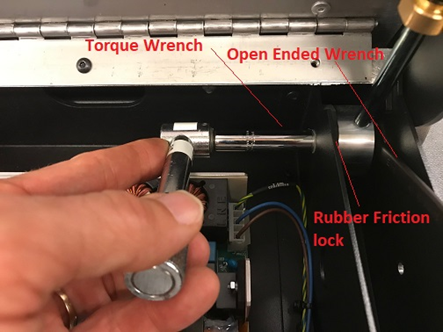
- The weak cylinder should allow easy removal of the bolt, and it should compress to allow it to come out of the frame pocket. Unscrew the cylinder from the display panel.
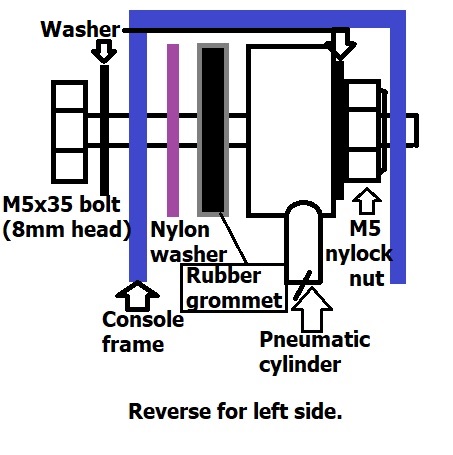
- Take note of the orientation of parts as they come out. From the head of the bolt there should be a washer/console frame/nylon fender washer/rubber grommet/cylinder block/washer/nylock nut. As shown below, the thicker part of the cylinder block goes towards the inside.
- Unscrew the round block from the old cylinder and reattach to the new one.
- Screw the new cylinder back into the mount on the display panel.
- Compress the cylinder and swing it into position back into the pocket of the console frame.
- Place the nylon washer and rubber grommet in between the frame and the block towards the inside as shown above. Use the cylinder to hold them both in place and slide them into position to line up the holes.
- Place the bolt into the hole from the inside of the console. You should just be able to work it in at an angle until it reaches the block. You may need another person and/or a pry bar to compress the cylinder while you push the bolt through, but you can also just thread the bolt in with a ratchet once you catch the threads enough inside.
- Through the exposed hole on the outside of the console, thread on the nylock nut and tighten it down to 25in/lbs (or just hand tight, barely compressing the rubber grommet).
- Reattach the side panels and repeat the procedure on the other side. A new cylinder should hold up the panel on it's own now, but switch sides with the prop just in case.