SolaPix FleX Effects Engine and Pixel Control
Setting Up SolaPix FleX Effects Engine on Hog 4
This guide was written referencing the SolaPix 7, but can be interpreted for SolaPix 19 and SolaPix 37.
![]()
Modular Addressing System
-
Base - Pan, Tilt, Zoom, Background Color, Intensity
-
FleX - Animations, Color Control, Intensity Effects
- Pixel - Pixel Mapping, Individual Cell Control
Understanding Module Priority
Module Priority is one of the most important factors of the fixture, especially when the pixel mode is enabled. Module Priority identifies which control source has the primary control, allowing you to decide what is on the fixture face at all times.
It is important to remember that when in a mode that gives pixel mode a high priority, the pixels will take control as long as any of the RGBW values are above 0%.
Pixel over flex over base - Pixels take priority but macros can be used
Flex over pixel over base - Macros take priority
Pixel over base - Basic Pixel Mapping
Flex over base - Basic Macros
Base - Basic moving light functions
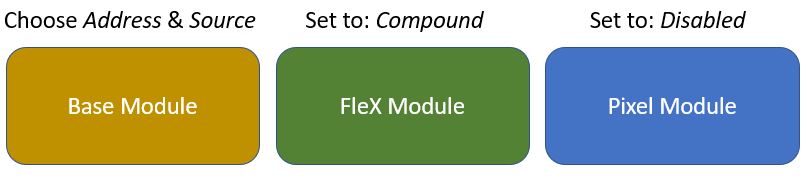
Base + FleX - 38 DMX channels
Fixture Steps:
**Fixture settings default to Base + FleX
If the fixture is not in default settings, set the following using the display menu on the fixture:
Hog 4 Steps:
For macro control
Step One: Select the Base by using [1.]
Step Two: Dial the (Intensity Encoder) up
Step Three: Select [Beam] -> Dial (Macro Encoder) to see a macro running as a black background on top of the colored background
Step Four: Select the FleX cells and dial the (Intensity Encoder) up and assign a color by selecting [Color] and dialing the (Cyan, Magenta, Yellow, and White Encoders).
Note: Some of the Macros have multiple colors which can be controlled by using [1.1], [1.2] and [1.3]
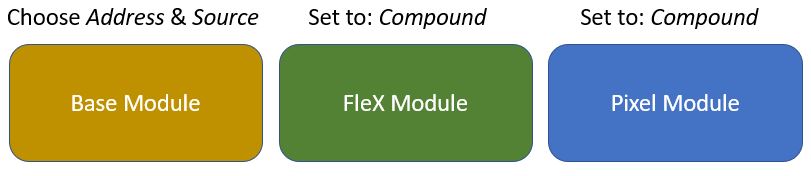
Base + Pixel - 49 DMX channels
Fixture Steps:
**Fixture settings default to Base + FleX
Set the following using the display menu on the fixture to use the fixture in Base + Pixel Mode:
![]()
Hog 4 Steps:
For individual pixel control
Step One: Select the Master by using [1.]
Step Two: Select (Control Mode) then Select (Independent Base Intensity)
Now you can use: [1.1] / [1.2] / [1.3] / [1.4] / [1.5] / [1.6] / [1.7] to select cells individually and give them color/intensity values and [1.] can be used to adjust pan/tilt/zoom
Zones
Zones are pre-determined groups of individual pixels
Step One: Select the Master by using [1.]
Step Two: Dial up the (Intensity Encoder)
Step Three: Select (Module Priority) and Select (Base)
Step Four: Select [Beam] and dial the (Zone Encoder) to highlight the individual zones
Step Five: Select [Color] and dial the (Cyan, Magenta, Yellow, CTO, and White Encoders) to change the color of the chosen zone
Base + FleX + Pixel - 66 DMX channels
Fixture Steps:
**Fixture settings default to Base + FleX
Set the following using the display menu on the fixture to use the fixture in Base + FleX + Pixel Mode:
Hog 4 Steps:
This mode allows for complete control over all of the fixture's functions.
Note: Module Priority Control is crucial in this mode as it is easy for the Pixel module to override and block the background or FleX animations.
For macro control
Step One: Select the Base by using [1.]
Step Two: Dial the (Intensity Encoder) up
Step Three: Select [Beam] -> Dial the (Macro Encoder) to see a macro running as a black background on top of the colored background
Step Four: Select the the pixel cells and dial the (Intensity Encoder) up and assign a color by selecting [Color] and dialing the (Cyan, Magenta, Yellow, and White Encoders).
Note: Some of the Macros have multiple colors which can be controlled by using [1.1], [1.2] and [1.3]
For individual pixel control
Step One: Select the master by using [1.]
Step Two: Select (Control Mode) then Select (Independent Base Intensity)
Now you can use: [1.1] / [1.2] / [1.3] / [1.4] / [1.5] / [1.6] / [1.7] to select cells individually and give them color/intensity values and [1.] can be used to adjust pan/tilt/zoom
Tip: If you intend to only use a specific control mode or module priority, these values can be parked for faster programming!