CPU-1 Failure or CPU-2 Failure or CPU-3 Failure
The information in this post is provided to assist in troubleshooting. Perform work at your own risk. ENSURE ANY POWER FROM DEVICES HAS BEEN DISCONNECTED BEFORE SERVICING ANY EQUIPMENT. If you do not feel comfortable performing the work, please contact us or your local service center. Be aware that ETC and its Affiliates are not responsible for any damage or injury caused by service of our products by anyone other than us or our authorized service providers, and such damage is excluded from the product’s warranty.
Cause:
CPU-X failure often means that the CM(E)d is not receiving AC power on that phase. IE, CPU-1 means phase A, CPU-2 means phase B, and CPU-3 means phase C.
If the processor is NOT a CM(E)d, it may have been set up incorrectly as a CM(E)d. Other Unison processor variants such as CME(i) do not use the components that would report those errors, so they would automatically give those errors because they do not detect the components.
Workaround / Fix:
- If the processor is indeed a CM(E)d, check power of appropriate phase and check the fuses.
- If the processor is a different variant, use the following steps to make sure it is assigned as the correct processor:
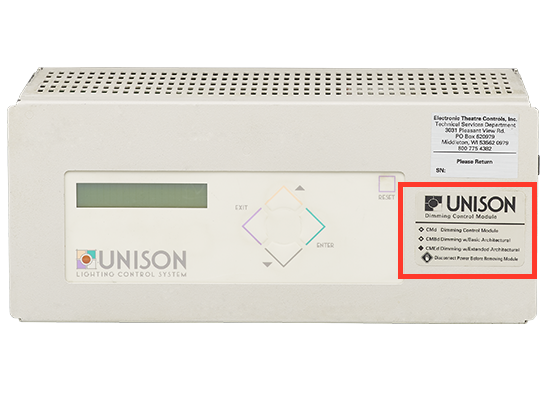
- Check the version of the processor by looking at the label on the right of it. There will be several options on a sticker, and only one should have a filled in black diamond. The name next to that diamond is what your processor should be.

(for example in this image the processor is a CMEd and the diamond next to it is filled in.) - Press and hold the 'Initialization Activate' button on the processor until the screen says MENU [Stat] (see image for reference, as the buttons are hidden).
- Check the version of the processor by looking at the label on the right of it. There will be several options on a sticker, and only one should have a filled in black diamond. The name next to that diamond is what your processor should be.
- Use the yellow 'Up' arrow button to go to MENU [Rack].
- Use the green 'Enter' button to select 'Control' and change it to or confirm that it matches what the processor should be.
- Use the purple 'Exit' button to leave this window and say 'Yes' to Save Changes.
