| |
To access configuration menus
- Press the concealed menu activate button for three seconds. Menu screen will appear. See Figure 1 for concealed button.
- Press [up arrow] or [down arrow] to scroll through bracketed options.
- Press [Enter] to move bracket placement to the right.
- Press [Exit] to move bracket placement left.
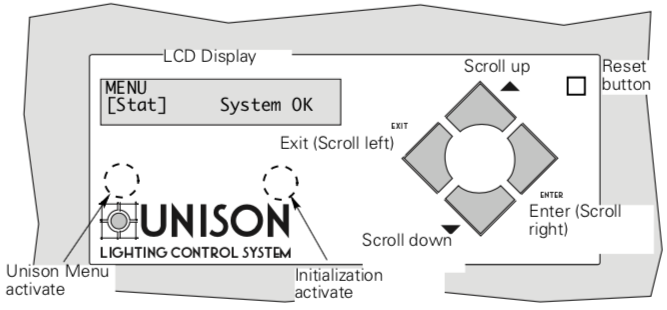
To reset a Control Module
When the rack door is open, a Reset button is available in the top right corner. Pressing it restarts the Control Module using saved settings. Resetting will temporarily interrupt all Control Module processing. Lights will flash momentarily or may go out while system boots.
|
|

|
To initialize a dimming rack
Initialization refers to the programming of rack voltage, size and DMX start address. The first time you access menus on a Unison dimming rack, you must initialize the dimming system processor.
- Complete Rack Configuration Chart.
- Press the concealed "Initialization activate" button for three seconds. The [Stat] menu will be displayed.
- Use [▲] or [▼] to scroll to the [Rack] menu.
- Press [Enter] to move the brackets underneath Control and use [▲] or [▼] to select the the appropriate dimming rack or external processing rack control module.
- If you have selected a dimming rack, move the brackets underneath Rack and use [▲] or [▼] to select either DR6 or DR12.
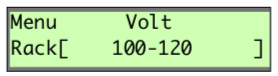
- Press [Enter] to move the brackets underneath Volt and use [▲] or [▼] to select the voltage that matches your feed, either 100-120, 120 Delta or 277 VAC.
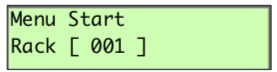
- Press [Enter] to move the brackets underneath Start and use [▲], or [▼] to enter a DMX512 starting address for your rack between 001 and 512.
DMX start address - the DMX512 channel number (between 1 and 512) applied to the first dimmer in the rack. Succeeding DMX channel numbers are automatically applied to the remaining dimmers.
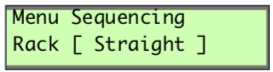
- Press [Enter] to move the brackets underneath Sequencing. Select either Straight or Balanced.
Straight or Balanced refers to how the DMX addresses will be distributed to the dimmers. Straight indicates that the distribution will be sequential starting at one. Balanced indicates that sequential loads will be distributed evenly over the three phases in the rack.
 |
Note: Single-phase racks cannot be phase balanced, as the racks are not split evenly. |
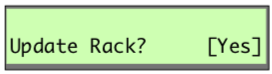
- Press [Enter] then [Exit]. The display changes to Update Rack? Use [▲] or [▼] to select Yes. Press [Enter] again to save changes and leave the Rack menu.
|
|

|
To detail dimming circuits
The Unison dimming processor is designed to control (dim) multiple lighting circuits. Control of each circuit is based on installed module type, connected load type, DMX address and circuit mode.
- Access configuration menu (press the Unison Menu activation button.)
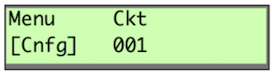
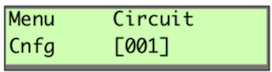
- Scroll to [Cnfg] with [▲] or [▼] and press [Enter]. The brackets move to the circuit number.
|
Note: Circuit numbers start with “1” for the first dimmer in the top slot of the rack. A rack can have one or two dimmer circuits per module. Dimmer load wire lugs are also labeled by circuit number. |
- Select the desired circuit number with [▲] or [▼] and press [Enter]. The display changes to Module Type.
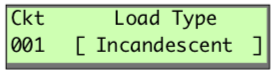
- Select the correct module type with [▲] or [▼] and press [Enter]. The display changes to Load Type.
|
|
|
|
Module Type
|
Description
|
Compatible loads
|
| 100-120 Volt Rack |
|
AFM
|
Required in empty dimmer slots
|
None
|
|
D15 and D20
D15E and D20E D15G and D20G
|
Standard 15 or 20 amp dimmer
500µs rise time 300µs rise time
|
Incandescent, 2- and 4-wire fluorescent, Low voltage, Neon, Cold cathode (CC), Non-Dim
|
|
R15 and R20
|
15 and 20 amp mechanically held relay
|
Any switched load
|
|
D15F and D20F
|
15 and 20 amp fluorescent dimmer
|
3 wire fluorescent dimmer ballasts
|
|
CC 15 and CC 20
|
Direct connection from line lug to load lugs protected by a 15 or 20 amp circuit breaker
|
Non-dim loads like color changer power supplies
|
|
Note: Circuit numbers start with “1” for the first dimmer in the top slot of the rack. A rack can have one or two dimmer circuits per module. Dimmer load wire lugs are also labeled by circuit number. |
|
277 Volt Rack
|
|
AR15 and AR20
|
15 and 20 amp mechanically held relay
|
Any switched load
|
|
AD15 and AD20
|
<p">15 and 20 amp dimmer 200µs rise time |
Incandescent, 2- and 4-wire fluorescent, Low voltage, Neon, Cold cathode (CC), Non-Dim
|
|
AD15F and AD20F
|
15 and 20 amp fluorescent dimmer
|
3 wire fluorescent dimmer ballasts
|
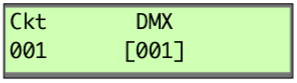
- Select the desired load type with [▲] or [▼] and press [Enter]. The display changes to DMX. The number displayed refers to the DMX channel.
 |
Note: When the Airflow module is selected the display goes directly to the Save Changes? screen. The display returns to the Ckt screen where you can begin detailing another circuit.
|
|
Load type
|
Setting options
|
|
Non-dim
|
DMX512 channel
|
|
Fluorescent (2, 3, 4 wire)
|
DMX512 channel, Ballast Type
|
|
Incandescent
|
DMX512 channel, DD (Dimmer Doubling) settings
|
|
Low Volt
|
DMX512 channel
|
|
Neon, CC (Cold Cathode)
|
DMX512 channel, Ballast Type
|
- Select the desired DMX512 address with [▲] or [▼] and press [Enter]. The brackets move to Mode.
|
Note: It is important to note the circuit to DMX channel assignments. Select the DD mode with [▲] or[▼] and press [Enter] |
 |
Caution: Dimmer doubling is only available in 120V systems using Source Four fixtures with 77V lamps. |
- If a 2-, 3-, 4-wire fluorescent or Neon/CC is selected in load type the display will move to Ballast Type. Use [▲] or [▼] to scroll to the correct type.
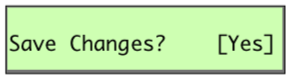
- Use [▲] or [▼] to scroll to [Yes] to record your changes or scroll to [No] to discard changes and press [Enter]. The display returns to the circuit number step of the [Cnfg] menu. Use [▲] or [▼] to begin configuring another dimmer circuit. Or press [Exit] to leave the Configuration submenu.
|
 |
To enter Dimmer Doubling (DD) settings
Dimmer Doubling (DD) can only be used in 120V systems using D15, D20, D15E, and D20E modules. This feature is used for applications where ETC Dimmer Doubling and Source 4 equipment is used. If you have not purchased Dimmer Doublers, this feature must be turned off.
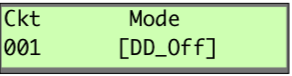
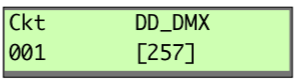
- Select either [DD_On] or [DD_Off] with [▲] or [▼] to enable or disable Dimmer Doubling and press [Enter]. If you select [DD_On] the display changes to [DD_DMX]. If you select [DD_Off], Save Changes? displays.
- Select the desired DMX512 address with [▲] or [▼] and press [Enter]. Use the default address number (the DMX address plus 256) unless a different address is specified. The display changes to [Save Changes?].
|
|
|
To set dimmer levels in the Test submenu
You can use the Test submenu to set dimmer levels to test your dimmer circuit wiring or lighting load operation. Test also allows you to view DMX levels being received by the dimming processor.
- Access the configuration menu (press the Unison Menu activation button.)
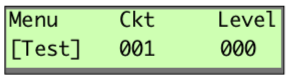
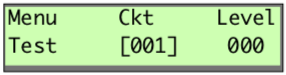
- Scroll to [Test] with [▲] or [▼] and press [Enter]. The brackets move to Ckt. The DMX input value for that circuit is displayed between a range of 0 and 255.
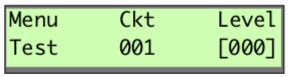
- Use [▲] or [▼] to scroll to the desired circuit number and press [Enter]. The brackets move to Level. This shuts off all DMX to the rack. DMX levels are held at last look and DMX level changes have no effect.
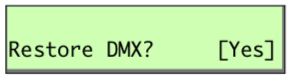
- Use [▲] or [▼] to scroll to the circuit output level. Circuit output will continuously match the levels as they scroll. Press [Exit] to set levels on another circuit or [Enter] to go to Restore DMX?. (Restoring DMX will cancel all test levels.)
|
Note: Circuit levels will remain at their test setting when you press [Exit]. You can set levels for all the dimmer circuits by repeating steps 2 and 3. |
- Use [▲] or [▼] to scroll to [Yes] to clear the test settings and restore DMX or [No] to temporarily keep the look and press [Enter].
|
Note: If you keep the test settings, DMX512 input is disabled until you return to the Test menu and restore DMX. |
|
|
|
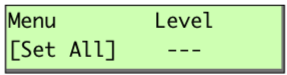
To set dimmer levels in the Set All submenu
The [Set All] submenu is an additional test menu. It allows you to change all of the levels in the dimmer rack.
- Access the configuration menu (press the Unison Menu activation button.
- Scroll to [Set All] with [▲] or [▼] and press [Enter].
- Use [▲] or [▼] to change the level of all dimmers.
- Press [Enter], and use [▲] or [▼] to scroll to [Yes] to clear the [Set All] and restore DMX. Or [No] to temporarily keep the look and press [Enter].
|
|
|
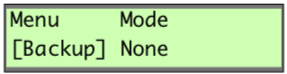
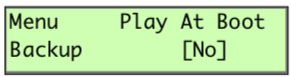
To set the Backup look
In the event of console failure, the backup look enables you to activate a single preset at the CMd or CMEd.
- Access the configuration menu.
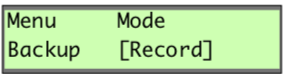
- Scroll to [Backup] with [▲] or [▼] and press [Enter]. The brackets move to Mode.
- Scroll to [Record] with [▲] or [▼] and press [Enter]. The system will record current levels.
|
Note: Any "Test" or "Set All" levels will also be recorded if DMX is not active. |
-
Use [▲] or [▼] to select if programmed backup look should play at boot-up of system processor. Select [Yes] or [No] and press [Enter].
-
Scroll to [Yes] to save changes and press [Enter].
|
Note: playing the backup look will disable DMX or test levels to the dimming rack. |
|