How Track Color Picker Changes on Faders Using Variables in Mosaic Designer 2
Explanation
The process of allowing faders and color pickers to track one another is most easily achieved through variable capture.
Variables are a way of collecting numbers from inputs, such as color pickers and faders, and then passing that information to an action.
By default variables are disabled in Mosaic Designer 2, to enable them, navigate to the project features tab and choose enable 'Trigger Variables' under the the trigger section.
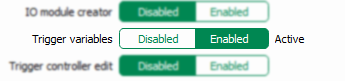
Additionally variables can also be enabled from the editor pane in trigger tab.
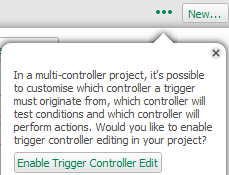
To do this click on the ellipsis and choose "Enable Trigger Control Edit", note that the ellipsis will only appear if the added trigger or action supports variable capture.
Interface Setup
Start by adding a touch device in the network tab or by enabling the touch device editor in the project properties screen.
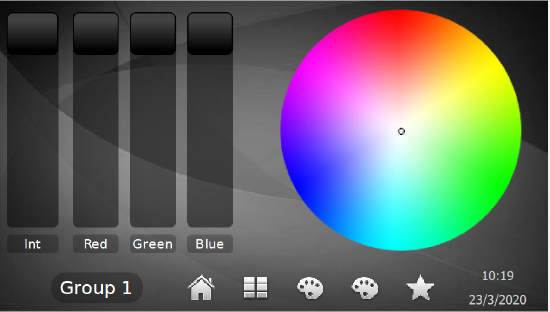
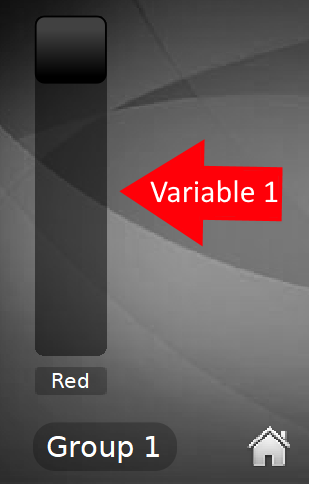
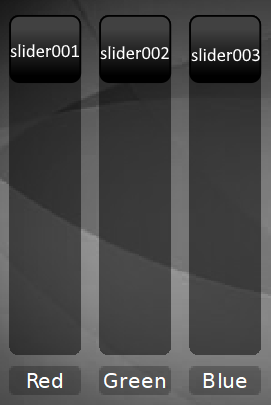
Create a touch configuration and add a page that has (1) Color Picker and (4) Faders.
When creating faders change the 'startup value' to 255 for each of the four faders. This property is changed by clicking on fader and navigating to slider properties in the right hand menu.
Keys
Next, establish the technical side of the variables.
Each element on the touch screen has a unique identifier called a key.
Natively, these keys are numerically numbered based on the element's type.
A fader's key would be 'slider00X', where X = the fader's number.
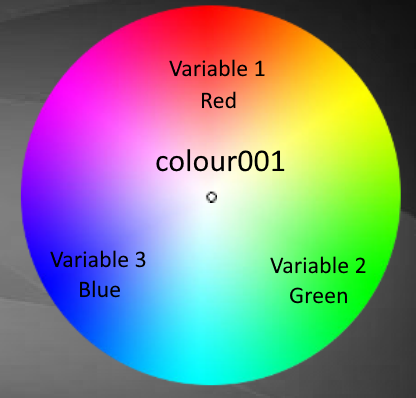
For a color picker the key would be 'colour00X', where X = the color picker's number. Note the European spelling of color this will be important later on.
Below is an example of the interface page with default keys.
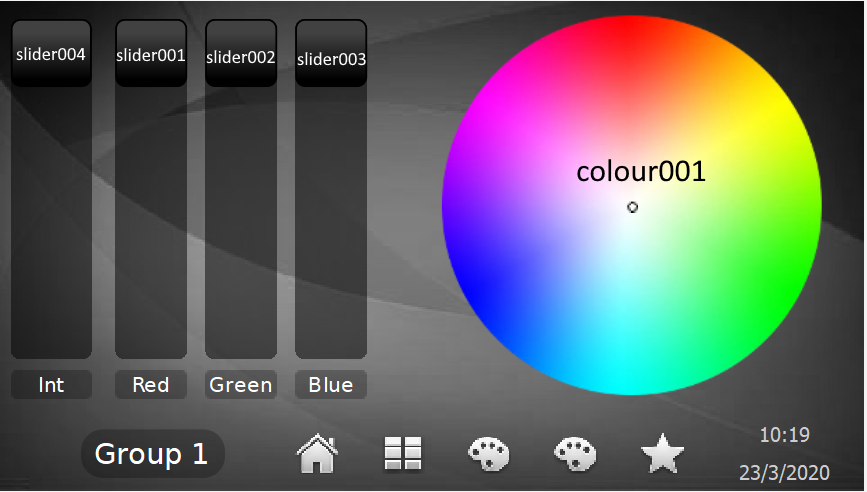
An element's key can be modified by clicking the item and navigating to the control section of the interface editor.
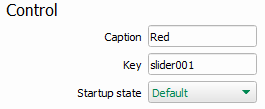
For this example, it's not recommended to change the default key.
Variables
A fader has a single variable that is captured when the fader is moved.
A color picker has three variables; red,green,and blue.
Faders Tracking Color Picker
Trigger Setup
Once the element's keys have been established, triggers must be created to capture the variables and apply them.
To start, create a 'Touch Colour Change' trigger.
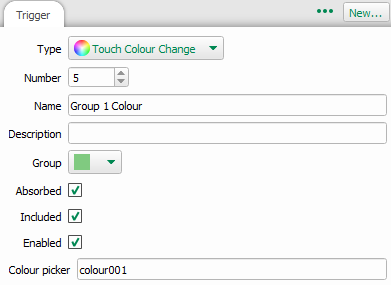
Type: The type of trigger, in this case it's 'Touch Colour Change'.
Number: The number of the trigger. This number is not needed or recorded for variable purposes.
Name: The name of the trigger.
Description: A description of the trigger. This field is useful when working with configurations that have multiple color pickers.
Color picker: The key of the color picker that is being targeted, in this case it's 'colour001'.
Action Setup
Color Picker Configuration
As there are 4 faders and 1 color picker this trigger will have 4 separate actions.
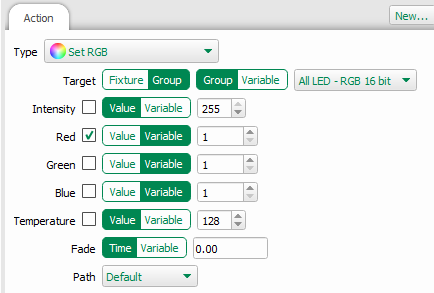
The first action should be a 'Set RGB' function.
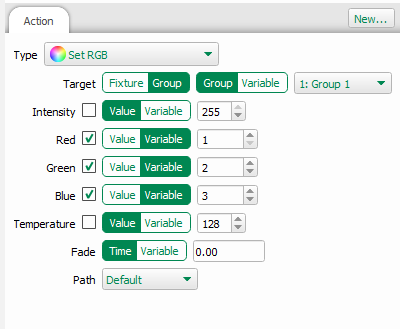

Type: 'Set RGB'.
Target: The target can either be set to a specific fixture or a group of fixtures, in this example it's targeting "Group 1".
Intensity: This action is not targeting intensity and this box should remain unchecked.
(TOM: my two cents is that Intensity should be targeted at a value of 255. When someone presses the color picker, do they want the light to turn on?)
Red, Green, and Blue: These are the colors that will be modified by this action. Additionally, this is where unique variable numbers are assigned for each color.
In the above image Variable 1 is Red, Variable 2 is Green, and Variable 3 is Blue.
Color Fader Configuration
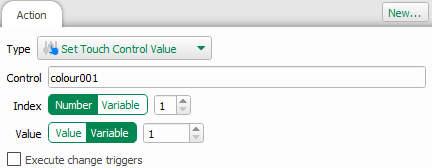
The second, third, and fourth actions will target the faders directly using a 'Set Touch Control Value' function.
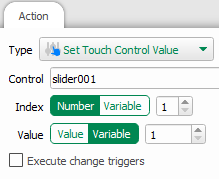
Type: 'Set Touch Control Value'.
Control: The fader that is being targeted, in this example it's the red fader, 'slider001'.
Index: Index refers to the value that will be changed. A fader has only one index (up or down), therefore the field should always be set to 1.
Value: In this example Mosaic has been instructed to change the fader based on variable 1.
Looking at the 'Set RGB' action above, the color Red is variable 1. Based on this information every time the color picker is moved the the red fader will be adjusted.
Create two additional 'Set Touch Control Value' actions each targeting a specific color.
For example; 'slider002' would have an index of 1 and a value of variable 2, 'slider003' would have an index of 1 and a value of variable 3.
Color Picker Tracking Faders
Trigger Setup
In order for the color picker track with the fader's movement Mosaic must apply the variable information to the color picker.
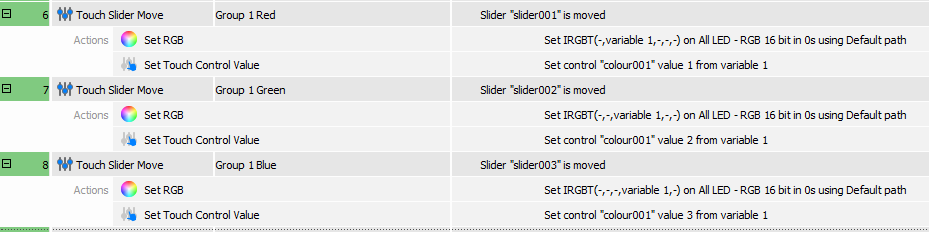
To start, create a 'Touch Slider Move' trigger.
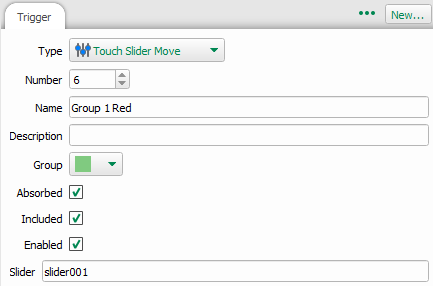
Type: 'Touch Slider Move'.
Slider: The key of the slider that is being targeted, in this case it's slider001.
Create two additional 'Touch Slider Move' triggers for the remaining color faders.
For example; Green's fader will be 'slider002' and Blue's fader will be 'slider003'.
Action Setup
Color Picker Configuration
To start configuring the action of this trigger, create a 'Set RGB' action.
As these sliders are only controlling a single color attribute the fader needs to specifically target that color attribute only.
In the below example, this action is targeting the red attribute. Notice that variable number is 1, as fader only has single variable that is being captured, the variable number should remain '1' for all colors when building the additional triggers.
Type: 'Set RGB'.
Red: The color being targeted by the fader and it's associated variable.
Fader Configuration
The fader will also need to have it's position set when the color picker is adjusted.
To start, create 'Set Touch Control Value' trigger
Type: 'Set Touch Control Value'.
Control: The color picker that is being targeted, in this case it's colour001.
Index: This number should be set 1.
Value: The variable that will be captured.
Create two additional 'Touch Slider Move' triggers for the remaining Green and Blue Colors.
It's important to note that each trigger is only setting a single color with the 'Set RGB' command.As the index number increases for each trigger (Red has a index of 1, Green has a index of 2, and Blue has a index of 3) the variable number remains '1' for all action in these triggers.
Once completed, the triggers should look similar to the below image.
Creating Intensity Fader
It's important to note that while an intensity fader isn't required for this process to work, it's does allow the end user to easily control the intensity..
Trigger Setup
To start, create a 'Touch Slider Move' trigger.
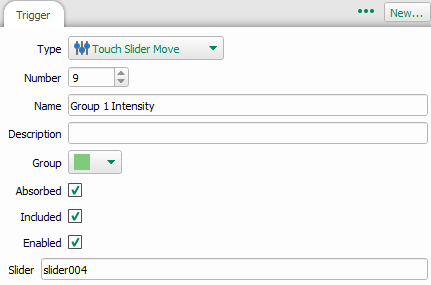
Type: 'Touch Slider Mover'.
Slider: The fader that is being specifically targeted, in this case it's 'slider004'.
Action Setup
To start, create a 'Set RGB Action'
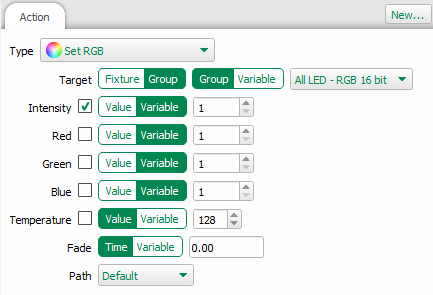
Type: 'Set RGB'.
Target: Group 1.
Intensity: This action is specifically targeting intensity. Check the box and assign variable 1.
Red, Green, and Blue: This action is not targeting these colors and these boxes should remain unchecked.
Upload and test your configuration!
An example of the above configuration can be found below.