How to setup and use keypads in ControlDesigner
One of the advantages to using touchscreens instead of a button or fader station in a Paradigm system is the ability to protect pages and controls with numerical passcodes entered via a keypad widget. The instructions below will explain how to set up basic keypad navigation from a home screen, to either a User or Admin level set of controls.
Example Config: Keypad Example.lcdconf
While ControlDesigner is a program available to anyone, LightDesigner is required to incorporate any .lcdconf file into the larger Paradigm configuration. LightDesigner is only available to ETC Certified Technicians, or to end-userse who have undergone LightDesigner training by the installer for their Paradigm system. Users who have not been trained must contact an ETC Dealer to implement this feature.
Keypads can be used on either pages or popups, although it's a bit more common to see them on popups, which is what the example below will use. The same popup/keypad can be called from multiple places, making it easy to create one set of passcodes and actions.
Gestures are enabled by default on all new touchscreen configs. These easily allow a user to bypass security since they can swipe between pages. You'll either want to disable gestures in their entirety, or for the specific pages you're protecting by following the instructions in How to disable gestures for Paradigm touchscreens in ControlDesigner.
- Define your user and admin passcodes:
- Select the touchscreen config in the Object Browser. This will be the top-most item in the list.
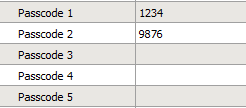
- In the Property Editor you'll see fields for Passcodes 1 thru 5. Each field is blank by default, and it does not matter which of the five you use, but they only accept numerals and can be no longer than ten digits.Our example will use '1234' for the User code, and '9876' for the Admin code.
- Create three pages. One will be a page which contains a button that shows the popup with the keypad, with another for the User controls, and the last for the Admin controls. This example names them 'Main', 'User Page', and 'Admin Page'. Order of the pages does not matter since we will not be using any "Next" or "Previous" page actions.
- On the User Page and Admin Page create a button with the Action to Change Page back to Main.
- Create a new popup, and add a keypad to the popup. The keypad widget is found on the tool bar, between the Date and Number Edit buttons. It is outlined in RED in the screenshot below. Click the button, then click and drag to draw the desired size of they keypad. Like any other CD object, you can adjust its size and placement in the property editor with the keypad selected.

- Add a Cancel button. Keypads do NOT have a Cancel button on them by default, but using one is a great way to close the popup without logging in, and also means you do not have to add your own dedicated button to do so. You can easily add one by clicking on the Keypad, and in its property editor change the Show Cancel property from 'No' to 'Yes'.
- NOTE: Selecting the keypad is easiest if you do it in the Object Browser. Alternatively you can click on the keypad between buttons to select it. If you click one of the buttons on the keypad you have only selected that button, and are now looking at the properties for it instead of the entire widget.
- Add an action to the Cancel button by selecting the keypad, then in the Action Editor select 'Cancel' from the Action List (outlined in RED). It may already be chosen by default.
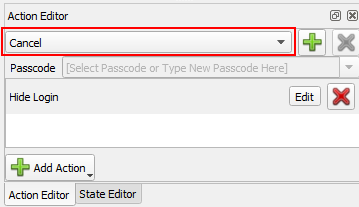
- Click the "Add Action" button and choose 'Hide Popup', then select your newly created popup name from the list.
- NOTE: You cannot add a passcode to the Cancel action.
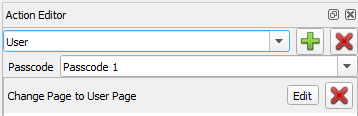
- Create a User login by selecting 'Unnamed 1' from the Action List.
- Re-name it to 'User' by clicking in that field and deleting 'Unnamed 1'.
- In the Passcode dropdown select 'Passcode 1' from the list.*
- Add an Action, and choose 'Change Page', with the User Page selected.**
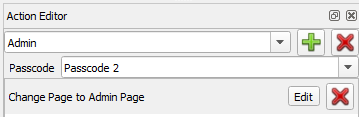
- Create an Admin Login by clicking the green + next to the Action List. It will automatically create a new list titled 'Unnamed 1'. Re-name it to 'Admin'.
- In the Passcode dropdown select 'Passcode 2' from the list*
- Add an Action, and choose 'Change Page', with the Admin Page selected.**
- On the Main Page create a button with an Action to Show Popup, pointing to the popup created in Step 3.
- Press the simulate button on the toolbar, and when you click the login button from the Main page, the popup/keypad should show. Pressing Cancel should take you back to the Main page, while entering either of the two passcodes should take you to the page each points to.
- Save the .lcdconf file in ControlDesigner, and import it into your LightDesigner configuration.
*It is also possible to directly enter a passcode in this field instead of choosing one of the five Passcodes entered in the configs property editor. If you use multiple keypads within a config that reference the same set of passcodes, it is recommended to point them to the passcodes in the property editor so you only need to change passcodes in one place, if they need to be changed at a later date.
**You do not need to add "Hide Popup" actions unless you've changed the popup "Hide On Page Change" property to 'No'. This property is 'Yes' by default.