Replace DMX Chips on a P-ACP-E or P-ACP-D Mk2
Issue
DMX A and/or DMX B is not working correctly in my P-ACP-E or P-ACP-D Mk2 processor, and the DMX need to be replaced for further testing.
Replacing DMX Chips on P-ACP-D
The P-ACP-D Mk2 hardware uses robust DMX chips soldered directly to a PCB inside the unit. These chips are not user-serviceable or replaceable in the field. In the rare case a DMX chip needs to be replaced in a P-ACP-D, a repair will need to be arranged with your ETC Dealer and ETC Technical Support.
Replacing DMX Chips on P-ACP-E
- Power off the DRd or ERn rack housing the P-ACP-E.
- Remove the P-ACP-E from the rack.
- Using a #2 Phillips screwdriver, remove the two screws on the top edge on the rear of the P-ACP-E, allowing the lid to slide out of place.
- When facing the front and looking down from the top, the DMX A and B chips are located in the top-right corner (outlined in yellow), and a single spare DMX chip is located near the front edge (outlined in cyan)

- The DMX A and B chips are silkscreened on the PCB with clear labels, in positions U3 and U4 respectively. Using a chip-puller, or your fingers, carefully remove the faulty chip without breaking any pins.
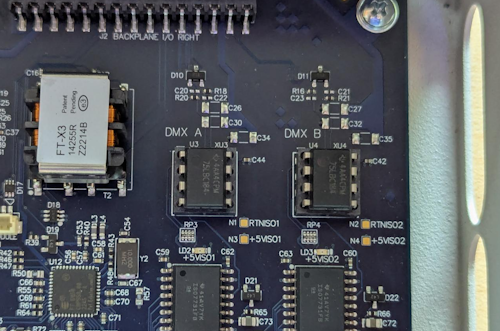
- The spare DMX chip is also silkscreened on the PCB with a clear label, in position U30. Remove this the same way as the other chip.

- When swapping, align the chips based on the indent/shiny dot indicating pin 1.
- Reverse the steps to re-install the P-ACP-E into the rack.