How to Set Up Your Wireless Network for iRFR or aRFR with Eos Family Consoles
iRFR and aRFR are only compatible with Eos version 2.6 or higher. Before proceeding, please confirm your console's current software version. If you're not running at least version 2.6, you'll need to update the console software.
For a setup guide for iRFR or aRFR -BTS and -LR as a PDF, please see aRFR/iRFR Setup Guide.
Network Configuration
iRFR and aRFR (referred in this document as WiFi Remotes) require that your lighting console be on a wireless network. As wireless networking hardware changes frequently, we do not recommend a particular model of router or access point. Instead, we offer these guidelines for configuration.
This guide assumes that the network is on an isolated network specifically for lighting data. ETC does not recommend shared network environments – contact ETC Technical Services if you have questions.
Choose Your Wireless Equipment
Wireless routers are by far the most common WiFi networking device. These devices typically have an Internet or WAN (wide area network) port on them as well as some local network ports. Their function is to operate a local network, wired and wireless, and route data as needed between that network and the bigger network connected to the WAN port.
Wireless access points are also acceptable. These act as a translator between the wired and wireless, with very little filtering or processing. Devices that connect to the access point are essentially on the same network as the wired devices.
Topology
The recommended setup varies based on your system.
- If you have an existing lighting network, use one of the Existing Network examples.
- If you have a single console with dual network ports and wish to use the second network port for the wireless network, refer to the Single Console with Dual Network Ports example.
- If you have a single console and no network, refer to the Single Console example.
Existing Network with a Router
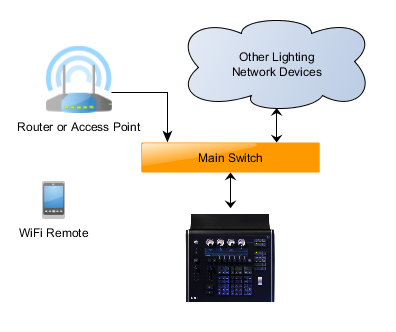
Connect the router's WAN port to a core switch in your system. If two switch ports are not available next to the console, ETC recommends installing a small unmanaged switch between the console, wall port, and router. The goal is to keep the router from being a point of failure for show-critical level information like sACN, EDMX, or ArtNet data. The switch will provide access to the network while not placing the router in-line.
Existing Network with an Access Point

Connect the access point to your core switch in the system. If another switch port is not available in the location where you want to set up the router, ETC recommends installing a small unmanaged 5-port switch. The goal is to have the router not between the console and the main network, in particular its show-critical level information like sACN, EDMX, or ArtNet data.
Note that access points will typically end up transmitting all multicast or broadcast information on the network. This means that level data from sACN, EDMX, and ArtNet may be sent over wireless, consuming bandwidth. In larger installations, this can become problematic and affect WiFi remote connection, performance, and responsiveness.
Single Console with Dual Network Ports on an Existing Network with a Router or Access Point
Newer consoles in the Eos Family have two network ports available for use. One application of the second network port is to allow for WiFi remote traffic to be separated from the rest of the lighting network. In this case, be sure that the DHCP service is turned on for the second network port and connect the router's WAN port or access point to the console. Since the two network ports are on entirely separate networks, this setup works in scenarios where you have a single console in the system or only wish to use a WiFi remote with that console alone.
Single Console with a Router or Access Point
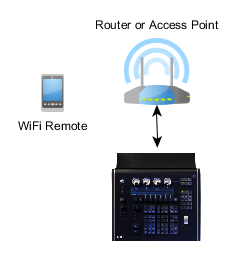
Some systems do not transmit lighting levels over the network. In these cases, connecting the router's WAN port or access point directly after turning on the DHCP service on the console will be completely fine.
Preparing Your Console
Find the Console’s IP address
An important detail for configuring the app will be the IP address of the console.
|
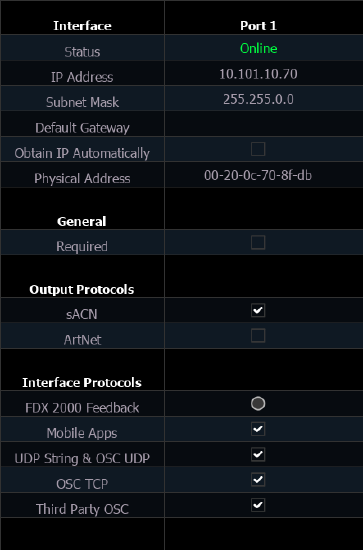
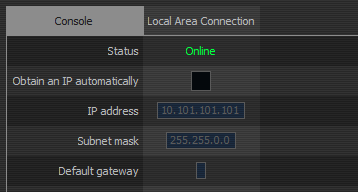
Eos v3.2.0 and greater: Press [Displays] or [Browser] and choose {Setup} -> {Device Settings}. Click on the {Network} tab. |
Eos v3.1.5 and lower: On Eos Family consoles, press [Displays] or [Browser] and choose {Exit}. Click on {Settings} when it pops up in yellow. Click on the {Network} tab. |
ETC has a set of standard network IP addresses, including appropriate defaults.
Standard IP Addresses Support Article Link
DHCP
One console in the system should be configured to hand out IP addresses to other devices in the system. This service is called DHCP, or Dynamic Host Configuration Protocol. In an ETC system, the DHCP service is run on either a console or Net3 Conductor appliance. Net3 Conductor is preferred. If you have multiple consoles and no Net3 Conductor appliance, we recommend choosing the console assigned as Primary (for Eos Family devices).
Net3 Conductor article on setting up DHCP
Eos and Cobalt Family article on setting up DHCP
Enable WiFi Remotes
Eos
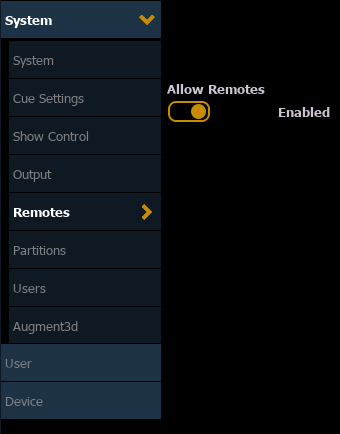
Allow Remotes/Allow App Connections
Press [Displays] or [Browser] and choose {Setup} -> {System Settings}. Click on the {Remotes} tab. Ensure that {Allow Remotes} is set to Enabled.
After Eos 3.2.0 we will go into {Mobile Apps} and enable {Allow App Connections}.
If you are unsure which version of Eos your console is running, follow these steps: Finding Software Version on Eos
|
v3.2.0 and greater:
|
v3.0.0 to 3.1.5:
|
v2.9.3 and lower:
|
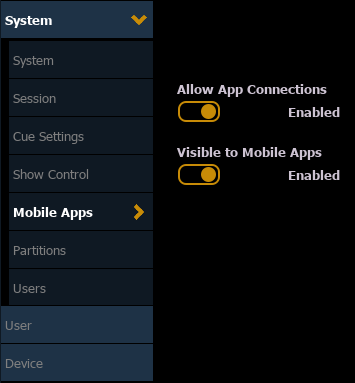

Visible to Mobile Apps/Visible to Remotes
Press [Displays] or [Browser] and choose {Setup} -> {Device Settings}. Click on the {Config} tab. Ensure that {Visible to Remotes} is set to Enabled.
After Eos 3.2.0 we will go into {Setup} -> {System Settings} -> {Mobile Apps} and enable {Visible to Mobile Apps}.
|
v3.2.0 and greater:
|
v3.0.0 to 3.1.5:
|
v2.9.3 and lower:
|
.png?revision=1)
.png?revision=1)
Configuring Network Port(s)
|
v3.2.0 and lower: Press [Displays] or [Browser] and choose {Exit}. Click on {Settings} when it appears in yellow. Navigate to the Network Tab and make sure that Mobile Apps is checked on the network port(s) where the wireless router or access point is connected.
|
v3.1.5 and lower: Press [Displays] or [Browser] and choose {Exit}. Click on {Settings} when it appears in yellow. If you are running version 2.0 or higher, navigate to the Network tab. Ensure that WiFi Remotes is checked on the network port(s) where the wireless router or access point is connected. If you are running an older version, the check box may be located in the {RFR} tab instead. |

Configuring Your Access Point or Router
We recommend the following settings. Refer to your hardware’s manual or documentation for the specific terminology and method for setting up the system.
- Most routers out of the box are running a DHCP server for their local ports and wireless devices. This is not the same as the DHCP server that we chose earlier. Leave this on.
- The WAN port should be set to listen for a DHCP address (receive internet address automatically).
- Turn off wireless security features, like securing the network with a passphrase, while configuring the network. Once you have the system up and running, you may feel free to turn these on to keep unwanted devices off the network. This simplifies the initial setup and removes extra variables.
- Turn off any settings like “Broadcast Storm Detection” or “Block Multicast”.
Bring the Network Online
After you have chosen a topology and configured the router, it is time to bring the network online.
Be sure that the DHCP server is on the network and running, whether this is a Net3 Conductor or console. Consoles should be powered on but waiting in the Welcome Screen.
Plug the router or access point into the network and plug it in to power. The router or access point will boot and receive a valid IP address from the DHCP server to communicate on the lighting network.
Start the console software. In most systems, this means launching as Primary or Server.
Connect Your Wireless Device
Connect to the new wireless network as you would any other WiFi network.
Android
- Click on the Settings icon
- Choose Wi-Fi
- Click on your network to connect. If you have enabled a passphrase, enter it when prompted.
iOS
- Click on the Settings icon
- Choose Wi-Fi
- Click on your network to connect. If you have enabled a passphrase, enter it when prompted.
The device will connect and acquire a DHCP address from the router. If using an access point, the console or Net3 Conductor appliance will supply an address through the access point.
Configure the iRFR or aRFR Application
iRFR or aRFR full version is not compatable with Cobalt consoles.
|
|
|
|
|
|
|
Troubleshooting
- Console is shown as a WIFI symbol with a line through it
- Verify that the console’s IP address was entered correctly
- Verify that you are connected to the correct wireless network
- Make sure the console and access point or router are connected and running
- Verify the console’s network port shows activity lights, indicating an active connection
- On iPhone make sure that you have local networks enabled for the app
- Settings > Privacy & Sequrity > Local Network
- Enable MobileRFR so that it can see devices on the network.
- Settings > Privacy & Sequrity > Local Network