aRFR Classic: Getting Started with your Eos Family Console
Connecting to Your Eos Family Console
NOTE: If you have not already set up your console's wireless network and configured your Android device to use that network, please see How to Set Up Your Wireless Network for iRFR or aRFR.
Once your Android device is configured to be on the same wireless network as your console, you will need to set it up to communicate with your console.
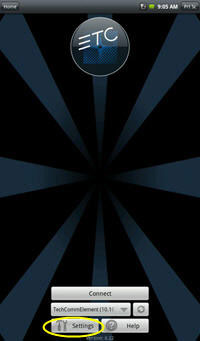
- Launch the aRFR Classic application on your device.
- At the Welcome screen, click {Settings}.
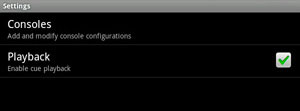
- Click {Consoles}.
- Enter in the console's device name. Hit the [Back] button on your phone to exit to the next field.
- Enter in the console's IP address. Hit the [Back] button on your phone to exit to the next field.
- Enter in the password. For Eos Family consoles, this will be the console's device name.
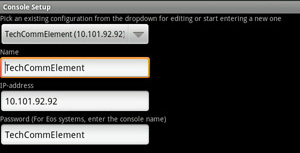
- Hit {Save} and hit the [Back] button twice to return to the welcome screen.
- From the welcome screen, select your console from the dropdown menu. If the aRFR app doesn't see your console online, it will display offline next to the console's name in the dropdown menu. If you know that the console is online, you can press the Refresh button to force a refresh of the status.
- Press the {Connect} button
Using the Virtual RFR
The Virtual RFR is designed to work exactly as the actual Net3™ RFR. Please refer to the RFR section in your console's manual for instructions on general RFR use.
You can download your console's manual here:
http://www.etcconnect.com/Products/Consoles/
The Virtual RFR will default to opening in the channel check display. To change the mode, press and hold the {M} button. The softkeys will display with the different modes, {Park}, {Live}, {Playbck}, {ChanChk}, and {Patch}.
Using the Displays
In addition to the virtual RFR display, the aRFR has five additional displays: {Colors}, {Pan/Tilt}, {Encoders}, {P.B}, and {Cues}.
- {Colors} - is a color picker display.
- {Pan/Tilt} - is a pan and tilt display.
- {Encoders} - displays the available encoders for a fixture.
- {P.B.} - is the playback display.
- {Cues} - displays a cue list.
At the top of three of the displays ({Colors}, {Pan/Tilt}, and {Encoders}), there are three white buttons. The two on the sides are for paging through the channels and the center one displays the currently selected channel. If you click on the center button, you will open a numerical keypad to be able to type in a channel number.

Using the Color Picker
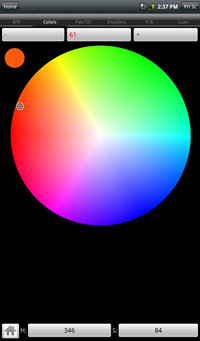
The current color for the first selected channel will be indicated by a small rotating cursor and in a small preview window to the left of the color wheel. Press anywhere on the color wheel to change the color, and the cursor will move to the new color.
Click the Home button to home the color.
To enter a specific value, you can click on the H or S buttons. This will open a small dialog where you can type in a parameter value.
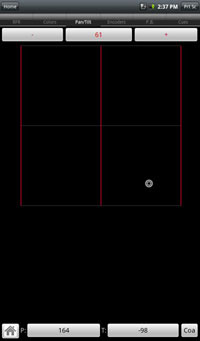
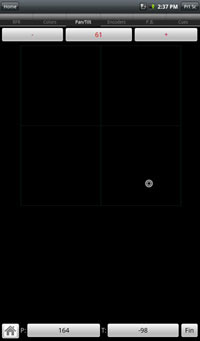
Using the Pan/Tilt display
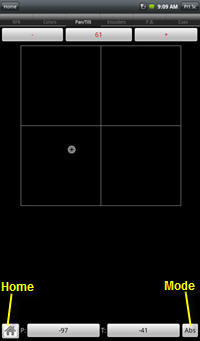
The current Pan/Tilt values for the selected channel are displayed by the crosshair cursor on the graph. To change the Pan/Tilt values, click on the graph.
To enter a specific value, you can click on the P or T buttons. This will open a small dialog where you can type in a parameter value.
Pan/Tilt has three different modes, Absolute, Fine, and Coarse. In Absolute mode, the Pan/Tilt values will snap to the location that you touched on the graph. In fine & coarse modes, you will need to drag your finger slowly to adjust the values.
Using the Encoder Display
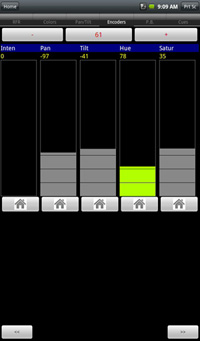
If the selected channel has related parameters, they will be shown on this display. If there are more parameters than what will fit, use the << and >> buttons to shift between multiple parameter pages.
Each parameter has a vertical section with the following items:
- Parameter name
- Parameter value
- Parameter encoder area where you control the parameter value by moving your finger
- Home button that takes the parameter to its programmed home position
Using the Playback Display
This display is always centered on the current cue, and allows direct playback control using the {Stop}, {Go}, and {Goto} buttons.
The playback display is color coded as following:
- Black is an inactive cue.
- Red is the active cue.
- Gold is a completed cue.

NOTE: The Playback buttons are disabled by default for safety. To use the buttons, you must enable them in {Settings}.
Using the Cue List Display
This display allows you to navigate through all the cues in your show without affecting the actual playback. By default, this display will follow the active cue. The cue number is displayed on the left hand side. An asterisk (*) indicates that the cue has parts. The total duration of the cue is displayed on the right hand side of the display. When the cue is active, the remaining time in the fade will be displayed.
The cue list is color coded as following:
- Black is an inactive cue
- Red is the active cue
- Gold is a completed cue.

Pressing the {Current} key will force the display to follow the current cue. Pressing {Up} or {Down} will scroll through the current cue list. Pressing {Jump} will open a window that will allow you to type in a specific cue to jump to. You use the standard Eos command line syntax to navigate to any cue in any cue list.