Dimmer profiles on Express consoles
Dimmer profiles
A dimmer profile is a variable level sent to a dimmer during a fade that is related in some way to the percentage of fade completion.
By varying the dimmer profile, you can compensate for nonlinear characteristics or other time-dependent variations in lighting instruments as well as warm filaments more slowly to increase lamp life. Dimmer profiles are not available for 16-bit channels, only for 8-bit channels.
A dimmer may have both a proportional level assigned to it as well as a dimmer profile.15 In the control sequence for a particular channel, the channel’s level is first modified by the dimmer scaling, if different from 100%. Then the resulting dimmer level is modified during the channel’s fade by the dimmer profile, if different from a linear profile, to yield the dimmer’s final output.
The console has 33 dimmer profiles, of which 32 are editable. Profile 0, the default profile, is a linear profile16 and is not editable. Profiles 1 through 9 have preset, nonlinear profiles and are all editable. Profiles 10 through 32 default to linear profiles and are all editable.
Pre-defined profiles
0 - Linear (not editable)
1 - IES square
2 - Slow bottom
3 - Fast bottom
4 - Slow top
5 - Fast top
6 - Full at 1%
7 - Preheat at 5%
8 - Preheat at 10%
9 - Hot patch
15 See Proportional patching, for information about how to make the dimmer output proportional to a scaling factor.
16 A linear profile is one that has an intensity level directly proportional to the fade time at all points in the fade time. Thus, when the fade is 50% complete, the intensity level is 50% of the full value.
Assigning a profile to a dimmer
You may assign one of the 32 alternative profiles to a dimmer. If you assign none, the console sets the dimmer to default profile 0, the uneditable linear profile. Following is the procedure for assigning a profile to a dimmer.17
17See Proportional patching, if you want to use this procedure to assign a proportional level to the dimmer.
| Keystrokes: | Action: |
|---|---|
| 1. Press [Patch].a | Prompt reads: Select dimmer numbers, then press [Enter] to assign to a channel, or press [At] to assign a proportion, or press Profile to assign a profile |
| 2. Enter the number of the dimmer to assign on the keypad. | |
| 3. Press [S7], More Softkeys, [S6], Profile. | Prompt reads: Select dimmer profile number |
| 4. Enter the number of the desired profile. | |
| 5. Press [Enter]. |
a Press [Dim] if the dimmer LED is not lit.
Profiles display
Press [Setup] [1][0], Profiles, [Enter] to go to the Profiles display.
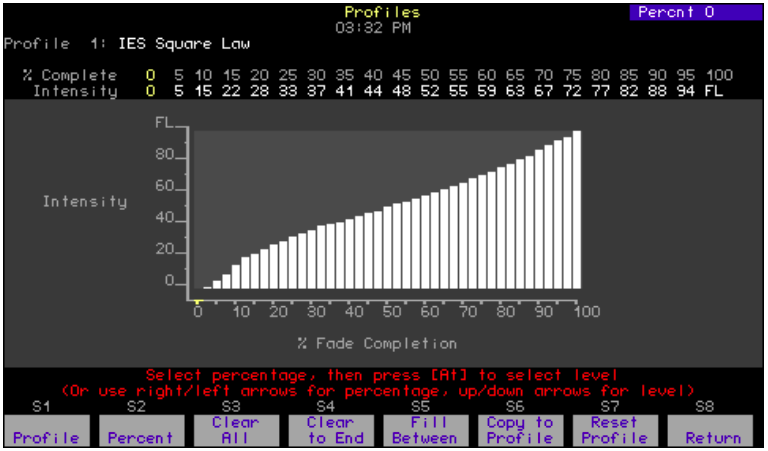
The Profiles display contains a bar chart, with the total time for completion of the fade broken down into 40 equally spaced bars. The height of each bar represents the percentage of the full fade level defined as intensity. Twenty of these bars are editable for intensity and are called fade points. In between the 20 editable fade points are the remaining 20 bars, and these indicate the calculated intensity levels between fade points.
17. See Proportional patching, if you want to use this procedure to assign a proportional level to the dimmer.
Also, the Profiles display contains the following information:
- The profile’s number and name (if labeled - see Labeling Profiles below).
- For each fade point, the percent of the fade complete at that point. Each fade point contributes 5% to the total fade.
- For each fade point, the intensity at that point.
Navigation and Feedback - Profiles display |
||||||
|---|---|---|---|---|---|---|
 |
 |
 |
 |
 |
||
| Select a fade point |  |
|
|
|||
| Change the intensity | |
|
|
|||
| Yellow numbers | Fade point percentage and intensity values | |||||
| Yellow bar | Fade percent point selected | |||||
Note: Use [At] to set the level with the keyboard or use [At] [+] or [At] [–] to bump the level by one.
Creating or editing a profile
If you need a profile that is different from any of the ten provided, you can either edit one of those that already exists (but not default profile 0) or create a new one. As you edit, the profile changes to display the results.
Edit intensities in the Profiles display as follows:
| Keystrokes: | Action: |
|---|---|
| 1. Press [S1], Profile, [1][2] [Enter]. | Selects profile 12 Prompt reads: Select percentage, then press [At] to select level (Or, use right/left arrows for percentage, up/down arrows for level) |
| 2. Press [S2], Percent, and enter a fade point number. | Selects a fade point |
| 3. Enter a new intensity on the keypad. | Selects an intensity for the face point |
| 4. Press [Enter] if finished or go back to step 2. |
Copying to another profile
One convenient way to create a new profile is to copy one of the existing ones to a new profile number and edit the new one. Use softkey [S6], Copy to Profile, in the Profile display to copy a profile.
Clear All
For a selected profile, Clear All changes the intensity of all fade points to undefined.18
Clear to End
For a selected profile, the Clear to End command sets as undefined the intensity of all those fade points above the selected one.18
Fill Between
When intensities in a profile are undefined, such as when you use Clear All or Clear To End, you can use Fill Between to have them automatically filled in with a linear profile. For Fill Between to work, you must have defined intensities on both sides of an undefined range (zero intensity is a defined value). Here is how Fill Between can be used to fill in undefined intensities throughout a particular range.
| Keystrokes | Action |
|---|---|
| 1. Press [S1], Profile, [1][5] | Selects profile 15. |
| 2. Press [S2], Percent, [5][0] | Selects the 50% fade point |
| 3. Press [S4], Clear to End, [Enter] | Changes all fade points above 50% to undefined. |
| 4. Press [S2], Percent, [7][5] | Selects the 75% fade point. |
| 5. Press [At] [1][0] | Sets the 75% fade point to intensity 10 |
| 6. Press [S5], Fill Between, [Enter] | Fills between the 50% and 75% fade points with a straight line. Fade points above 75% are unaffected. |
| 7. Finish profile to end. | Set inattentiveness of fade points between 75% and 100% |
Resetting a profile
Press [S7], Reset, eliminates all editing performed on a selected profile.19 When profiles 1-9 are reset, the original relationships shown under Pre- defined profiles, are restored. When profiles 10 through 32 are reset, they return to linear relationships.
18 Undefined intensities are marked ** on the Intensity line.
19 You may reset all profiles at once by selecting Clear Profiles from the Clear Functions menu.