Creating Macros in Express
You can include any key or button on the console except [Enter Macro] in a macro.96 You cannot enter slider settings or wheel movements. Each macro can contain up to 50 keystrokes. You can also link macros.
Caution: The console does not check the sequence of keystrokes to confirm that it will work. It is possible to create macros that don’t work. When you run the macro, you will receive whatever error messages are appropriate.
To avoid problems, you should plan your macro before you start recording it by determining exactly what keystrokes you want to include. You might want to do this by running through the task and writing down each keystroke.
96 Macros cannot execute MIDI commands.
Using Learn
The Learn function allows you to create a macro by performing an actual sequence of keystrokes. The console records the keystrokes as you make them. The recorded keystroke sequence can then be played by pressing the appropriate macro key. Once you record a macro in Learn mode you can edit the sequence in Macro Editing mode to adjust its operation. Learn works in any display mode except the Macro Editing display and the Designer’s Worksheet Editing display.
To create a sample macro using Learn, follow these steps:
| Keystrokes: | Actions: |
|---|---|
| 1. Press [Stage]. | Selects Live display mode |
| 2. Press [Learn]. | Prompt reads: Select macro number to learn, then press ENTER To cancel, press CLEAR |
| 3. Press [7] [Enter]. | Learning Macro 7 flashes in red in the upper left corner of the monitor Prompt reads: Select operation(s) for this macro – press ENTER MACRO when done (Wheels, trackpad and sliders are not valid entries in macros) |
| 4. Enter [Channel] [1] [Thru] [5] [At] [5] [Enter]. | Sets channels 1 through 5 at 50 percent |
| 5. Press [Macro Wait]. | Prompt reads: Enter wait time Press ENTER when done |
| 6. Press [5] [Enter]. | Inserts a five second wait into the macro Prompt reads: Select operation(s) for this macro – press ENTER MACRO when done (Wheels, trackpad and sliders are not valid entries in macros) |
| 7. Enter [Channel] [1] [Thru] [1][0] [Full]. | Sets channels 1 through 10 at Full |
| 8. Press [Macro Wait]. | Prompt reads: Enter wait time Press ENTER when done |
| 9. Press [5] [Enter]. | Inserts a five second wait into the macro Prompt reads: Select operation(s) for this macro – press ENTER MACRO when done (Wheels, trackpad and sliders are not valid entries in macros) |
| 10. Enter [Channel] [1] [Thru] [1][0] [At] [0] [Enter]. | Sets channels 1 through 10 at zero |
| 11. Press [Enter Macro]. | Concludes macro recording |
| 12. Press [M*] [7] [Enter]. | Macro 7 runs. Channels 1 through 5 rise to 50 percent. After five seconds, channels 1 through 10 rise to Full. After five seconds, levels drop to zero |
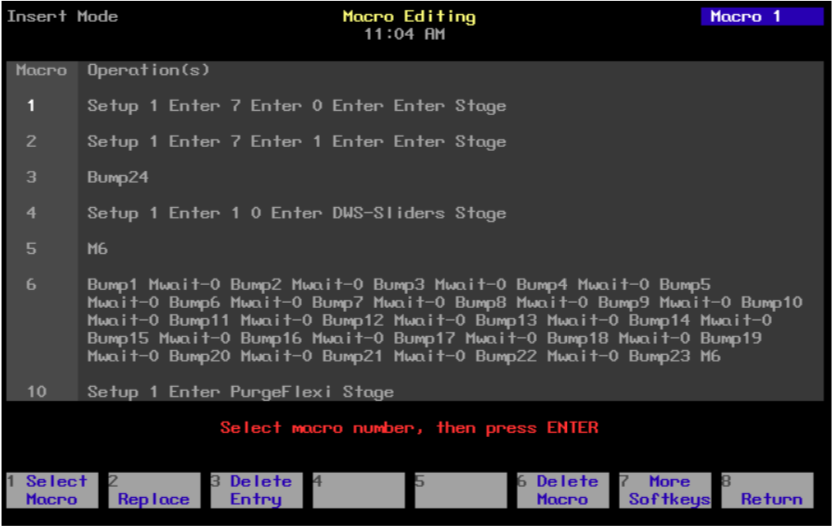
Using Macro Editing
The Macro Editing display allows you to create or edit macros without affecting channel levels. Some of the softkeys in this display, such as [S2], Replace, and [S7], More Softkeys, are for editing purposes only and cannot be entered into a macro. Others, such as [S1], Select Macro, and several softkeys available after first pressing [S7], More Softkeys, may be entered into a macro. Three keys that cannot be entered into a macro in the Macro Editing display are Enter Macro, [←], and [→].97
96 If your macro needs to contain softkeys that are unavailable in the Macro Editing display, you must use Learn to create it.
Follow these steps to create a macro to record a show to diskette:
| Keystrokes: | Actions: |
|---|---|
| 1. Press [Setup]. | Selects Setup display screen |
| 2. Select 8, Macro Editing, and press [Enter]. | Selects Macro display screen Prompt reads: Select macro number, then press ENTER |
| 3. Press [8] [Enter]. | Blank macro created Prompt reads: Select operation(s) for this macro – press ENTER MACRO when done (Wheels, trackpad and sliders are not valid entries in macros) |
| 4. Press [Setup] [3] [Enter]. | Enters setup display Macro contents line reads: SETUP 3 ENTER |
| 5. Press [1] [Enter]. | Selects Write Show To Disk Macro contents line reads: SETUP 3 ENTER 1 ENTER |
| 6. Press [Enter]. | Confirms selection Macro contents line reads: SETUP 3 ENTER 1 ENTER ENTER |
| 7. Press [Enter Macro]. | Stores macro 8 |
Macro wait
To program a pause in the macro, press [Macro Wait] at the point in the macro where you want the pause to occur. Enter the time you would like the macro to hold, then press [Enter]. Continue to enter remaining macro commands.
To program a pause in the macro, in the Macro Editing display, press [S7], More Softkeys, and insert [S8], Macro Wait, at the point in the macro where you want the pause to occur. Enter the time you would like the macro to hold, then press [Enter].
Times may be expressed in minutes and seconds, or as fractions of sec- onds (in decimal format). Times can be programmed from 0.1 seconds to 99:59 minutes. Acceptable time values include: 0.2 (.2 seconds), 00:12 (12 seconds), 5.5 (5.5 seconds), or 5:30 (five minutes, 30 seconds).
Linking macros
Any macro may end with a link to another macro. When macros are linked, the first macro runs, then the second macro follows automatically. Press the appropriate macro key at the end of your sequence to create the link. Pressing the macro key automatically ends and stores the macro.
For example, to create a macro that sets all active channels to 50 percent, fades them out, then runs another macro, follow these steps:
| Keystrokes: | Actions: |
|---|---|
| 1. Press [Setup] [8] [Enter]. | Selects Macro editing mode |
| 2. Press [1] [Enter]. | Selects macro 1 to create Prompt reads: Select operation(s) for this macro – press MACRO ENTER when done (Wheels, trackpad and sliders are not valid entries in macros) |
| 3. Press [Enter] [At] [5][0]. | Sets all active channels to 50 percent Macro line reads: ENTER AT 5 0 |
| 4. Press [Macro Wait][S7], More Softkeys, [S8], Macro Wait, [1][0] [Enter]. | Macro pauses for ten seconds Macro line reads: ENTER AT 5 0 Mwait-10 |
| 5. Press [At] [0] [Enter]. | Fades all active channels out Macro line reads: ENTER AT 5 0 Mwait-10 ENTER AT 0 ENTER |
| 6. Press [M3]. | Stores macro. Links macro to macro 3 Macro line reads: ENTER AT 5 0 Mwait-10 ENTER AT 0 ENTER M3 |
Note: You may also link a macro to a cue so the macro will run at the same time the cue does. See Linking a macro to a cue, for more details.
Using submasters in macros
Submaster bump buttons can function in macros in three different ways:
- as a normal bump button;
- to always fade a submaster to full (regardless of its current condition);
- to always fade a submaster out (regardless of its current condition).
To include a bump button that starts a timed submaster or changes the direction of a running fade, press the submaster bump button while programming the macro.
Use [S1], On Sub-Bump, to fade the submaster up, regardless of its current setting. Use [S2], Off Sub-Bump, to fade a submaster out, regardless of its current setting.
To create a macro that turns a submaster on for five seconds, then turns it off, follow these steps:
| Keystrokes: | Actions: |
|---|---|
| 1. Press [Setup] [8] [Enter]. | Selects Macro editing mode |
| 2. Press [4] [Enter]. | Selects macro 4 to create Prompt reads: Select operation(s) for this macro – press ENTER MACRO when done (Wheels, trackpad and sliders are not valid entries in macros) |
| 3. Press [S7], More Softkeys, [S1], On Sub- Bump. | Selects macro 4 to create Prompt reads: Select operation(s) for this macro – press ENTER MACRO when done (Wheels, trackpad and sliders are not valid entries in macros) |
| 4. Press [3] [Enter]. | Macro line reads: OnBump3 |
| 5. Press [Macro Wait][S8], Macro Wait. |
Macro line reads: OnBump3 Mwait-0 |
| 6. Enter [5] and press [Enter]. | Macro line reads: OnBump3 Mwait-5 |
| 7. Press [S2], Off Sub-Bump. | Macro line reads: OnBump3 Mwait-5 OffBump Prompt reads: Enter submaster number |
| 8. Press [3] [Enter]. | Macro line reads: OnBump3 Mwait-5 OffBump3 |
| 9. Press [Enter Macro]. | Records macro 4; leaves editing mode |
| 10. Press [Stage] [M4]. | Macro runs |