MIDI Time Code in Express
The console generates an internal time code in the MIDI protocol. The console also can run under external MIDI. You can have both clocks simultaneously enabled so that if ever the external time code signal stopped during a show, the internal clock would immediately take over preserving the continuity of your show.
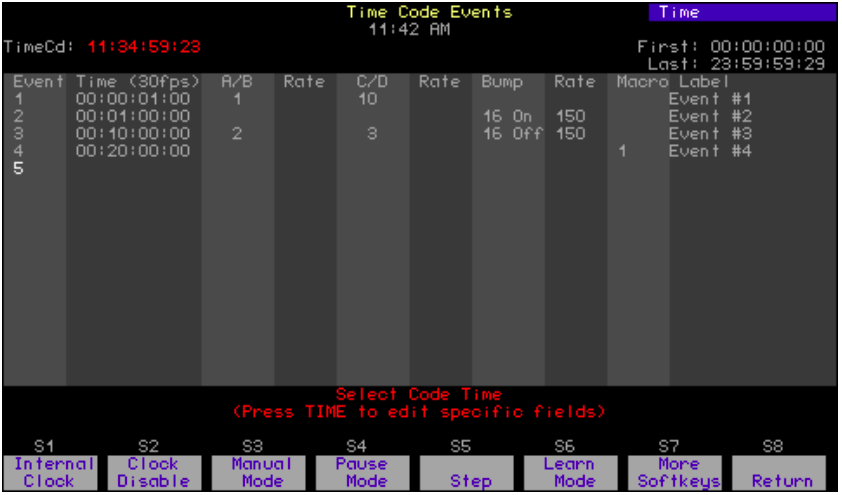
Shows designed for time code control consist of a series of events that play back at specified times. A time code program also has a modifiable loop time that ranges from 5 seconds to 24 hours. There can be as many as 3,000 time code events, with each event having any combination of cues loaded in faders (one cue for each of two faders), a submaster bump button or a macro.
Up to 32 events may be executed in a single frame.111 Event times are expressed in hours, minutes and seconds, with each second broken down into frames. For example, 01:25:30:17 is one hour, twenty-five minutes, thirty seconds and seventeen frames. Two frame rates are available in addition to the default rate, which is thirty frames per second.
Setting time code frame rate
If you are running the time code program from an external clock with internal clock backup, make sure the internal clock has the same frame rate as the external clock. The default frame rate is 30 frames per second, but you can reset it to 24 or 25 frames per second.
Reset it as follows:
| Keystrokes: | Actions: |
|---|---|
| 1. Press [Setup]. | Selects Setup display |
| 2. Press [6], Options Settings, and press [Enter]. | Selects Options Settings menu |
| 3. Press [6], Time Code Frames Per Second, [Enter]. | Prompt reads: Select Time Code frames per second, then press ENTER (1 = 30 fps, 2 = 25 fps, 3 = 24 fps) |
| 4. Press [2] [Enter]. | Time code frame rate is set to 25 fps |
111 If more than 32 events are assigned to the same frame, only the first 32 are executed in that frame, with the rest executing in the following frame or frames until all those assigned are used up. In manual mode, however, only one event is executed when step is pressed, regardless of how many are assigned.
Creating a time code program
You can create a time code program in either of two ways: by definition in the Time Code Events display or live after activating Learn Mode in the Time Code Events display. The cues, submasters or macros that you include in time code programs must be pre-recorded.
For all procedures in this chapter involving programming in the Time Code Events display, press [Setup] [1][3], Time Code Events, [Enter] [Enter] to go to that display. In the display:
- Press [Enter] to advance the cursor across the event line.
- Press horizontal arrows to move to other fields in the event line.
- Press vertical arrows to move up or down to other events.
- Press the right arrow at the end of an event line to move the pointer to the first field of the next event.
- Press the down arrow in the last event to create a new event.
Creating a program by definition
Use the following procedure to define a time code program in the Time Code Events display. A time code program created in this manner is not recorded until you leave the Time Code Events display, which sorts the program’s events as well.112
| Keystrokes: | Actions: |
|---|---|
| 1. Enter [1][0][0] [Enter]. | Selects one second as the time of the first event you want to create Prompt reads: Select A/B Cue |
| 2. Press [1] [Enter]. | Enters cue 1 for event 1 to play on the A/B fader. Prompt reads: Select A/B Rate (0 to 2000, 100 = Normal) |
| 3. Press [1][2][5] [Enter].a | Enters a rate of 125 percent of the recorded fade rate Corner reads: Rate 125 |
| 4. Press [Enter]. | Highlight moves to the C/D field Prompt reads: Select C/D Cue |
| 5. Repeat steps 1 through 4 for fader C/D. | Moves the highlight to the Bump field. Prompt reads: Select submaster number for bump event, then press [+] for ON, or [–] for OFF |
| 6. Press [1][2] [+] [Enter].b | Selects submaster 12 and turns the submaster ON. Prompt reads: Select Bump Rate (0 to 2000, 100 = normal) |
| 7. Press [Enter]. | Leaves fade rate at normal and moves the highlight to the Macro field Prompt reads: Select Macro |
| 8. Press [5] [Enter]. | Selects macro 5 to run when event plays. Prompt reads: Enter Label |
| 9. Press [Enter]. | You cannot enter a label from the console but can do so with Expression Off-Line. See Expression Off-Line, for specific details. Prompt reads: Select event number |
| 10. Press [2] [Enter]. Enter the number of an event followed by [Enter]. | Selects event 2. Repeat steps above for this and subsequent events |
a Zero stops the fade; 50 runs the fade at half its recorded rate. If no rate is entered, the cue runs at its recorded rate.
b Entering [+] sets the submaster ON; entering [–] sets the submaster OFF.
112 You can force an immediate sorting the events in the Time Code Events Display. Press [S8], Sort, to sort the events. The sort key is in the third tier of softkeys in this display, so if you don’t see it, press [S7], More Softkeys, until it appears at [S8].
Creating a program using Learn Mode
Learn Mode allows you to record macro keys, submaster bump buttons and fader [Go] keys into time code events as you go along. Because you are making real-time decisions about the timing of events, you can record a program live in Learn mode without specifying code times. When you leave Learn Mode (press the Learn Mode softkey a second time), the program is recorded with sorted event times.
Follow these steps to record a time code program in Learn mode.
| Keystrokes: | Actions: |
|---|---|
| 1. Press [S7], until [S6] reads Learn Mode. | |
| 2. Press [S6], Learn Mode. | TimeCd Learn flashes in red in the upper left corner of the screen |
| 3. If using the internal clock to time the show, press [S2], Clock Enable, to start the clock.a | The internal clock, in the upper right corner of the display, starts to run |
| 4. Go to the Stage display | |
| 5. If using an external clock, start it now. You must have time code input enabled as explained under External time code clock. | |
| 6. Select the cues, submasters and macros you want to record as time code events. | |
| 7. At the exact moment in the program that you want an event to begin, press [Go] for the fader in which you want the time code event to run the cue, press the submaster’s bump button, or start the macro. | Each button press is recorded as an event in your time code program |
| 8. Press [Setup] [1][3] [Enter] [S6], Learn Mode. | Returns to Time Code Events display and deactivates Learn mode; edit the events as necessary |
a After starting the clock, you may press [Record] to enter a blank event.
Sorting/recording events
Events are recorded when sorting is done. Sorting is done when you leave the Time Code Events display or you end the time code Learn Mode. You can also force sorting without leaving the Time Code Events display.
A reason for sorting before leaving the Time Code Events display arises when you are playing the program you are currently editing. If the program has not yet come to the place where you made the edits, those edits will be effective on that pass. If, however, the program has already passed the place where you made the edits, those edits will not be effective until the next pass of the program. In some cases, you may want to reset the event list pointer, which is explained below.
To sort, note if your softkeys show Sort at softkey [S8]. If not, press [S7], More Softkeys, one or two times until that softkey appears. Then press [S8], Sort.
Editing time code programs
Edit time code programs in the Time Code Events display. While editing a time code program, you can run it simultaneously because the editing procedure is buffered in memory. Your edits, however, may not be effective immediately upon leaving the Time Code Events display because the program is controlled by the events list pointer. If that pointer has already passed an event you edited, the edits don’t take effect until the event list pointer is reset to the beginning of the program.
Re-setting the event list pointer
The event list pointer jumps through time code events regardless of what the time code signal is doing. For example, if the program’s next event is 100 frames away, the event list pointer resets immediately to that frame while a steady time code signal moves to it uniformly, frame by frame.
You can interrupt the program by interrupting the time code signal that drives it. If you are using the console's internal clock, you only need to disable that. Likewise, if you are driving the program with an external time code clock, you need only disable the external clock. If using both clocks, you need to interrupt both the internal and the external time code signals to interrupt the program.
Please note that when you disable an external clock while relying on the internal clock for backup, the resynchronization of the clocks cannot occur in less than five seconds after the external signal is restored. Any events scheduled during that resynchronization period will be missed on that pass but will be picked up on the next pass of the program.
If you have been editing the program, the events list pointer may need to be reset. Without leaving the Time Code Event Display and without disabling the clock, you can force the event pointer to reset with the Learn Mode softkey. This works because when you leave Learn Mode by pressing softkey [S6] a second time, you force a resorting of time code events in the program and a reset of the event pointer. There is no need to actually use Learn Mode—just press the Learn Mode softkey twice in succession to do the job.
Resetting loop time
A time code program loop plays from the first event time to the last event time, then resets and plays again. Any events with code times before the first time or after the last time are ignored. The resettable loop time can run from five seconds to 24 hours.113
If you are running a time code program from an external clock, the external clock will control the loop time with its own first event time and last event time settings. To provide synchronized internal clock backup, you must set the first event time and last event time in the Time Code Events display to correspond exactly with those times set for the external clock. Otherwise events might be missed until the two clocks synchronize. It takes at least 5 seconds for external and internal clocks to synchronize.
Use this procedure to set loop times either when running on the internal clock alone or when running from an external clock with internal clock backup.
| Keystrokes: | Actions: |
|---|---|
| 1. Press [S7] until [S8] reads Reset Loop. | |
| 2. Press [S8], Reset Loop. | Prompt reads: Enter first valid frame of internal time, then press ENTER. (Press TIME to edit specific fields) |
| 3. Press [1][0][0][0]. | Sets ten seconds as the starting time for the time code program |
| 4. Press [Enter]. | Prompt reads: Enter last valid frame of internal time, then press ENTER. (Press TIME to edit specific fields) |
| 5. Press [5][0][0][0][0] then press [Enter]. | Sets the time code program to reset at the five minute mark |
113 If the loop is set to less than five seconds, the internal clock resets it to five seconds from the loop’s starting time.
Deleting time code events
Follow these steps to delete time code events:114
| Keystrokes: | Actions: |
|---|---|
| 1. Press [S7] until [S6] reads Delete Event. | |
| 2. Press [S6], Delete Event. | Prompt reads: Select event number(s) to delete, then press ENTER To cancel, press CLEAR |
| 3. Press [5] [And] [6] [Enter]. | Enters events 5 and 6 to delete Prompt reads: To confirm, press ENTER To cancel, press CLEAR |
| 4. Press [Enter] to delete the event or [Clear] to leave it unchanged. |
Inserting time code events
Insert a time code event into an existing time code program with this procedure:
| Keystrokes: | Actions: |
|---|---|
| 1. Press [S7] until [S1] reads Insert Event. | |
| 2. Press [S1], Insert Event. | Prompt reads: Select event number to insert, then press ENTER To cancel, press CLEAR |
| 3. Press [4] [Enter].a | Prompt reads: Select number of events to insert, then press ENTER To cancel, press CLEAR |
| 4. Press [2]. | Indicates that you wish to insert two new events Corner reads: Insert 2 |
| 5. Press [Enter]. | New events 4 and 5 are inserted; all following events are renumbered |
a The new event(s) will be inserted before event 4.
114 The Clear Time Code Events menu option on the Clear Functions menu allows you to delete all recorded time code events. To do so, press [Setup] [4] [Enter] [1][3] [Enter] [Enter].
Copying time code events
If you are creating a series of similar time code events, you may find it easier to create one event and then copy that as the basis for additional events.
Follow the procedure below to copy a selected event or range of events to different code times:
| Keystrokes: | Actions: |
|---|---|
| 1. Press [S7] until [S2] reads Copy Event. | |
| 2. Press [S2], Copy Event. | Prompt reads: Select event number(s) to copy, then press ENTER. To cancel, press CLEAR |
| 3. Press [1] [Thru] [5] [Enter]. | Selects events 1 through 5 to copy Prompt reads: To copy selected event(s), select time and press ENTER. To cancel, press CLEAR |
| 4. Press [Time] [Time] [2][5]. | Selects 25 seconds for the first event to copy |
| 5. Press [Enter]. | Copies event 1 to a new event starting at 25 seconds; the rest of the events maintain their original relationship in time |
Moving time code events
Follow this procedure to move a selected event or range of events from one code time to another. The event will move to the new time when you sort the event list or leave the Time Code Events display.
| Keystrokes: | Actions: |
|---|---|
| 1. Press [S7] until [S3] reads Move Event. | |
| 2. Press [S3], Move Event. | Prompt reads: Select event number(s) to move, then press ENTER To cancel, press CLEAR |
| 3. Press [1] [Thru] [5] [Enter].a | Selects events 1 through 5 to move Prompt reads: To move selected event(s), select time and press ENTER. To cancel, press CLEAR |
| 4. Press [Time] [Time] [Time] [5]. | Selects five minutes for the first event to move |
| 5. Press [Enter]. | Copies event 1 to a new event starting at the five minute point; the rest of the events maintain their original relationship in time |
a. To move a single event, you may also use the arrow keys to highlight the code time for the event you want to move, then press [+] or [–] until the new code time is displayed in the keypad prompt window, and press [Enter]. Or, use the keypad to enter the new time, then press [Enter].
Editing events
You may add, change or delete events in the Time Code Events display.115 The changes are effective when you quit the Time Code Event display or press the Learn Mode softkey twice.116
Follow the procedure below to edit a time code program:
| Keystrokes: | Actions: |
|---|---|
| 1. Use the arrow keys to highlight the field of the item you want to edit. | Selects field to edit |
| 2. Enter the new contents of the field. If you wish to delete the item, press [Clear]. | |
| 3. Press [Enter], or use the arrow keys to select another field. |
Range editing
If you wish to apply a change to a range of events, you may select multiple events and edit them all in a single step.
For example, if you wanted to set the rates for your first ten events to 50 percent, proceed as follows:
| Keystrokes: | Actions: |
|---|---|
| 1. Press [S7] until [S1] reads Select Event. | |
| 2. Press [S1], Select Event. | Prompt reads: Select event number |
| 3. Press [1] [Thru] [1][0]. | |
| 4. Press [S4], Rate. a | The first rate field is highlighted Prompt reads: Select A/B Rate |
| 5. Press [5][0]. | Sets the rate to 50 percent |
| 6. Repeat steps 6 and 7 for the remaining rate fields. |
a Alternatively, you can press other softkeys at this point to edit code time, cue, submaster or macro settings.
115 The console does not permit labeling directly. Insert labels or edit in the label field with Expression Off-Line. See Expression Off-Line, for more information.
116 Pressing the Learn Mode key twice is a shortcut way to reset the event list pointer. See Re-setting the event list pointer, for information.
Or, if you wanted to move ten events five seconds later in a program:
| Keystrokes: | Actions: |
|---|---|
| 1. Press [S7] until [S1] reads Select Event. | |
| 2. Press [S1], Select Event. | Prompt reads: Select event number |
| 3. Press [1][1] [Thru] [2][0]. | |
| 4. Press [S2], Code Time. | The time field is highlighted Prompt reads: Select Code Time (Press TIME to edit specific fields |
| 5. Press [Time] [Time]. | Selects the seconds field for all ten events Prompt reads: Select seconds |
| 6. Press [+] five times. | Each time you press [+], the seconds field for each event increases by one second |
| 7. Press [Enter]. | Sets the new times |
Running a time code program
You can run a time code program in three ways: using the console’s internal time code clock, using an external time code clock or manually.117 When using the external time code source, the internal clock serves as a back up to continue the program if the external clock fails.
Internal time code clock
Follow this procedure to run a time code program using the console’s time code clock:
| Keystrokes: | Actions: |
|---|---|
| 1. Press [S1], Internal Clock | Prompt reads: Set internal clock, then press ENTER (Press TIME to edit specific fields) |
| 2. Use the keypad or the [+] and [–] keys to enter the code time of the first event you want to view, or enter zero to start at the beginning of the time code program. | |
| 3. Press [Enter]. | |
| 4. Press [S2], Clock Enable, to start the internal clock running at the desired code time. a | Each time code event will run at its recorded time |
a This softkey toggles between Clock Enable and Clock Disable. A disabled clock is indicated by the message Clock Disabled in the upper left corner of the display and an unchanging TimeCd value. When the clock is enabled and runs, the TimeCd value runs up.
117 As you play a time code program, you may find it useful to include the Time Code List in the Stage and Blind displays. Display the Time Code List by pressing [Setup] [6] [Enter] [7] [Enter] [1] [Enter].
External time code clock
When running a real time program with an external clock, the event list pointer jumps to agree with the frame of the external clock. Sometimes the timing signal is not yet present even though the external clock is enabled, causing a delay in the execution of the program. When that happens, you will see a Waiting for input message at the upper left corner of the Time Code Events display. When the external signal begins, the message disappears and the TimeCd value begins to run.118
You can lose events on the first pass through the program if the external signal starts before the program is ready.119 That happens because the event list pointer moves with the external signal and has already passed the code time of one or more events. These missed events, however, will be played in subsequent passes through the program.
Enable an external clock with the procedure below. Note that the procedure also enables the console’s internal clock, which can then provide backup if the external clock signal fails. The order in which these two clocks is enabled is important. Also note that it takes at least five seconds for the external and internal clocks to come into synchronization, so any events during that initial synchronization period could be missed.
| Keystrokes: | Actions: |
|---|---|
| 1. Press [Setup]. | Selects Setup display |
| 2. Press [6], Options Settings, and press [Enter]. | Selects Options Settings menu |
| 3. Press [5], Time Code Input, [Enter]. | Prompt reads: Enable/disable external time code input 0=Disable, 1 = Enable MIDI Time Code (MTC) |
| 4. Press [1] [Enter]. | Enables the external MIDI time code clock |
| 5. Press [S8], Return. | Returns to the Setup display |
| 6. Press [1][3] [Enter]. | Selects the Time Code Events option |
| 7. Press [S2], Enable Clock. | Enables the internal time code clock |
118 You can verify which clock is running the program by the color of the Timecd number in the upper left corner. A red number means the internal clock is running the program; a green number means that the external clock is running the program.
119 Losing events on the first pass can also happen if you edit a program that is running at the same time. To avoid that, see Re-setting the event list pointer.
Manual playback
The [Manual Mode], [Pause Mode], and [Step] softkeys allow you to manually control playback of time code events without a time code source enabled. Press [Time] to select an event out-of-sequence by specifying its code time.
Use either the Manual Mode or Pause Mode softkeys to ensure that neither an internal nor an external time code clock can run events while you are creating or editing a time code program.
| Keystrokes: | Actions: |
|---|---|
| 1. Press [S3], Manual Mode or... Press [S4], Pause Mode. |
Stops the time code input and resets the console to the first recorded time code event, or... Interrupts time code input at the current time code event |
| 2. Press [S5], Step. a | Advances to the next recorded time code event, |
| 3. Repeat step 4 to advance sequentially through time code events. | |
| 4. If you are in Manual mode, press [S3], Manual Mode. If you are in Pause mode, press [S4], Pause Mode. | Returns to normal operation and the time code resumes |
a In Manual mode, pressing [Step] starts with the first recorded time code event and proceeds in recorded order. Only one event is executed each time you press [Step].