How to create a Conductor upgrade or image USB stick in UpdaterAtor
Overview
The ETC Conductor can be updated using two different methods: upgrading or imaging. The upgrade method only updates Conductor with new files that bring bugfixes and new features, and leave all settings in places. The image method wipes the Conductor's hard drive and re-writes it with all fresh files. All settings are set to defaults with this method.
Unfortunately the upgrade method cannot be used for all versions. The method used will vary depending on the software version already on Conductor, and the software version being updated to. Refer to the product release notes to determine which method you should use.
Find instructions below for creating an upgrade or image USB stick in UpdaterAtor. Both methods require UpdaterAtor to be installed on an Internet connected computer.
Upgrade USB Stick
This process requires a USB drive that has at least 500MB of free space. It can have other files on the USB drive, and nothing is deleted or overwritten during this process (unless it already has Conductor upgrade files on it, which would get overwritten). Also this process always downloads the files for the latest software version available. It is impossible to create an Upgrade USB Stick for a previous software version.
- Plug the USB drive into your computer
- Open UpdaterAtor
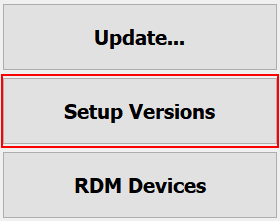
- Click on "Setup Versions" in the top-right corner
- Click the line that says "Conductor"

- NOTE: this file is not necessary to create an Upgrade USB Stick.
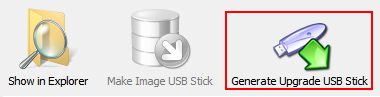
- Click the button that says "Generate Upgrade USB Stick"
- All the necessary files will begin downloading from ETC's servers, and will show progress for each file above the "Done" button. This can take 10 minutes or longer depending on your internet connection speed.
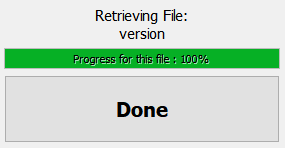
- When all the files are finished the status will update and say "Conductor files retrieved"

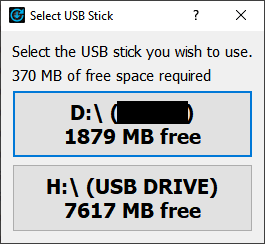
- A small window will pop up asking you to Select a USB Stick. It will show any USB drives connected to your computer, as well as the available free space.
- After choosing your drive the status will change to "Writing files to USB stick" with a progress bar. Once complete it will update to "All Conductor files copied"
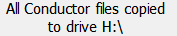
- At this point is is safe to close UpdaterAtor, and remove the USB drive from your computer.
Instructions for upgrading a Conductor can be found in the product release notes.
Two folders are created on the USB drive: Archive, and repo. Once the update is completed on the Conductor, if you want to free up space on your USB drive simply delete these two folders.
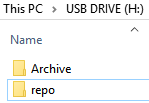
Image USB Stick
This process requires a USB drive that is a minimum of 8GB in size. The entire drive will be formatted and overwritten so backup any files on the drive you don't want to lose before continuing.
- Plug the USB drive into your computer
- Open UpdaterAtor as Administrator
- Many Windows machines, especially running Win10, will encounter an Access Denied Error when trying to create the image USB stick if it's not run as Administrator.
- Click on the "Setup Version" button in the top-right corner
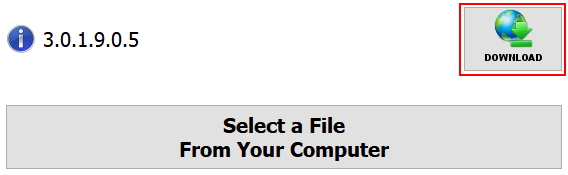
- Click on the line that says "Conductor". If you have no Conductor image file present on your computer it will say "File Not Found", otherwise will list the version number of the file on your computer. If the version listed matches the one you want, skip to step 8 to proceed with creating the USB Image Stick.
- In the bottom-left click the "Download" button next to the version you want to download. Image file size varies for different versions, and could be between 1.7GB to 3.5GB. Download speed will be mostly impacted by your internet speed.
- While the file downloads you'll get a progress update above the "Done" button in the bottom-right.
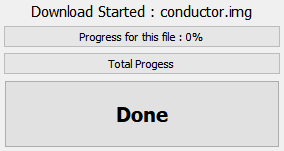
- When finished the software version selection in the bottom-left will change from a Download button to "Installed", and the Conductor line in the top half of the window will update to show the version number downloaded.
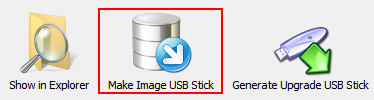
- Click on the "Make Image USB Stick" button
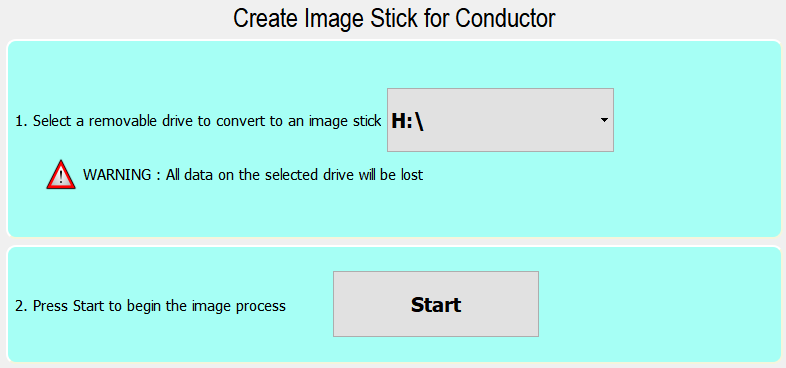
- A window will pop up which prompts to select your USB drive, and then click the "Start" button
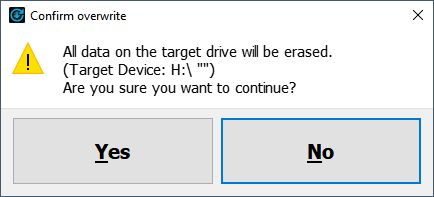
- Choose "Yes" on the prompt to Confirm overwrite
- As the creation progresses you'll get a status

- Once the process has finished click the "Done" button. At this point you can safely close UpdateAtor and remove the USB drive
The image process creates multiple partitions on the USB drive, including one which is only readable in Linux, which is the underlying OS of Conductor. If your computer prompts you to format a new drive letter you don't recognize after the image process completes in UpdaterAtor, DO NOT click format. Click cancel instead!
Clicking format would re-write that partition and you'll have to start the image process in UpdaterAtor over.