SmartLink LinkPower Supply Kit Installation Procedure
Note: You may have only one station power source on the SmartLink network. This source may be either the LinkPower Supply (S-LPS) or a SmartLink Station Power Module (S-SPM) which powers up to 16 SmartLink stations. As well, you may have up to four SmartLink host products in a SmartLink system. One SmartLink host product (SmartPack, SmartSwitch, Unison DRd with SmartLink or Sensor + with SmartLink) in the system must have a LinkPower Supply or Station Power Module installed for wall station power.
Due to the similar design for the SmartPack Wall Mount and the SmartSwitch Relay Panel control terminations, the following instructions may be used for either product.
Installation Procedure
The LinkPower supply kit includes a LinkPower supply and four screws.
Step 1: Remove power from the control electronics.
- For a SmartPack Wall Mount, turn the Standby breaker off.
- For a SmartSwitch relay panel, turn the circuit breaker off at the breaker panel.
Step 2: Remove the two screws securing the I/O panel to the chassis.
Step 3: Fold the I/O panel down to reveal the control terminations.

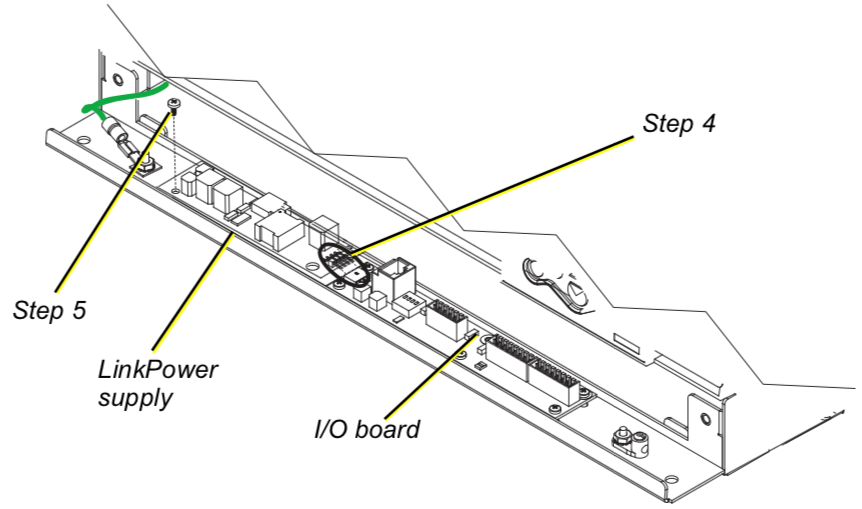
Step 4: Angle the LinkPower supply board approximately 10° and insert the four pins as found on the LinkPower supply into the receptacle on the I/O board.
Step 5: Align the LinkPower supply with the four screw mounts located on the I/O panel and secure with the four screws provided. Do not over tighten the screws.
Step 6: Close the I/O panel and secure with the two screws.
Step 7: Re-apply power to the control electronics.
