Cue Stack Guide for Foundation
Working with the Cue Stack
Cues are used to automatically change the rigging look on stage. These looks can be stored and then called up in a sequential fashion (each cue is a step in the sequence).
Cues are stored in the cue stack according to their number which can range from Cue 0.01 to Cue 999.99. Cues are created and edited from the lower portion of the C ue Stack screen using the cue command buttons.
Cues can store trims or specific positions for any given channel. For ease of editing, the use of trims when building cues is highly recommended.
When viewing the Cue Stack screen, the information presented can be divided up into a top and bottom section. generally speaking, the top section provides information on where everything will be at the end of a cue while the bottom section provides information on how it all gets there (displaying dynamic information such as cue timing and speed).
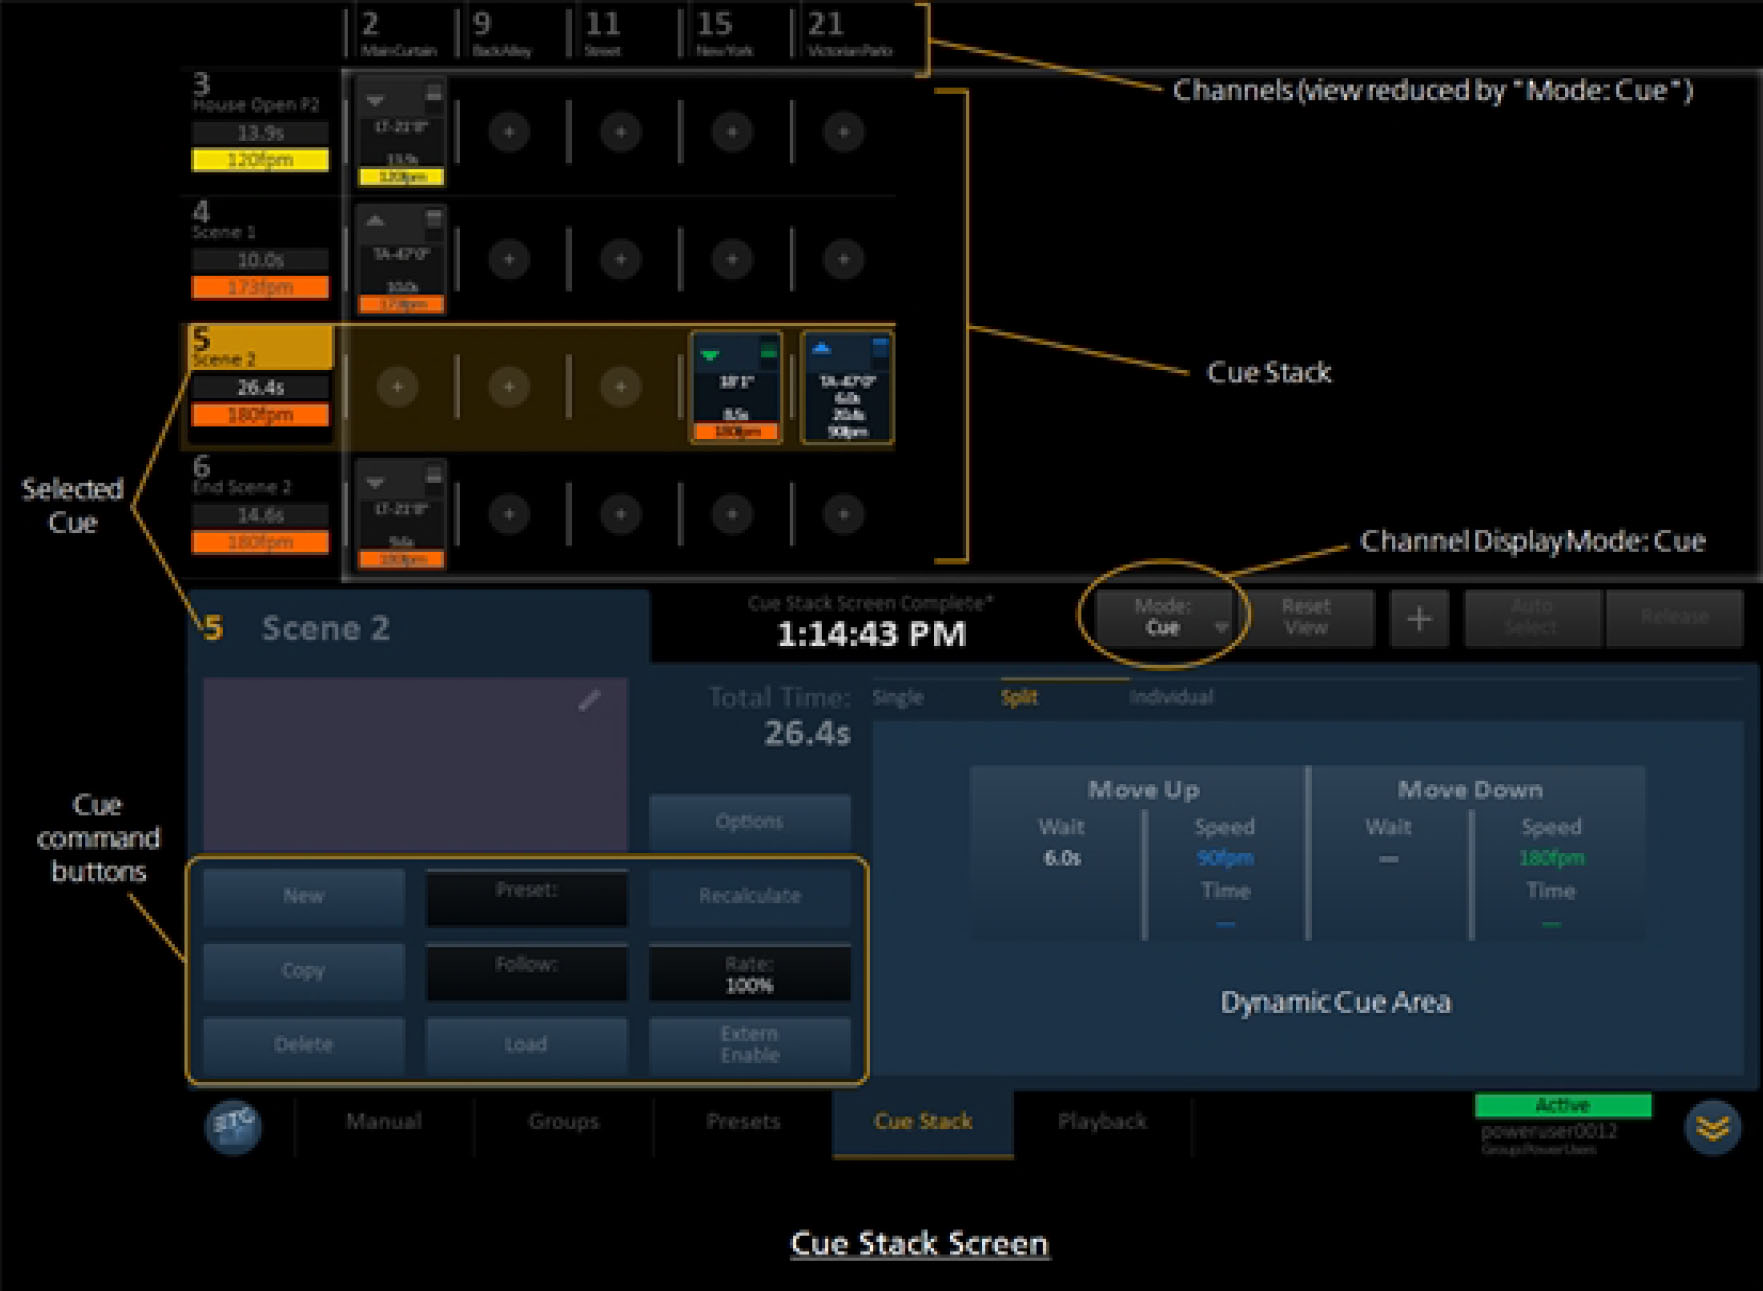
Unlike presets, cues can have specific timing associated with them as a whole or on an individual channel basis. They can also have different specified times for up moves and down moves (known as "split times"). Cue speed and timing information can be viewed in the Dynamic Cue Area found in the lower right portion of the Cue Stack screen.
Cues are represented by cue icons.
Channel data within cues is represented by cue channel icons.
Once recorded, cues are recalled from the Playback Screen.
A cue stack is saved with the show file.
NOTE: When you start building your cue stack, your first cue should be a " Setup cue," which specifies a starting position for all channels which will be used in your
show. A setup cue ensures that all motors with moves in the show start at the same position each time the show is run. Therefore channel and cue speed, timing, and direction data will be consistent from the start of the show.
Creating Cues
Cues are created from the Cue Stack screen. Be sure to read about using Setup Cues in your cue stack.
To create a cue:
- Press the "New" button. The "New Cue" dialog will open.
- Enter the desired cue number and name in the appropriate field. An alpha-numeric keyboard will appear when you press either field. Cue numbers can range from 0.01 to 999.99.
- Press "Create" to create the new cue. The cue will appear in the cue stack and will be selected.
Once created, you can start adding channel content to your cue.
Add Cue Content
Once a cue has been created, you can begin to add channel content to it.
NOTE: ETC recommends that you use trims when building cues, rather than specific positions. Doing so will offer a much faster way to update cues. Trims represent a universal way to update a motor position throughout all references. If a desired position changes, trim-based cues can be updated by altering a single referenced trim position. Whereas with specified positions, all cues must be updated manually.
To add channel content to a cue:
- Select the "+" symbol in the selected cue line for a channel you wish to include movement for in the cue. You may press and drag the channel row at the top of the cue stack to view more available channels. Once the "+" is pressed, the motor position dialog will open.
- Enter the desired position for the motor to move to. Using trims for this is highly recommended as it will facilitate faster edits. You can choose from the four available trims; or you can choose from other trims by pressing the "Trims..." button. You can also enter a specific position by pressing the position field; you can use the current position by pressing "Current"; you can choose from the four available trims; or you can choose from other trims by pressing the "Trims..." button.
- Press "Ok". The dialog closes and the motor position information will appear in the cue.
- Repeat steps 4-6 until all desired channels have position information recorded in the cue.
- Repeat all of these steps to create more cues in the cue stack.
NOTE: It is not necessary to save a cue. Once channel data is added, it is stored in the cue. However, it is always good practice to save your show file on a regular
basis.
If you want to adjust timing for any cue, please read the section on Cue Timing.
If you want to specify the speed for any cue, please read the section on Cue Speed.
Editing Cues
Editing cues is essentially the same as adding content to a cue. Cues are edited from the Cue Stack screen.
To edit an existing cue:
- Select the desired cue in the cue stack.
- Add or remove channels as desired.
- To add a channel, press the "+" symbol in the selected cue line for a channel you wish to include movement for in the cue and enter a position in the corresponding dialog.
- To remove a channel, press the cue channel icon for the desired channel and press "Remove" in the corresponding dialog.
- Change the position setting for any included channel(s).
- Press the cue channel icon for the desired channel. The motor position dialog will open.
- Alter the desired trim or specific position.
- Press "Ok".
Once changes are made, they are stored in the cue. Be sure to save your show file periodically while editing.
Delete Cue
Cue can only be deleted from the Cue Stack screen.
To delete a cue:
- Select the cue in the cue stack. The cue will be highlighted in gold.
- Press "Delete". A confirmation dialog will open.
- Press "Yes" to delete the cue. Press "Cancel" to abort deletion.
CAUTION: If you delete a cue, certain motor movements from this cue will not be executed and therefore certain motors will not necessarily be at the expected position when playing subsequent cues. Once you delete a cue make sure that there are no problems with the playback of the entire cue stack.
Copy Cue
Cues can be copied as new cues in the cue stack. Copying cues is preformed from the Cue Stack screen.
To copy a cue:
- Select the cue in the cue stack. The cue will be highlighted in gold.
- Press "Copy" in the cue command buttons. The "Copy Cue" dialog will open. The next available whole numbered cue will be automatically entered.
- If a different cue number is desired, press the "Number" field to enter a different cue number.
- Press the "Name" field if you wish to specify a different name for the cue.
- Press "Create" to copy the cue. Press "Cancel" to abort the copy. Once created, the new cue will appear in the cue stack with the contents of the original cue.
Load Cue
Once created, cues can be loaded from the C ue Stack or Playback screens. Loading a cue prepares the console to execute the contents of that cue.
Loading a cue from Cue Stack
To load a cue from the Cue Stack screen:
- Select the cue in the cue stack. The cue will be highlighted in gold.
- Press "Load" in the cue command buttons. The screen will switch to "Manual" and both "Go" buttons will illuminate. The cue is now loaded and ready to play back.
See " Playing Back from Cue Stack"
Loading a cue from Playback
To load a cue from the Playback screen:
- Select the cue in the cue stack. The cue will be highlighted in gold.
- Press "Load" in the cue command buttons. Both "Go" buttons will illuminate. The cue is now loaded and ready to play back.
See " Playing Back from "Playback"
NOTE: In playback, loading a cue out of sequence will move all motors to the location where they should be when this cue is on stage, just as if the cue stack was played back in sequential order up to this cue. Therefore motors that are not stored in this cue may also move to a target position when the cue is loaded out of sequence.
Setup Cue
Setup cues are used to move motors to their starting locations at the top of a show. They also establish which motors will be used in the cue stack. In order to play cues in Playback, you must create a setup cue (or multiple setup cues) so that all motors used in the show are sent to a known starting position.
NOTE: Building a setup cue first will help you when programming subsequent cues. Once you have established what channels are used in your cue stack (from your setup cue), you can use the " Mode: Cue" button to reduce the visible channels and therefore this requires less left-right scrolling when programming cues.
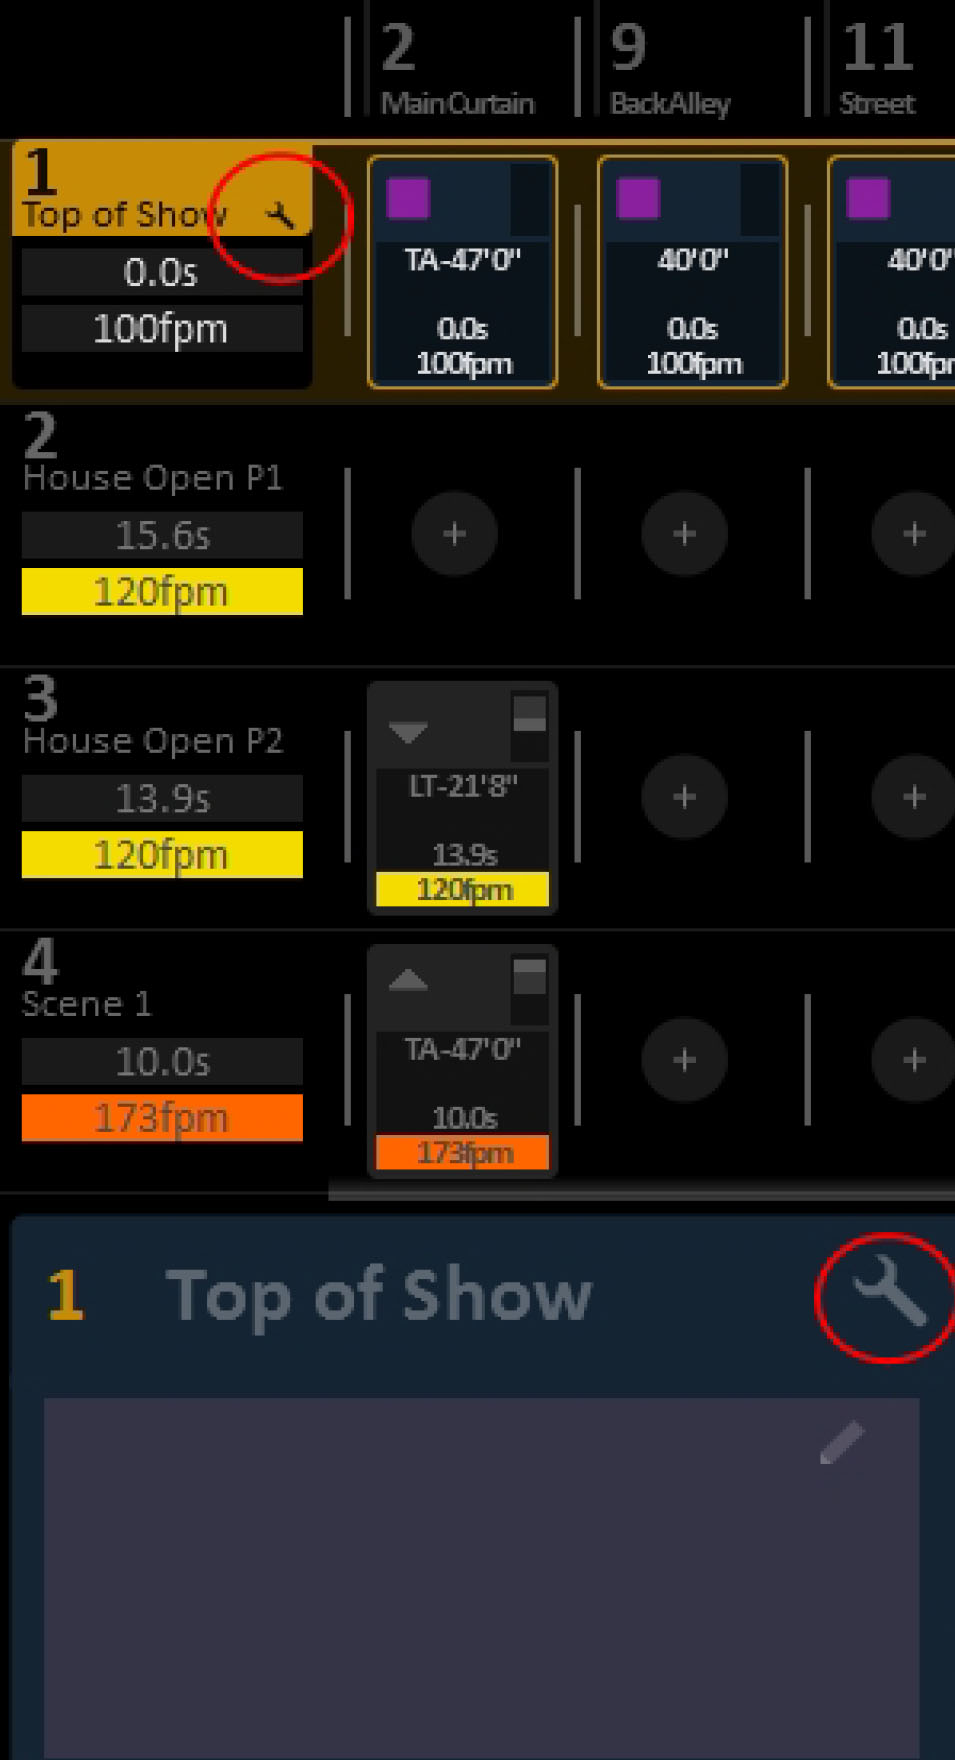
Designating Cues as Setup Cues
Once you have created a cue, you can designate it as a setup cue. Doing so will allow the cue to be executed in Playback even if it has motors that have not yet been used or that are not at their expected position.
To designate a cue as a setup cue:
- Press "Cue Stack" to view all recorded cues in the show.
- Select the cue you wish to designate as a setup cue. The cue will highlight in gold.
- Press the "Options" button in the cue command buttons. The "Cue Options" dialog will open.
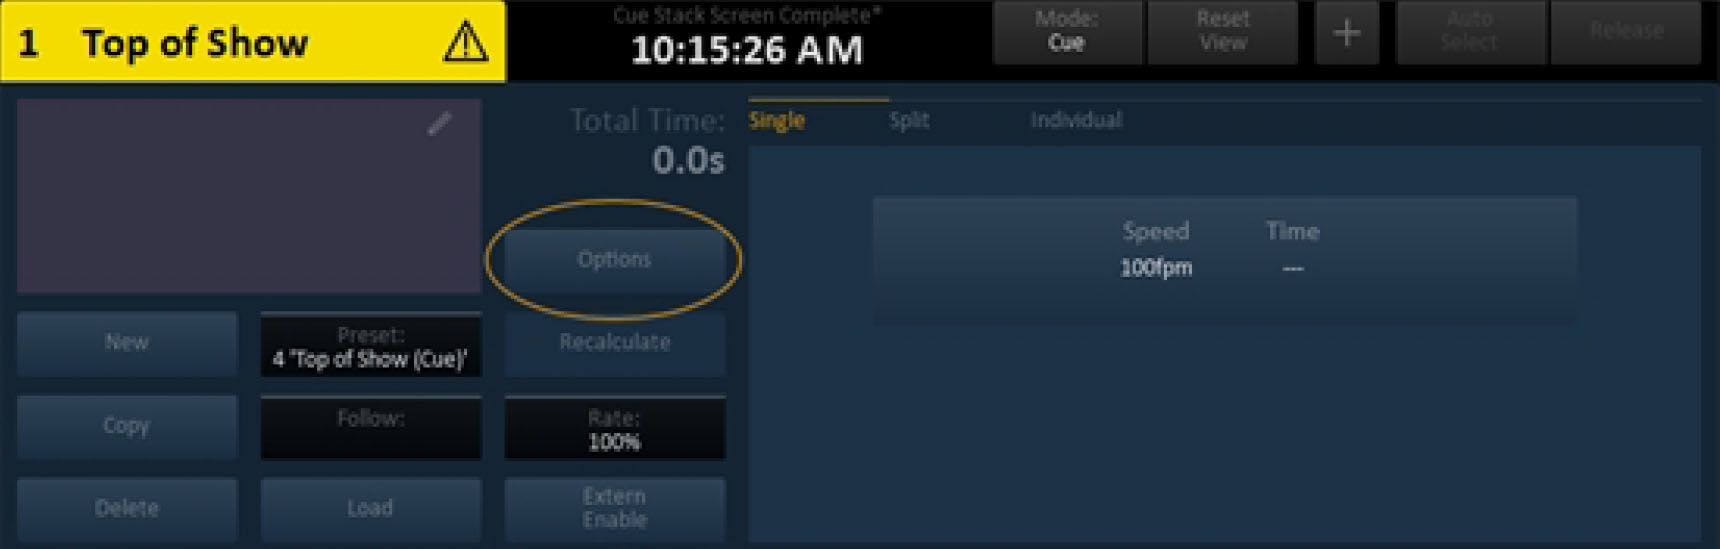
- By the "Setup Cue:" heading, press the box next to the phrase "Cue can run in Playback even with motors used for the first time."
- Press "Ok". The dialog will close. The selected cue will now have a small wrench visible in the cue icon; this indicates that the cue is now a setup cue.
Building Setup Cues
A setup cue (or cues) should be the first cue in your cue stack as it specifies the starting position for all motors that are used throughout the show. Once built, you must designate setup cues using the cue "Options" button found in the cue command buttons.
Once designated as a setup cue, Foundation will treat such cues differently when executed in Playback.
If you cannot include all motors used in the show in a setup cue (for example: due to system limitations on the maximum number of moving motors), you should create several setup cues until all motors in the show have been accounted for and are in their respective initial
starting position.
To build a setup cue:
- From the Manual screen, position all motors used in the show to their desired starting positions. ETC recommends that you record these motor positions as trims to ease editing later.
- Press "Cue Stack". The Cue Stack screen will appear.
- Press "New". The "New Cue" dialog opens.
- Press the "Number" field to enter a number for the setup cue. This number should be lower than the first existing cue in your system.
- Press the "Name" field to enter the name of the cue (such as: "Setup1")
- Press "Create". The cue will be created.
- In the setup cue row, press the "+" for a channel that you wish to include in the cue. A motor position dialog will open.
- Enter the desired position for the channel in the cue. You may use trims, current position, or a specific position. For ease of editing, the use of trims when building cues is highly recommended.
- Press "Ok". The motor position will be recorded.
- Repeat steps 8-10 for any other channels you wish to include in the cue.
NOTE: It is not necessary to save a cue. Once channel data is added, it is stored in the cue. However, it is always good practice to save your show file on a regular basis.
- If system motor limits prevent you from including all motors used in the show in a single setup cue, repeat steps 1-10 to create additional setup cues.
- Designate the cue as a setup cue. See " Designating Cues as Setup Cues"
The setup cue can now serve as a "universal start" position for all channels used in the cue stack. Play it back before the start of each show to set all motors in position.
Cues offer the ability to control the timing of any motor movement. Timing can be altered on a cue basis or on an individual channel basis or both. Cues can also have different times for up or down moves, which is referred to as split times.
Timing information can be viewed in the Dynamic Cue Area found in the lower portion of the Cue Stack screen.
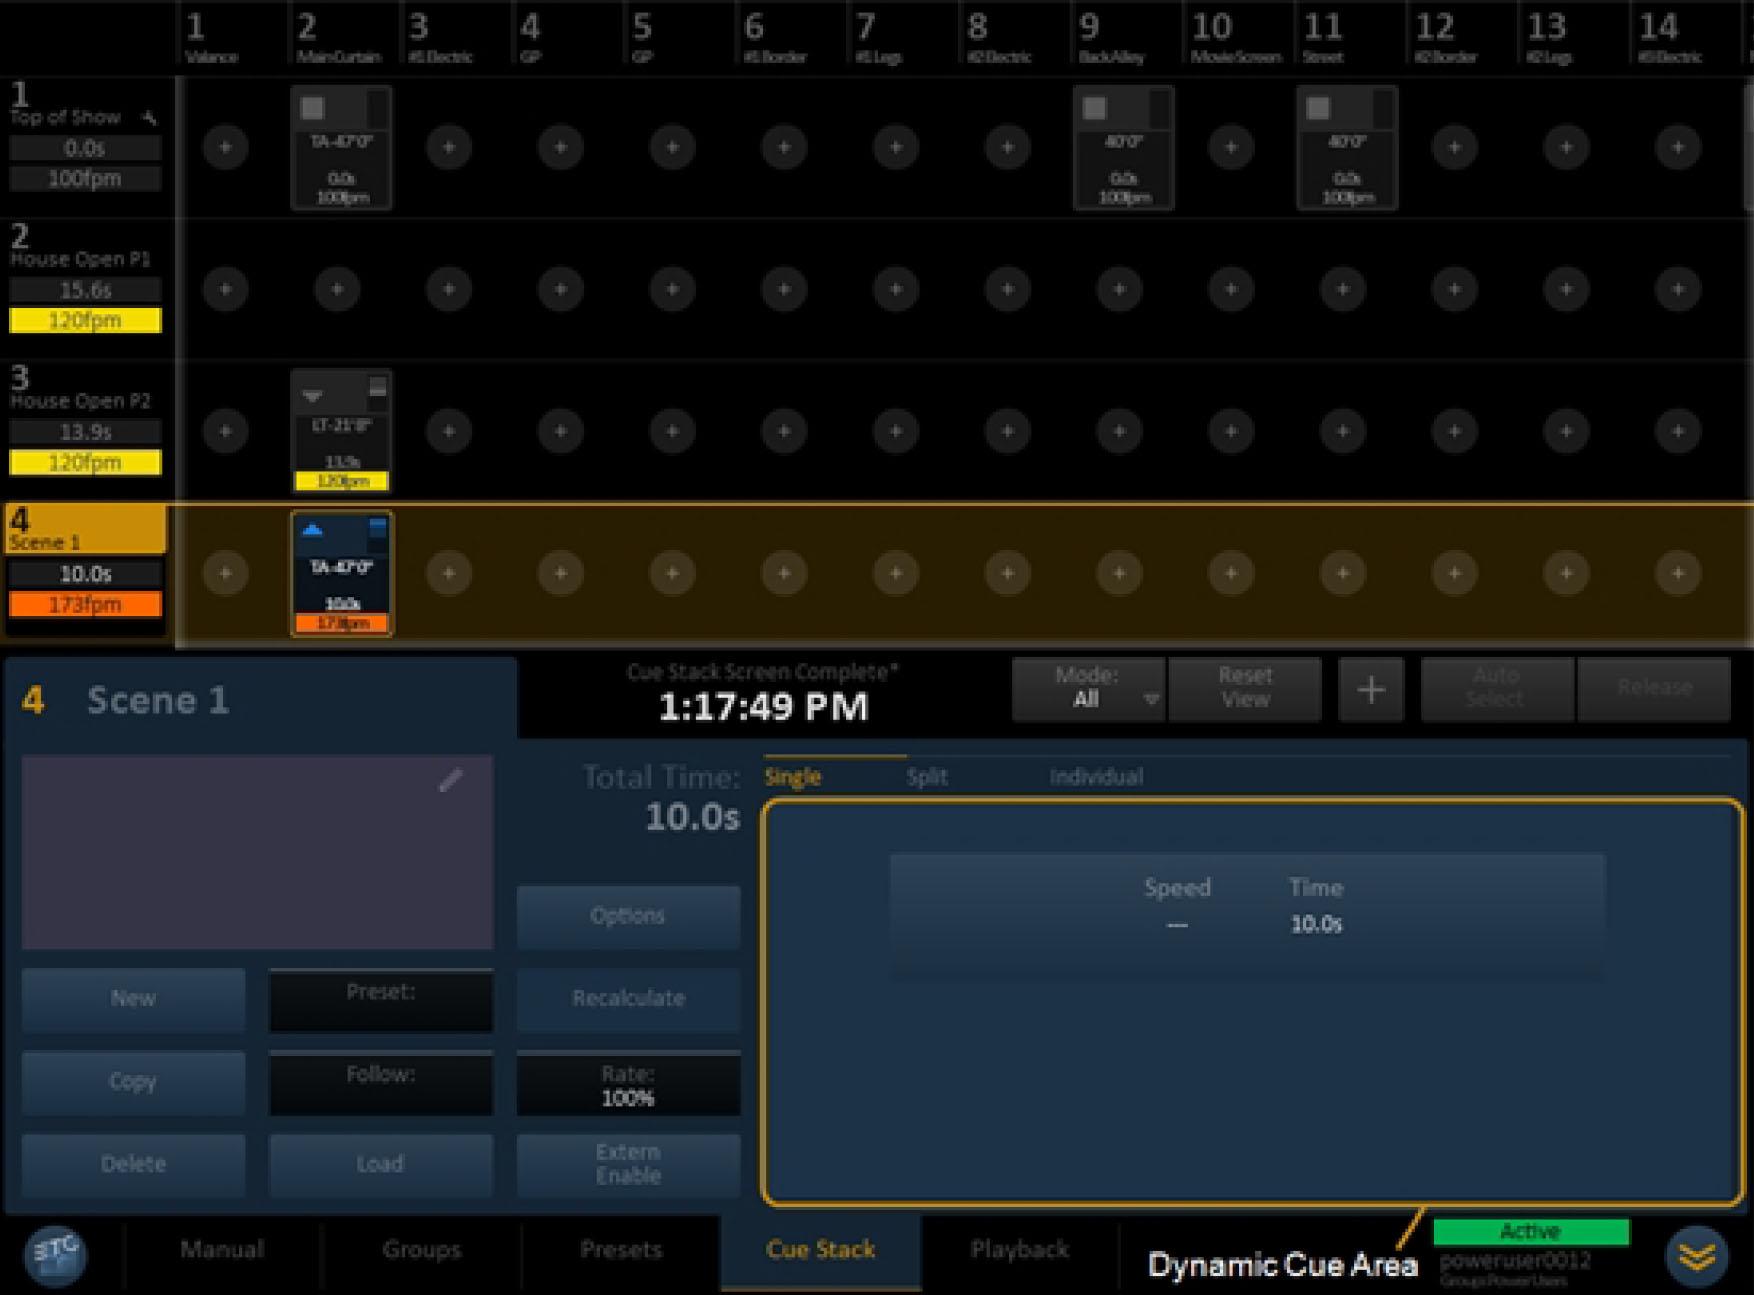
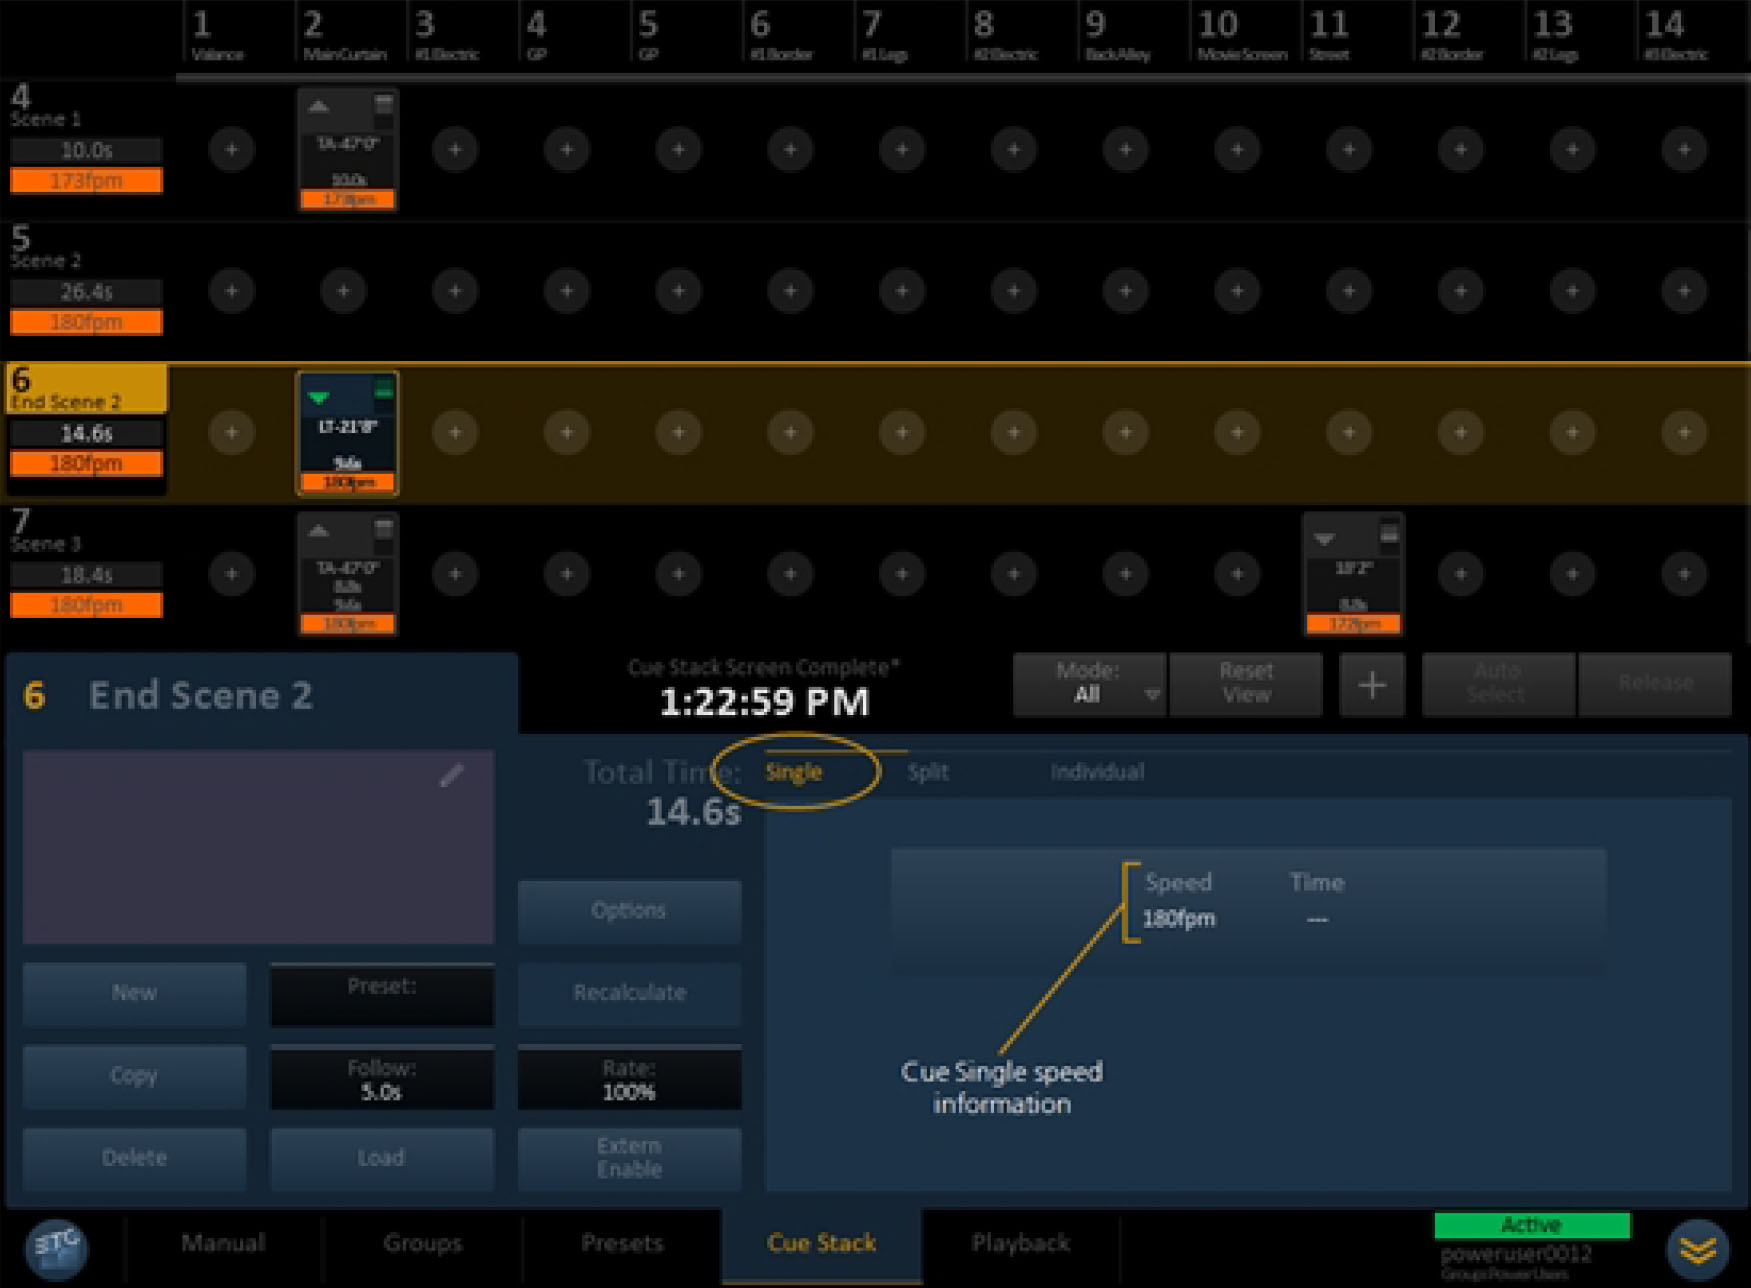
There are three tabs in the dynamic cue area: Single, Split, and Individual.
- Select "Single" to program the same timing information for all channels in a cue at once.
- Select "Split" to program different times for up and down moves, or to enter wait times, for all channels in a cue.
- Select "Individual" to program specific move times or wait times for individual channels in a cue.
Follow Times
A follow time allows the automatic start of the next cue in the cue stack, with a delay if necessary. A follow time can be added to any cue and must be added from the Cue Stack screen.
When executed, a cue with a follow time will complete its movement; then the specified follow time will delay the next cue, after which, the next cue in the list will be executed.
Follow times may be between 0.0 and 99.9 seconds.
To add a follow time to a cue:
- Select the cue in the cue stack. The cue will be highlighted in gold.
- Press "Follow" in the cue command buttons. The "Edit Follow Time" dialog will open.
- Enter the desired follow time (in seconds and tenths of seconds) from the keypad.
- Press "Ok". The follow time will be added to the cue and displayed in the "Follow" button when that cue is selected.
Wait Times
A wait time is a specific amount of time that the system will wait before enacting a move. Wait times can be added to split times or to individual channels in a cue.
Example of a Split Wait Time
To program a split wait time See "Program Split Timing."
Example of an Individual Wait Time

To program an individual wait time See "Program Individual Timing."
Program Single Timing
You can specify a move time for an entire cue (all channels and moves, whether up or down) from the Cue Stack screen.
Once recorded, single time will calculate the required speed for the participating motors, based on the start position, end position (=travel distance), default ramps and requested time.
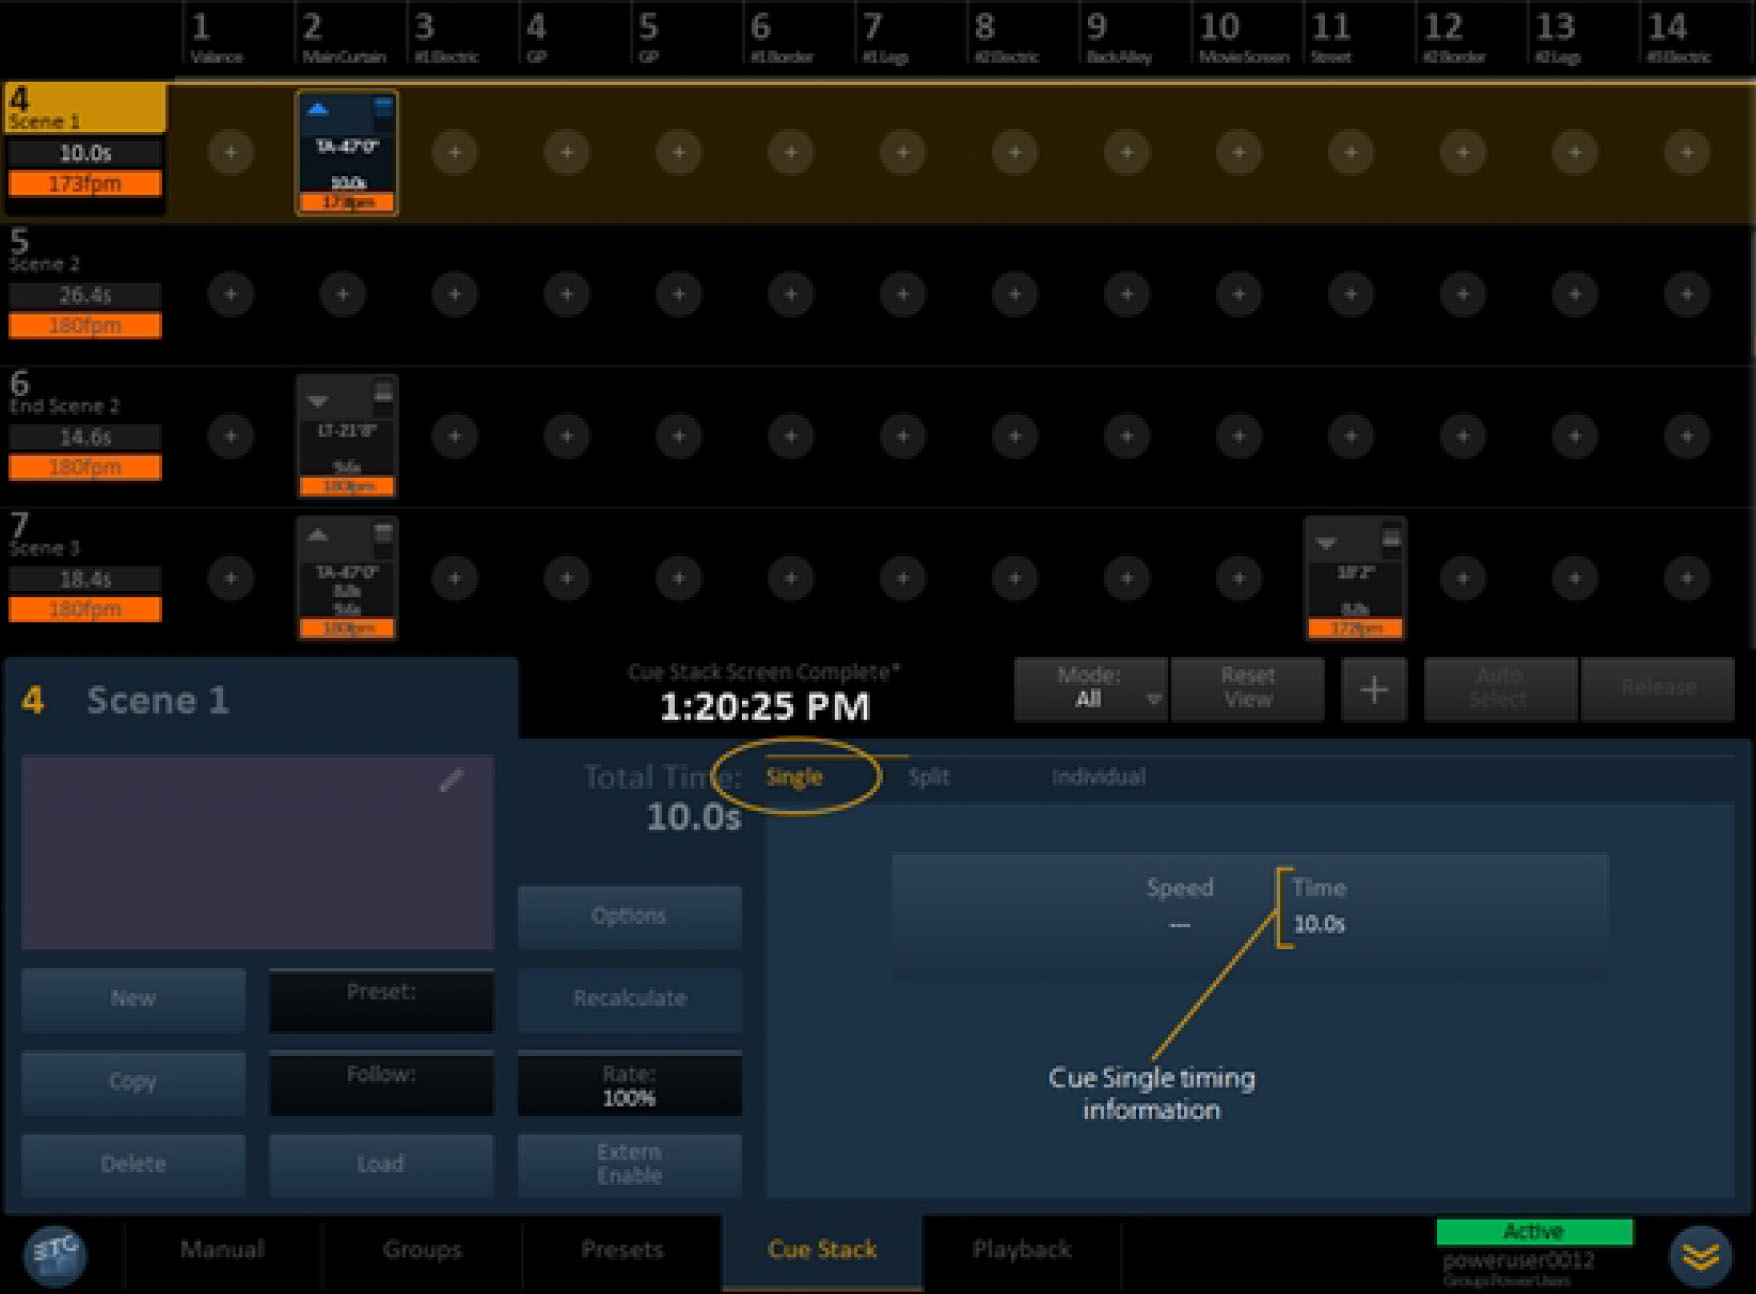
To program a "Single" move time for a cue:
- Select the desired cue in the cue stack. The cue will be highlighted in gold.
- Select "Single" in the Dynamic Cue Area in the lower right portion of the screen (this may already be displayed by default). The cue's speed and time data will be displayed.
- Press the "Time" field. The "Edit Move Time" dialog will open.
- Enter the desired cue time using the keypad. Times can range from 1.0 seconds to 99.9 seconds.
- Press "Ok". The time will be recorded. Cue time will be displayed in the cue icon and in any affected cue channel icons.
NOTE: If a motor will not be able to move to the requested position in the requested time, an error message is produced. The speed will be set to the maximum available speed and the achievable time will be displayed.
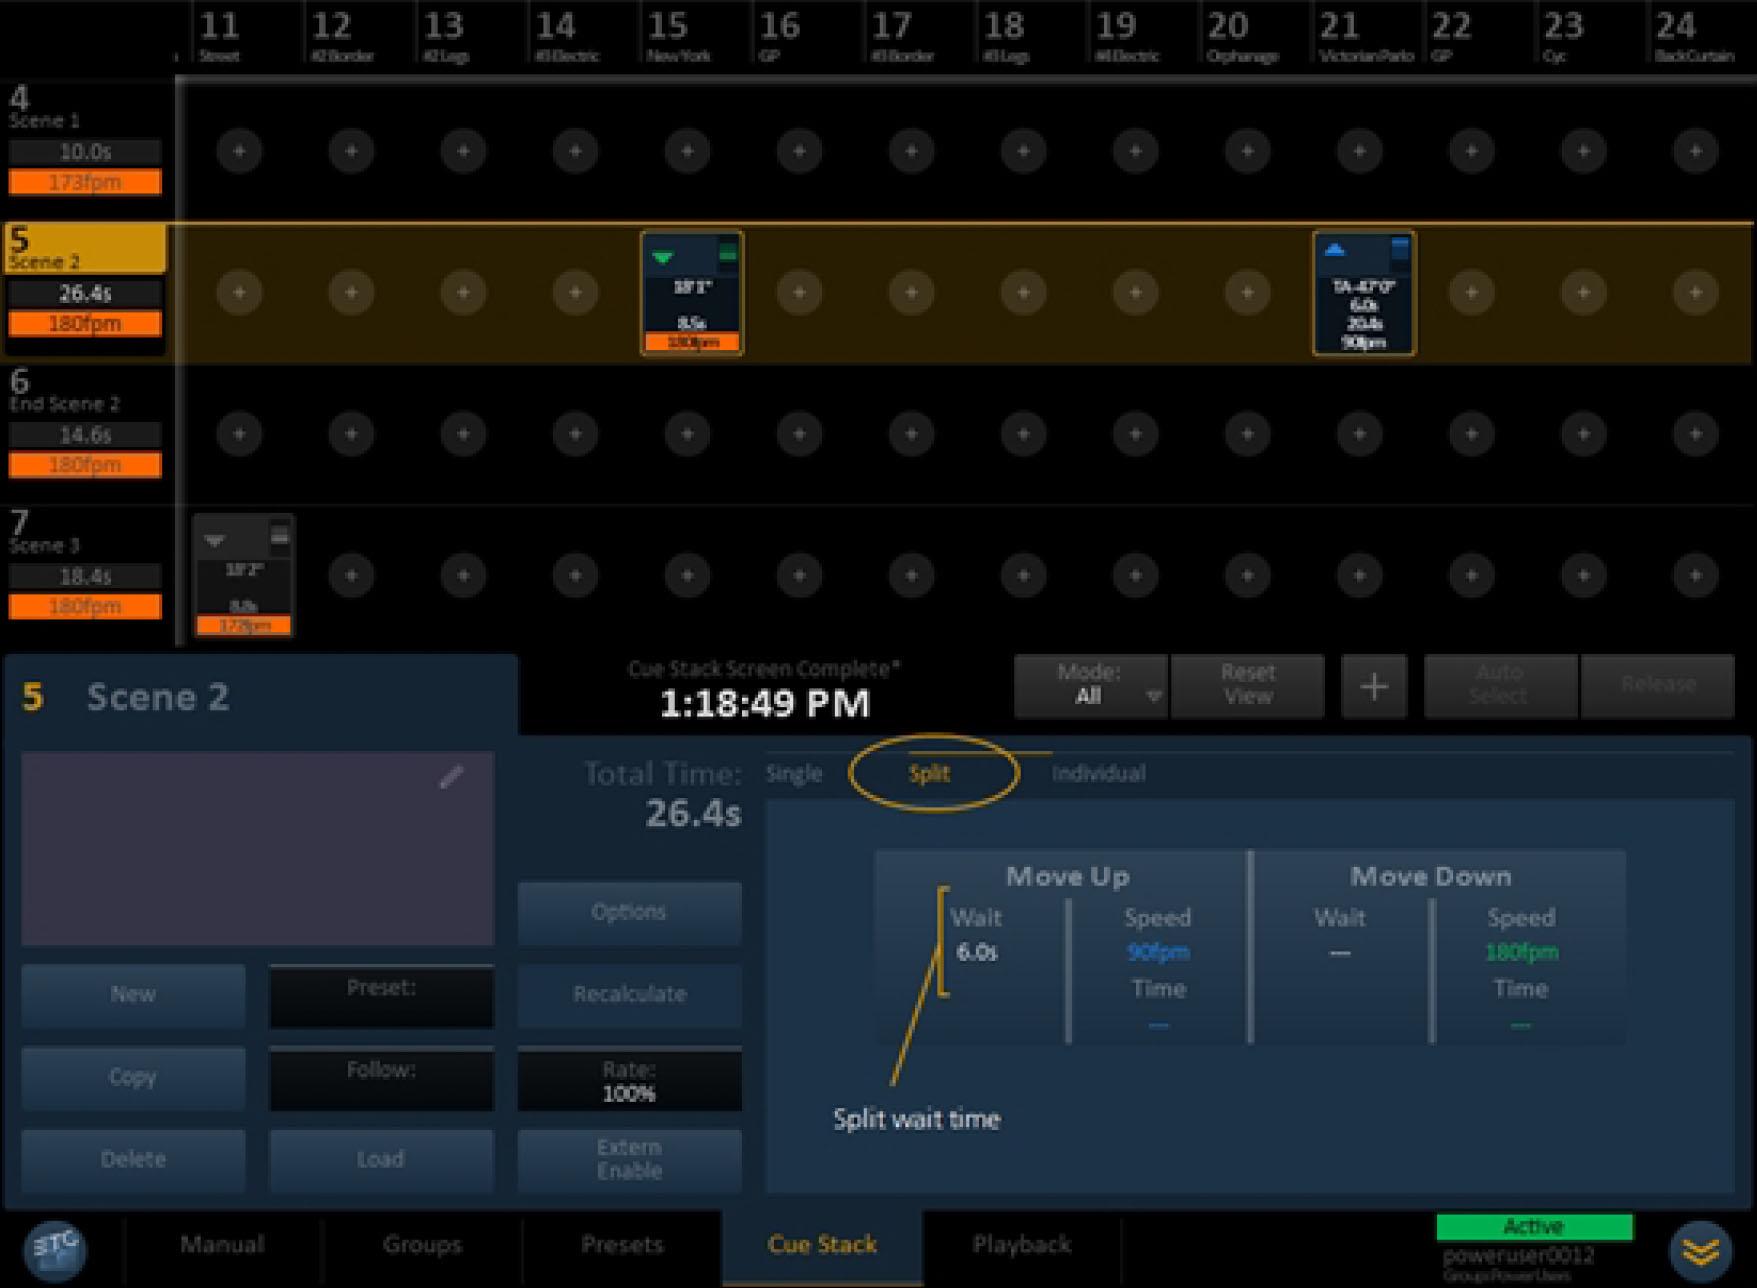
Program Split Timing
You can specify different move times for the up and down moves of an entire cue from the Cue Stack screen. You can also apply a wait time for the up or down split moves as well.
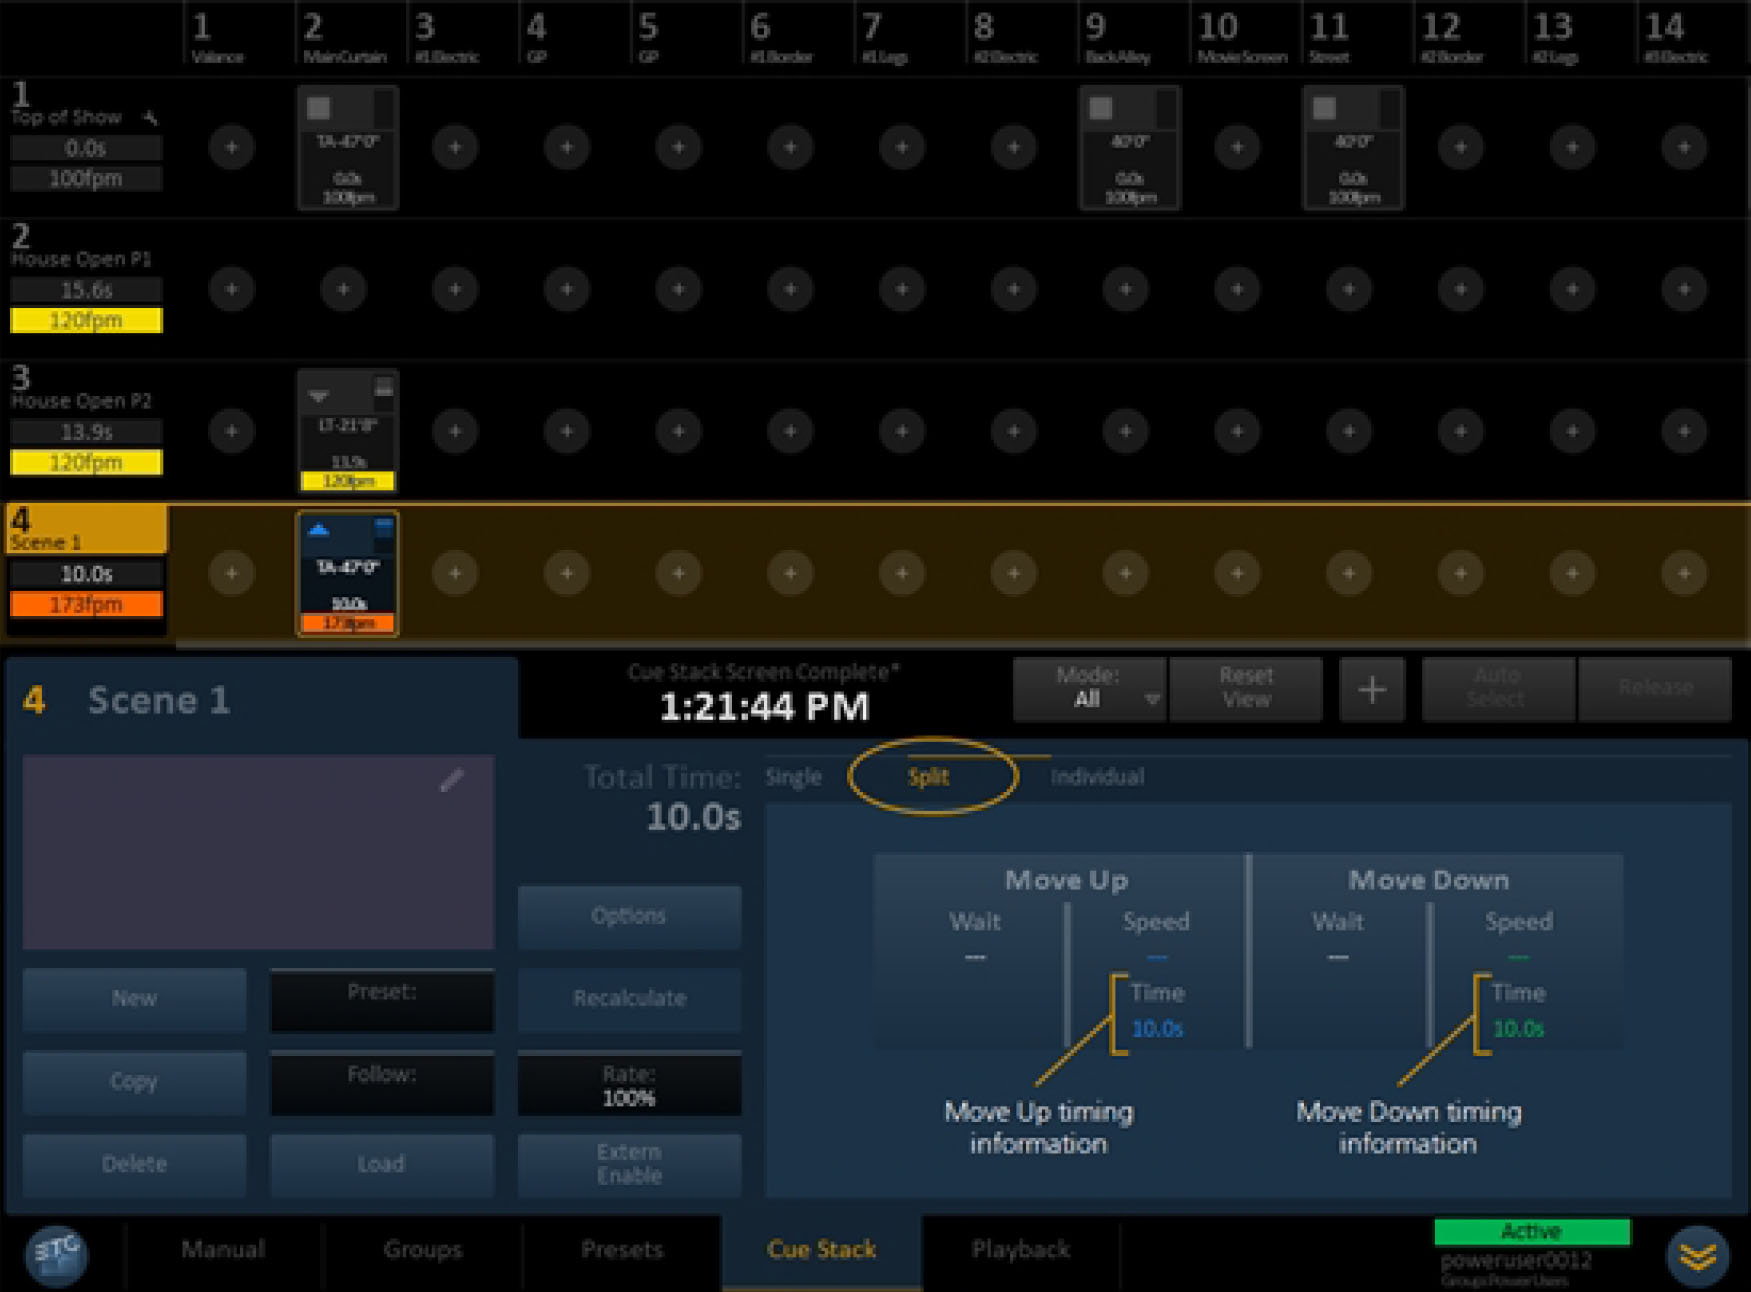
To program split move times for a cue:
- Select the desired cue in the cue stack. The cue will be highlighted in gold.
- Select "Split" in the Dynamic Cue Area in the lower right portion of the screen. A table with the various cue "Move Up" and "Move Down" information will appear.
- Press the "Time" field for the desired direction in the table. The "Edit Move Time" dialog will open.
- Enter the desired time using the keypad. Times can range from 1.0 seconds to 99.9 seconds.
- If you wish to record a wait time for any channel, repeat steps 3 & 4 for the "Wait" field of the desired direction.
- Repeat steps 3-5 for the opposite direction, if desired.
- Press "Ok". The times will be recorded. Cue time will be displayed in the cue icon and in any affected cue channel icons.
Program Individual Timing
You can program specific move times for individual channels within a cue.
Individual timing can be viewed in the Dynamic Cue Area area of the Cue Stack screen.
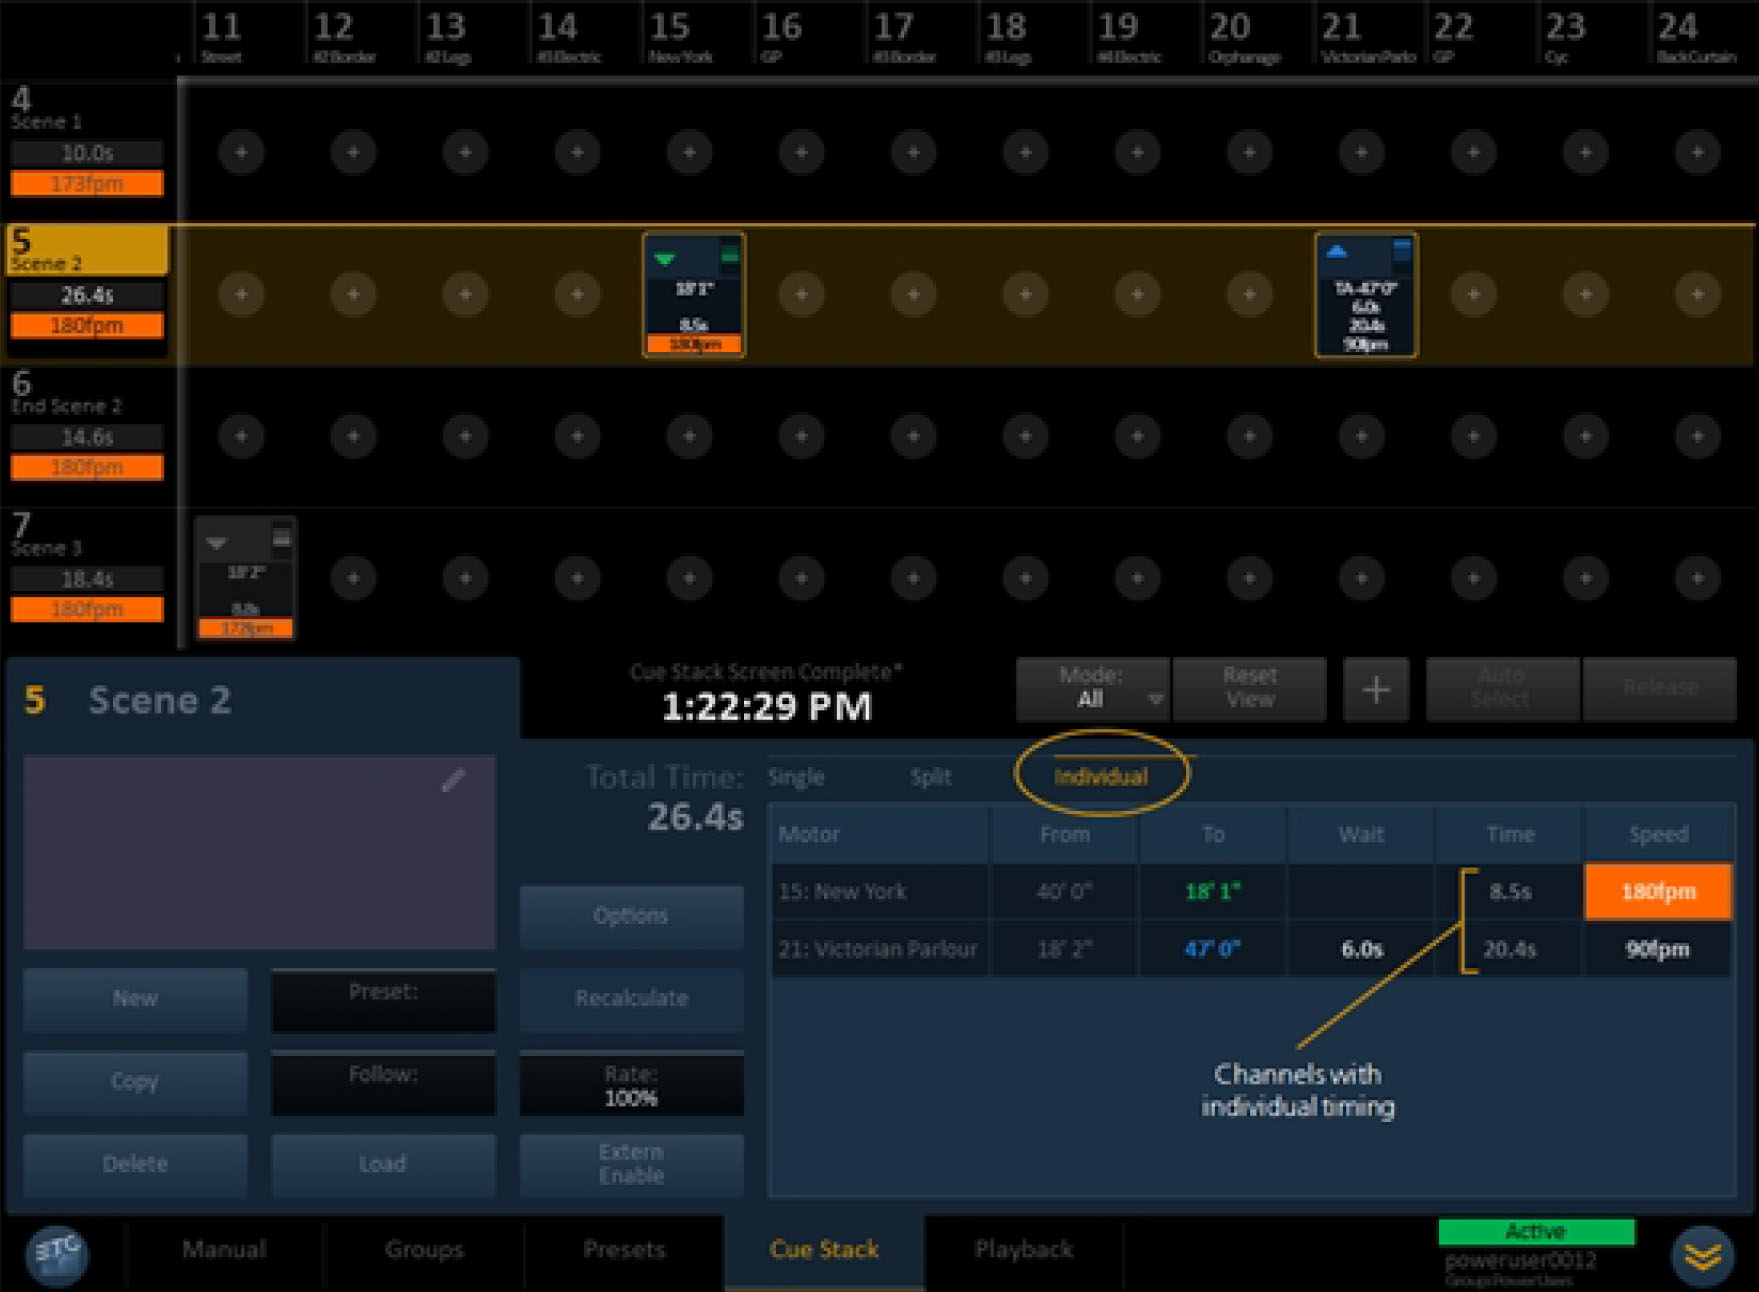
To program individual times for channels in a cue:
- Select the desired cue in the cue stack. The cue will be highlighted in gold.
- Select "Individual" in the Dynamic Cue Area in the lower right portion of the screen. A table with the various channels in the cue will appear.
- Press the "Time" cell for the desired channel in the table. The "Edit Move Time" dialog will open.
- Enter the desired time using the keypad. Times can range from 1.0 seconds to 99.9 seconds.
- If you wish to record a wait time for any channel, repeat steps 3 & 4 for the "Wait" cell of the desired channel.
- Press "Ok". The time will be recorded. Times entered for a specific channel will appear white in the table. Times that are gray are derived from either cue single timing or from a specified speed.
Cue Speed
Much like timing, cue speed can also be set for a cue or for specific channels in a cue.
Speeds are entered from the dynamic cue area and can be done from the "Single," "Split," or "Individual" tabs.
- Select "Single" to program the same speed information for all channels in a cue at once.
- Select "Split" to program different speeds for up and down moves for all channels in a cue.
- Select "Individual" to program specific speeds for individual channels in a cue.
Speeds are limited by the individual motor in use. For Prodigy V1000S hoists, the range is between 5 feet per minute (fpm) and 180 fpm. For Prodigy fixed-speed hoists the speed is 30 fpm.
Program Single Speed
You can specify a move speed for an entire cue (all channels, whether up or down) from the Cue Stack screen.
Once recorded, single speed will dictate the speed at which the moves in a cue occur when the cue is executed. Speeds for variable speed hoists can range from 5 to 180 feet per minute (fpm).
NOTE: Specified speeds will only apply to variable speed motors in your rigging system. Variable speeds are not achievable with all motors. For example, Prodigy fixed speed hoists run at a speed of 30 fpm. Therefore, channels associated with fixed speed motors are restricted and are excluded from cue speed information.
To program a "Single" move speed for a cue:
- Select the desired cue in the cue stack. The cue will be highlighted in gold.
- Select "Single" in the Dynamic Cue Area in the lower right portion of the screen (this may be displayed by default). The cue's speed and time data will be displayed.
- Press the "Speed" field. The "Edit Move Speed" dialog will open.
- Enter the desired cue speed using the keypad. Speeds can range from 5 fpm to 180 fpm.
- Press "Ok". The speed will be recorded. The cue's time will be calculated automatically and displayed along with the speed in the cue icon and in any affected cue channel icons.
Program Split Speed
You can specify different speeds for the up and down moves of a cue from the Cue Stack screen. These are called "Split" speeds. You can also apply a wait time for the up or down split moves as well.
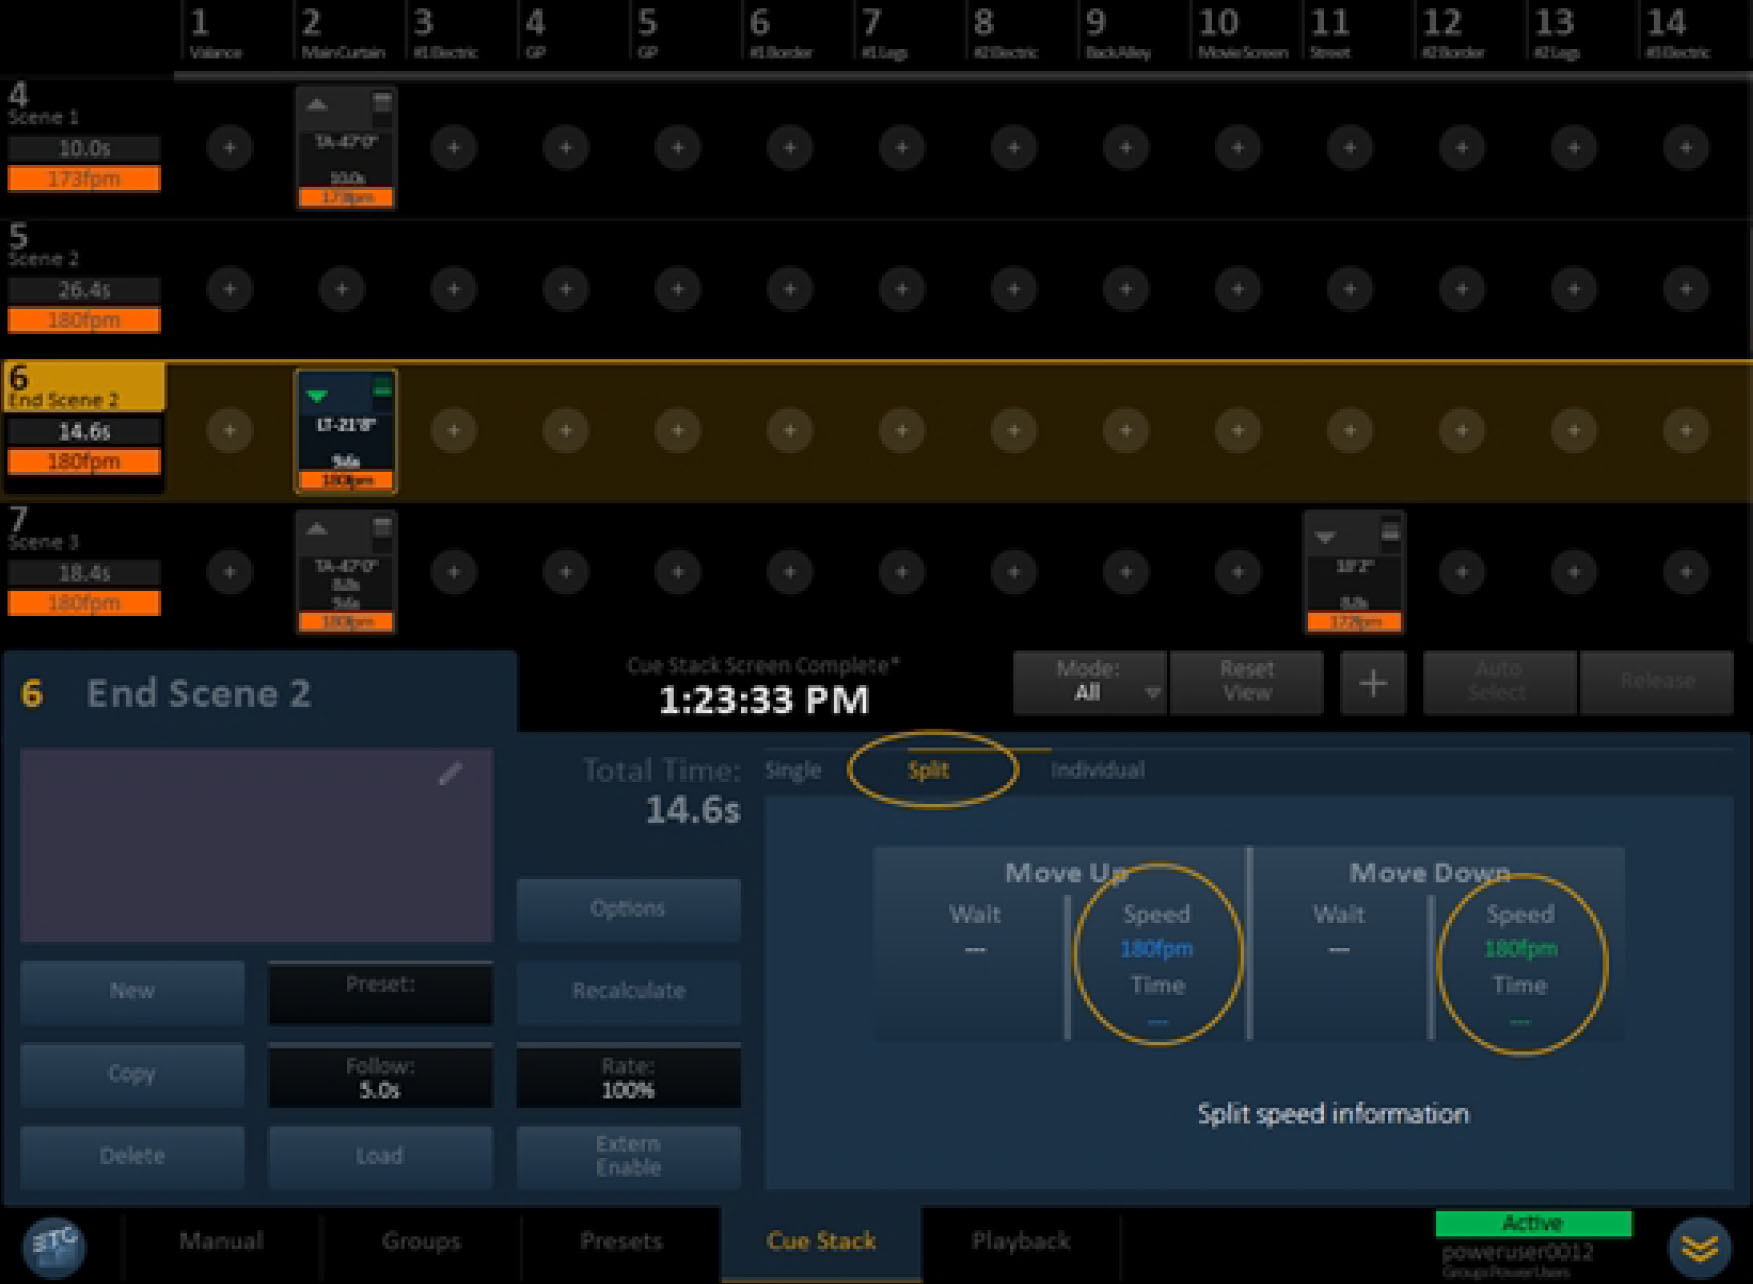
To program split speeds for a cue:
- Select the desired cue in the cue stack. The cue will be highlighted in gold.
- Select "Split" in the Dynamic Cue Area in the lower right portion of the screen. A table with the cue "Move Up" and "Move Down" information will appear.
- Press the "Speed" field for the desired direction in the table. The "Edit Move Speed" dialog will open.
- Enter the desired speed using the keypad. Speeds can range from 5 fpm to 180 fpm.
- If you wish to record a wait time for any channel, repeat steps 3 & 4 for the "Wait" field of the desired direction.
- Repeat steps 3-5 for the opposite direction, if desired.
- Press "Ok". The speeds will be recorded. The cue's time will be calculated automatically and displayed along with the speed in the cue icon and in any affected cue channel icons.
Program Individual Speed
You can program specific move speeds for individual channels within a cue.
Individual speeds can be viewed in the Dynamic Cue Area area of the Cue Stack screen.
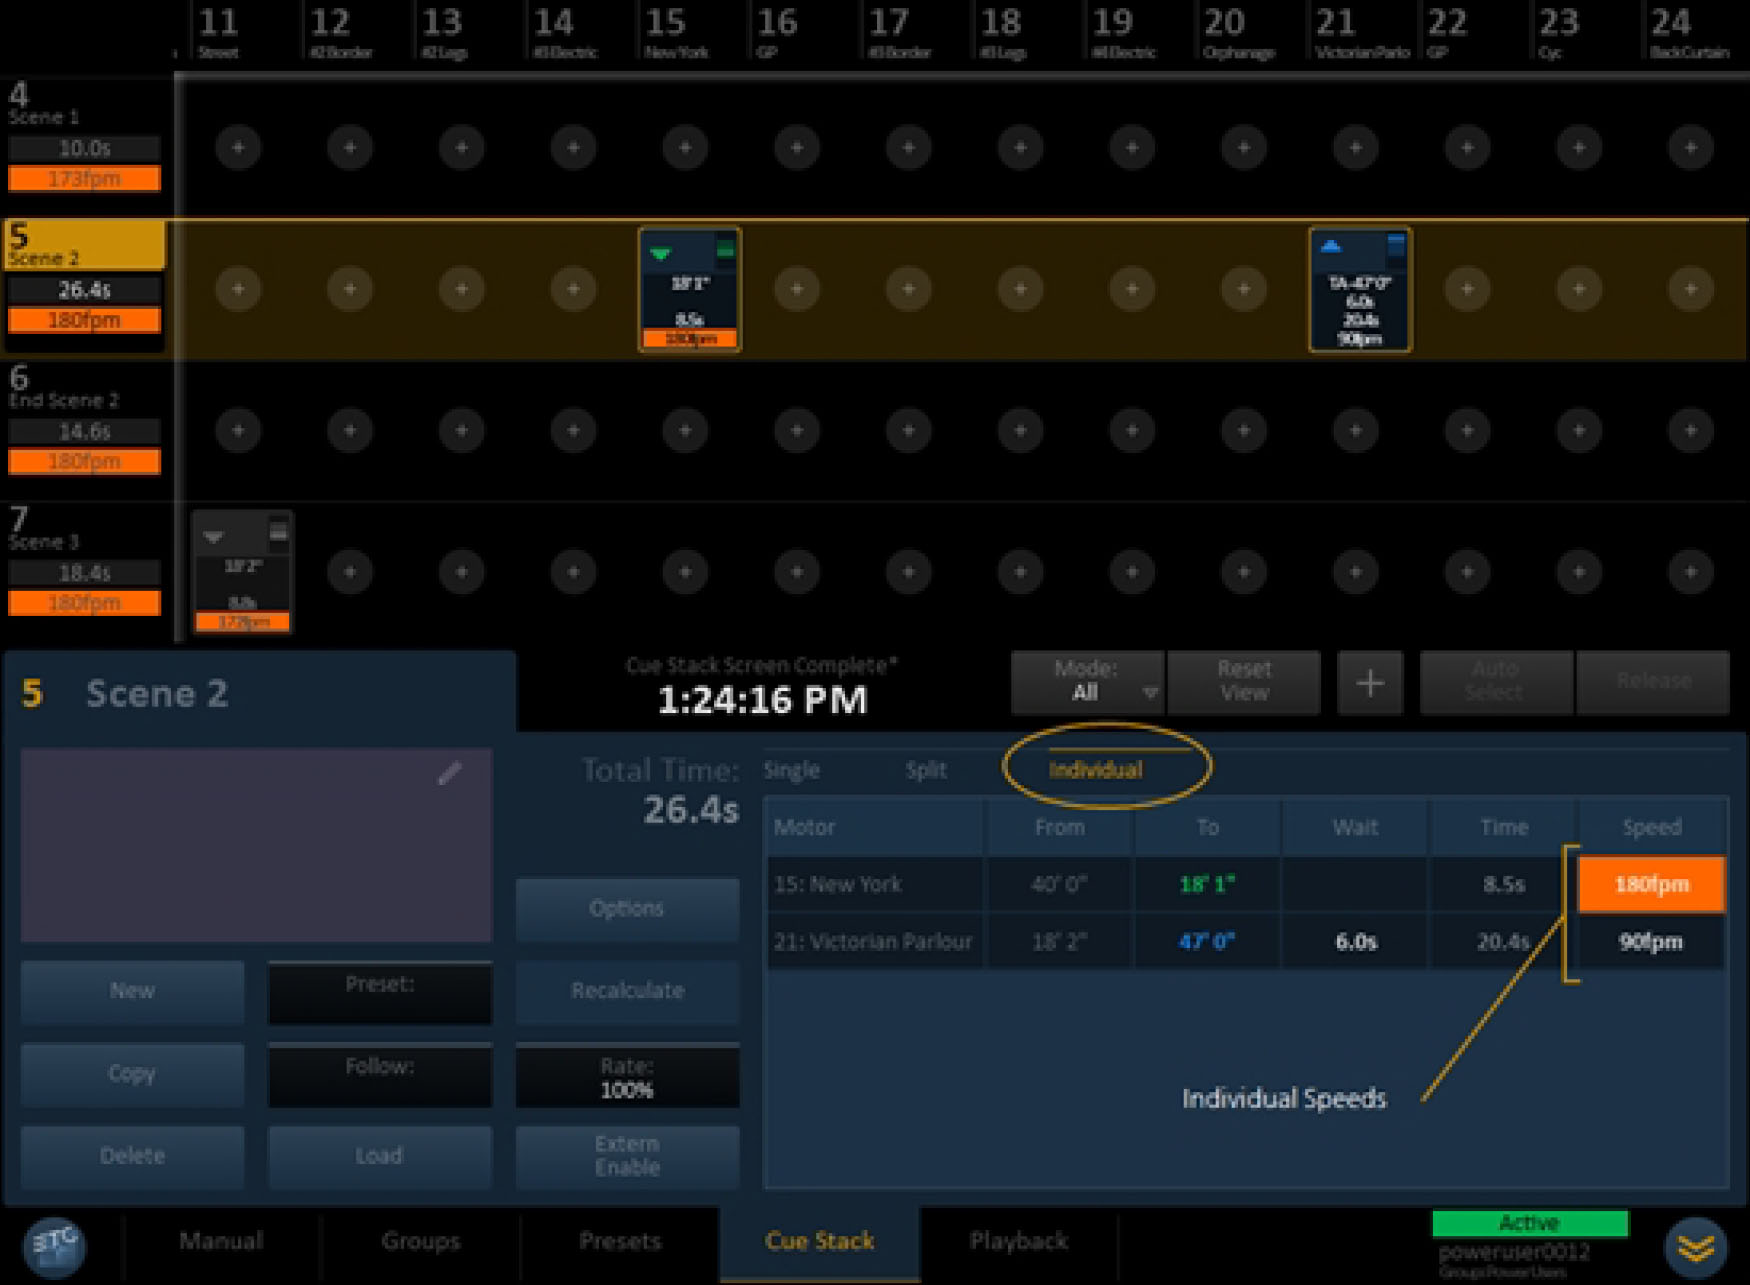
To program individual speeds for channels in a cue:
- Select the desired cue in the cue stack. The cue will be highlighted in gold.
- Select "Individual" in the Dynamic Cue Area in the lower right portion of the screen. A table with the various channels in the cue will appear.
- Press the "Speed" cell for the desired channel in the table. The "Edit Move Speed" dialog will open.
- Enter the desired speed using the keypad. Speeds can range from 5 fpm to 180 fpm.
- If you wish to record a wait time for any channel, repeat steps 3 & 4 for the "Wait" cell of the desired channel.
- Press "Ok". The speed will be recorded. The cue's time will be calculated automatically and displayed along with the speed in the cue icon and in any affected cue channel icons.
Speeds entered for a specific channel will appear white in the table. Speeds that are gray are derived from either cue single timing or from a specified time.
Additional Cue Options
You can also perform the following functions when working with cues:
- Rate
- Recalculate
- Reference a preset
- Trigger OSC Commands
- Activate a remote Enable button
Rate
The "Rate" field is a cue command button that allows you to adjust the overall rate of the entire cue relative to the recorded cue and channel times. Cue rates are applied from the Cue Stack screen.
This feature is useful when a cue involving times or speed that have been individually programmed must be altered to be slightly faster or slower. Rather than reprogram all of the individual speeds or times in the cue, a specific rate can be applied instead. This rate can be easily altered until the desired result is reached.
To modify a cue using Rate:
- Select the desired cue from the cue stack. The cue will be highlighted in gold.
- Press the "Rate" field. The Edit Rate dialog will appear.
- Enter the desired percentage (Range is from 1% to 999%. Less than 100%=slower, greater than 100%=faster)
- Press "Ok". The new rate will be displayed on the "Rate" field.
When the cue plays back it will play at the rate-adjusted speed.
You can also use the joystick rate override feature on cues that have a rate override.
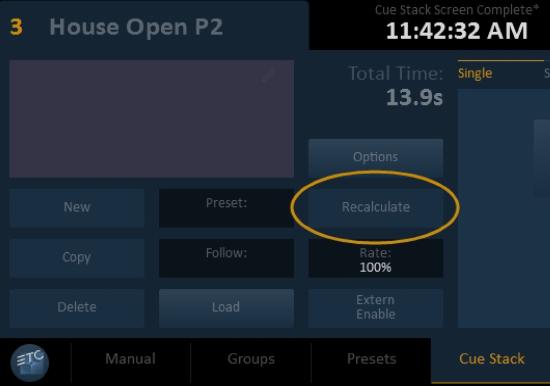
Recalculate
Recalculate is a cue command button available from the cue stack.
Occasionally during programming, the position of motors in cues may change. A change in position will affect the distance of travel for subsequent cues using that motor, which therefore affects that cue’s time. Foundation will not automatically apply the changes to subsequent cues in order to prevent unexpected results. In order to reassert the desired timing data for that cue, a recalculate command can be used. At this point, a comprehensive summary of the resulting changes will be presented to the user.
If a cue's requested time or travel distance changes, the "Recalculate" button is activated to allow you to recalculate the speeds for the selected cue.
To recalculate a cue after a change in motor position:
- Select the desired cue from the cue stack. The cue will be highlighted in gold and the "Recalculate" button for that cue should be active.
- Press "Recalculate". The Recalculate Cue dialog will open and a list of motors will be displayed with the proposed changes to their speed and timing data indicated.
- Examine the changes to ensure they are satisfactory.
- Press "Ok". The changes will be implemented.
Referencing Presets
Cues can be programmed to reference presets for their content. In this instance, all channel data in the preset (all included channels and the respective motor position) will be referenced by the cue. No other channel data is able to be stored in the cue. In other words, the cue can play back the contents of the preset and nothing else.
If any attempt is made to alter the position information for any channel in the cue, you will be notified that you are about to break the link with the preset. The same is true if you attempt to add a channel to the cue that is not in the preset.
Times and speeds for a preset-referencing cue can be altered on a single, split or individual basis.
Referencing presets is done from the Cue Stack.
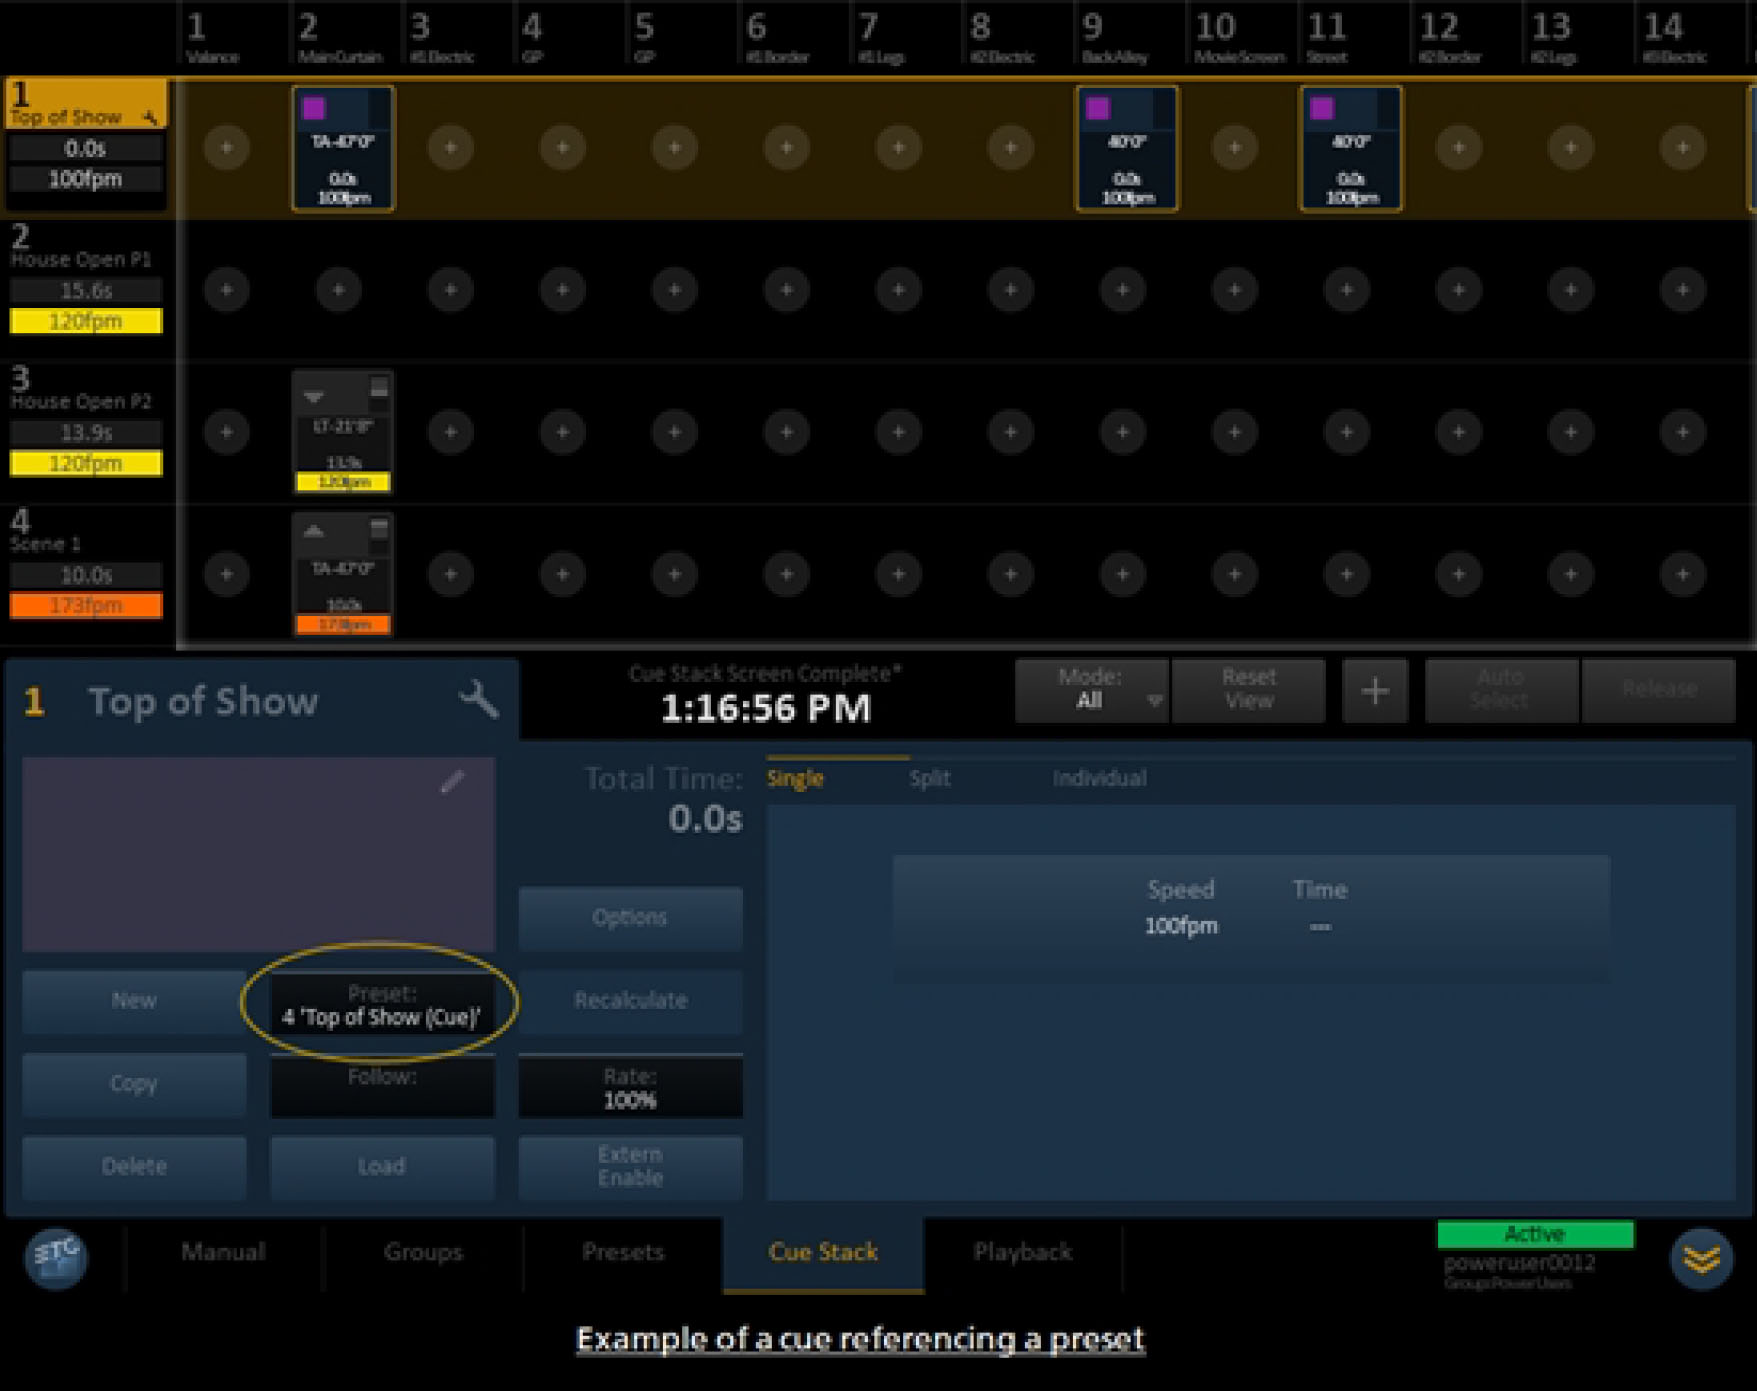
To reference a preset in a cue:
- Create or select the desired cue in the cue stack. The cue will be highlighted in gold.
- Press the "Preset:" button found in the cue command buttons. The "Connect Preset" list will open.
- Select the desired preset from the list. The preset will be highlighted in gold.
- Press "Ok" to complete the reference. Press "Cancel" to abort.
Triggering OSC Commands Through Cue Events
You can use the Open Sound Control (OSC) protocol to send commands to other controls in the system when certain events occur during Cue playback. For example, you could send a command to an EOS console that instructs a specific channel to go to full when a specific motor has completed movement through cue playback.
To configure a Cue to trigger and OSC command, perform the following steps:
- Access the Cue Stack screen, select a Cue and press the "Options" button. The Cue Options dialog appears.
- Press the "Edit OSC Events" button. The Edit OSC Events for Cue dialog appears.
- Press the green + button to add an OSC Event. The Edit OSC Event dialog appears
- Select the cue event you want to trigger the OSC command from the Type field. You can choose from the list of events and triggers below.
- Enter the command you want to trigger when the corresponding cue event occurs in the OSC Command field and press OK.
Cue Event and Triggers
| Cue Loaded | Triggered once a cue is loaded into playback and is ready to be started |
| Cue Started | Triggered once the cue is started in playback |
| Cue Paused | Triggered once a cue is paused in playback |
| Cue Restarted | Triggered once a cue is restarted after a pause in playback |
| Cue At Target | Triggered once all motors in a cue arrive at their respective target positions |
| Cue Finished | Triggered once all motors are at their target and the follow time has elapsed |
| Cue Progress Move | Triggered once the movement phase of a cue has reached the specified percent - this percent does not apply to the follow time phase of the cue |
| Cue Progress Follow | Triggered once the follow time phase of a cue has reached the specified percent - this percent does not apply to the movement phase of the cue |
| Cue Progress Total | Triggered once the total cue progress (movement and follow time) has reached the specified percent |
| Motor Started | Triggered once the specified motor has started movement |
| Motor At Position | Triggered once the specified motor has reached the specified position |
| Motor At Trim | Triggered once the specified motor has reached the specified trim |
| Motor At Target | Triggered once the specified motor has reached target. |
External Enable Button
This cue feature can be selected to require activation of a remote "Enable" button before a cue "Go "command can be initiated.
This is useful in situations where the console operator cannot directly see the moving load and a third party observer or "spotter" with a remote button unit at an adequate vantage point can ensure a safe cue execution. The main operator still retains the ability to override speed with the joystick and still receives all visual feedback from the console.
To record a cue with a required external enable command:
- Select the desired cue in the cue stack. The cue will be highlighted in gold.
- Press "Extern Enable" in the cue command buttons. The button will be highlighted.
In order to play back this cue, a remote enable button must be connected to a remote plug-in station and an observer with a view of the moving load must press and hold the remote button during the cue's entire travel.
This feature can be altered in system settings to be a remote "Go" command, rather than "Enable". This is a system-wide setting and can only be altered by an Administrator. " The system can only be set to allow for either "External Go" or "External Enable" but not both.
See " Playing Back a Cue with External Enable"
If you have questions, please contact the Rigging Hotline at 888-244-9986