HES Fixture Rebranding Process
Applies to: SolaWash Pro 2000, SolaSpot Pro 2000, SolaSpot Pro 2000 Frame, SolaSpot Pro 1000, SolaSpot Pro 1500, SolaWash FX 1000, SolaWash FX 2000
What is included: 1 Display Label, 2 Bezel Product Name Labels, 2 large Road Case Product Name Labels, 2 small Road Case Product Name Labels, 4 “An ETC Company” Labels
What you will need: Plastic/rubber scraping tool, Isopropyl Alcohol, Towel or Rag, Heat Gun (optional)
*All Serial Labels and ETL Labels must be applied by a HES/ETC Employee
| Previous Fixture Name | Current Fixture Name |
| SolaWash Pro 2000 | SolaWash 2000 |
| SolaSpot Pro 2000 | SolaSpot 2000 |
| SolaSpot Pro 2000 Frame | SolaFrame 2000 |
| SolaSpot Pro 1000 | SolaSpot 1000 |
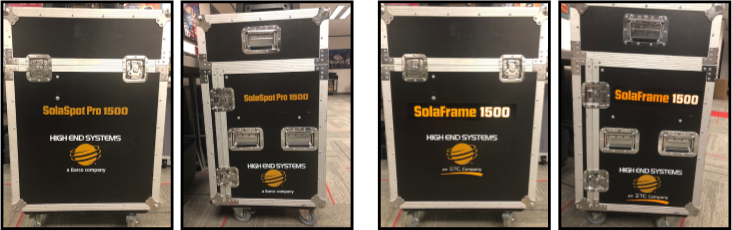
| SolaSpot Pro 1500 | SolaFrame 1500 |
| SolaWash FX 1000 | SolaHyBeam 1000 |
| SolaWash FX 2000 | SolaHyBeam 2000 |
 HES Fixture Rebranding Process
Please note: each fixture may vary depending on the placement and number of labels
Rebranding Road Cases:
-All Road Case labels can simply be covered by the new labels
-The shorter fixture name labels will be placed on the shorter side of the road case
-The longer labels will be on the side with the locks
-The “An ETC Company” labels will cover “A Barco Company” on all four sides
Before After
Rebranding Fixtures:
Bezel Labels:
- All Bezel labels can simply be covered by the new labels
Display Label:
- Remove five Philips screws from the front plastic cover on the base of the fixture.
- Peel up one corner of the display and very slowly remove the display
- In order for the new display to sit flush, you will need to remove the residue left. To do this you can use rubbing alcohol and a plastic/rubber scraper or a heat gun
- Always be mindful of the button board and Display PCB. If using a heat gun, the Display PCB must be removed to avoid melting
- Before applying the display label remove the thin film protector on the top and bottom of the label’s screen
- When placing the new Display label, be sure that it is oriented correctly to line up with the screen and button board
- Smooth out label and test the functions of the display buttons

Please contact HES Support with any questions