Setting Up an Alina System
Symptoms/Issue
RAYN Alina luminaires are multi-spectral horticultural lamps offering six standard and up to two custom wavebands for research-based applications. Lamps are powered and controlled via auxiliary power supply (available in 600W and 1500W versions) and are RDM-compatible. Here are some tips for setting up an Alina system.
Establish a Numbering Schema
In order to control the lights in a meaningful fashion, it is important to define and understand which light is (physically) where. Having a logical numbering scheme will help tremendously.
Start with the addressing:
- You should have some kind of plan view layout of your grow area's lights
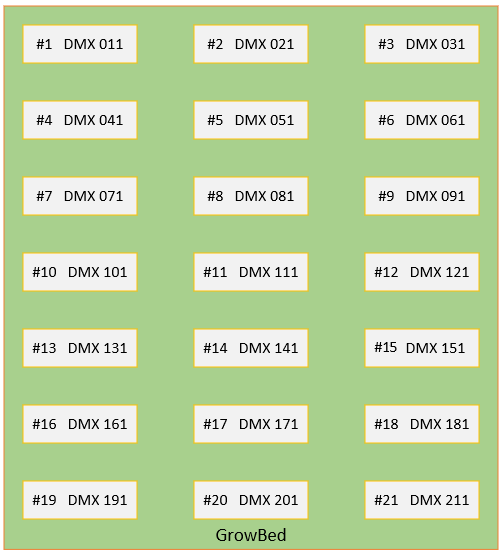
- These lights now should be assigned some logical numbering scheme so that they can be easily identified later.
- For instance: on a piece of paper (or the electronic equivalent) start on the top left of the plan view and call that light 'Fixture #1' with 'DMX Address 11'. Now move to the light adjacent, and call that 'Fixture #2' with 'DMX Address 21' and so on.
(Basically employ some kind of numbering scheme/order that makes sense to you)
NOTE: Depending on whether your Alina fixtures have User Kits installed, 7 or 9 addresses are needed to control each fixture. However, since it's possible for User Kits to be added later, it is wise to allot a DMX footprint of 9 addresses for each fixture.
DMX addressing schemes usually start fixture 1 at address 1, so then fixture 2 could be at address 10, with fixture 3 at address 19, and so on. But, for simplicity's sake, you might start your addressing scheme at address 11 so that each fixture # matches the address: fixture 1 at 11, then fixture 2 would be at 21, fixture 3 at 31...fixture 10 at 101.
Once you have completed your plan view document, move over to the RAYNTouch or Syrcadia for PC to finish setup.
Network Setup
Alina Power Supplies (APS) require an Ethernet network connection to either the RAYN Touch controller or PC running Syrcadia software. APS units ship from the factory with link-local IP addresses assigned to the internal gateway. Typically, this should be changed to a Static IP scheme consistent with whatever the PC or RAYN Touch are configured for.
Alternatively, change the IP of the RAYN Touch or PC's Ethernet connection that is being used to communicate with the Alina system to match the link-local scheme--not recommended.
To find the link-local IP address of the APS, use one of the following methods:
- Windows Command Prompt: run 'arp -a' command--the APS's address should appear in the list of connected devices under the LAN Interface
- Concert: Options>Find Unreachable Devices
- 3rd party software i.e. Angry IP Scanner
The best way to change the gateway's IP is via Concert. Ensure the IP scheme matches the PC or RAYN Touch controller.
Syrcadia Setup
- Go to the Settings menu by clicking/tapping the gear icon
 on the left-hand side of screen.
 - In the Files tab, click/tap Save to give your configuration file a name.

- Go to the Preferences tab and turn on “Device Detection (RDM)”, indicated by orange box.

- Go to the Devices tab. All connected fixtures should be visible here.

- Determine which fixture is which by selecting one at a time and clicking/tapping the 'Identify' button. The fixture will begin flashing ON and OFF.
- Identify the matching light on your plan view and in Syrcadia enter the respective device and DMX start address.

- Repeat until all lights are identified and there are no more DMX address conflicts (indicated in RED).
- Select the correct Zone for each light from the dropdown menu. Zone 1 is created by default. If more uniquely-controllable areas are required for your system, first create as many additional zones as you need in the Zones tab by selecting the green 'plus' icon
 .
.

- Lastly, assign each fixture a unique Device ID (Dev.).
- Go back to the Preferences Tab and turn off “Device Discovery (RDM)”.
- Save the changes you made to your configuration file in the Files tab. Your filename will appear as GREEN text in the upper right-hand corner of the screen when the file is up-to-date.

Notice that the 'Find' and 'Identify' buttons are hidden when Device Discovery is disabled.
You have now properly configured your Alina lighting system and you can start recording Spectrums, Day plans and Crop Plans.