Downgrading MSC X Generation 3 Hardware to 1.12.1
Identifying your Generation of MSC X hardware
First, you must determine what generation of MSC X hardware you have.
There are 3 generations of MSC X Hardware
First generation MSC X units look like this:

Second and Third generation units look like this:

Second generation unit serial numbers run from: 001XXX – 021XXX
Third generation unit serial numbers run from: 022XXX – Current
Note that second and third generations are identical and can only be differentiated based on the unit's serial number.
An MSC X serial number is located on the rear of the controller as shown in the image below.

Downgrading
1st and 2nd generation units can be downgraded by using the "Mosaic Recovery Tool" distributed in the current Mosaic Designer 2 bundle.
3rd generation MSC X units can downgraded to version 1.12.1 using the MSC X Recovery Tool distributed by in 1.12.1 Mosaic Designer Software pacakge.
This software can be found by searching the ETC Software archive or by clicking here for PC or here for Mac.
Using the Legacy Downgrade Tool
This process will erase all data on the MSC X when downgrading from V2 to V1
Navigate to the Mosaic Designer 1.12.1 directory and launch the MSC X Recovery tool as an Administrator.
After opening the program select "MSC X Rev 2 (USB Flash Drive)" from the product selector drop down.
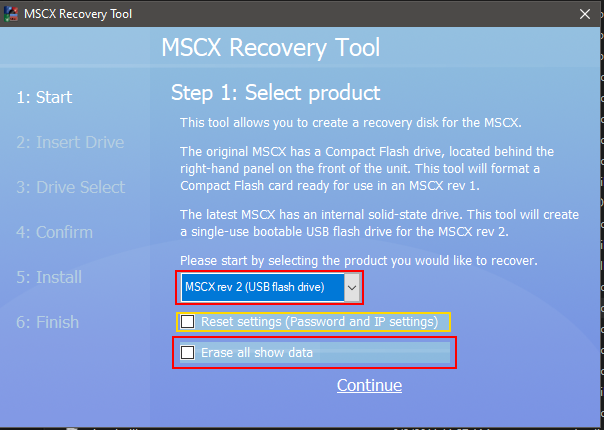
If you wish to reset IP settings and any controller password, click the appropriate check box.
If you wish to erase all show data, choose "Erase all show data".
Choose, 'Next' to proceed to the drive selection screen and select the appropriate drive.
All data on the USB flash drive will be erased.
Click 'Next' and confirm that the appropriate drive has been selected.
Choose 'Format & Install'. The drive will now be imaged will now be imaged to 1.12.1.
Once the image completes, you'll see the following screen.

Click "Exit" and eject the drive from your computer.
With the MSC X powered off, place the USB drive into one of the rear USB ports and power the MSC X on.
The image process will take approximately 3 minutes to complete, once completed the MSC X should appear within the network tab of
Mosaic Designer. Once the unit appears within the network tab, the USB drive can be removed.