Fixture Physically Pans or Tilts in the Opposite Direction from Visualized Movement
Symptoms
Your fixture physically moves in the opposite direction or differently from what is visualized in Augment3d.
Explanation and Troubleshooting Options:
There are a number of possibilities for the fixtures moving differently in Augment3d than reality. Here are a few things to check for and solutions that go along with them:
Always ensure that your fixture profile is updated before continuing with troubleshooting. See How to Update Fixture Profiles
Fixture Orientation in Augment3d
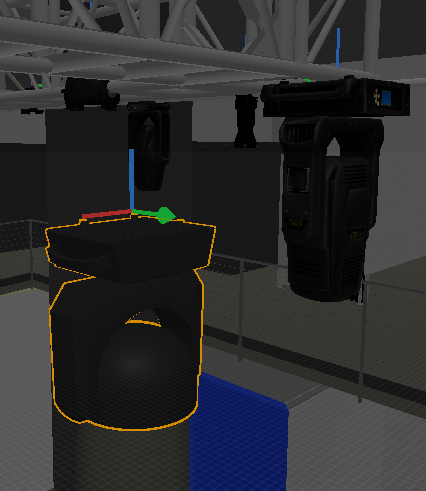
Check that the fixture orientation in Augment3d matches the way that the fixture is hung or positioned in reality. This can include looking at the model details if using a fully modeled fixture type:
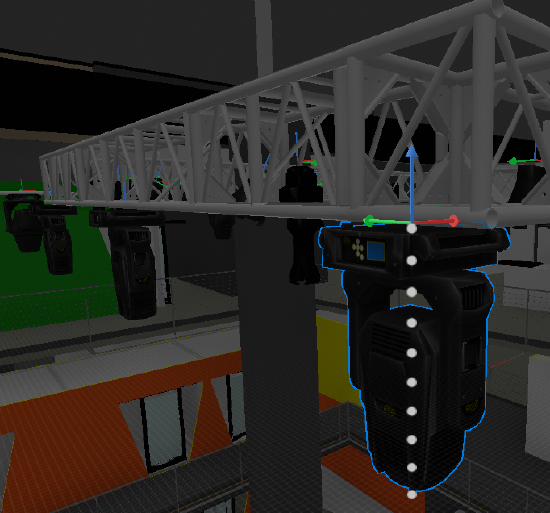
Or look at the model axes orientation:
Pan or Tilt Inversion
If a fixture in Augment3d pans and / or tilts in the opposite direction as it does in the real world, either parameter may be inverted.
Many fixtures have settings for inverting pan and/or tilt or to swap pan and tilt in the fixture software. Check that these settings are off first before testing for inversion as described below.
Testing for pan or tilt inversion
- Set the fixture’s pan to 0° and tilt to +90°. Increment the pan in either direction.
Does the virtual fixture rotate in the same direction as the physical fixture? - Set the fixture's pan and tilt to 0°. Increment the tilt in either direction.
Does the virtual fixture point in the same direction as the physical fixture?
Correcting pan inversion
If you find that the pan value did not move in the correct direction, swap the minimum and maximum DMX values of the inverted parameter in the Fixture Editor
The Eos fixture library does not invert tilt. So if that parameter appears to need to be inverted, it is either hung incorrectly in the Augment3d model or the physical fixture has an inverted tilt setting.
Pan Range
If the pan direction is correct, but the virtual fixture pans further in either direction than the real fixture, the fixture's physical pan range or values may not match its profile.
Testing pan range
- Aim your fixture at a point on your stage. Press the “Flip” button. Does the fixture return to the same point? If so, pan is mapped correctly. If not, set the fixture's tilt to +90°,or until the fixture is pointing forwards.
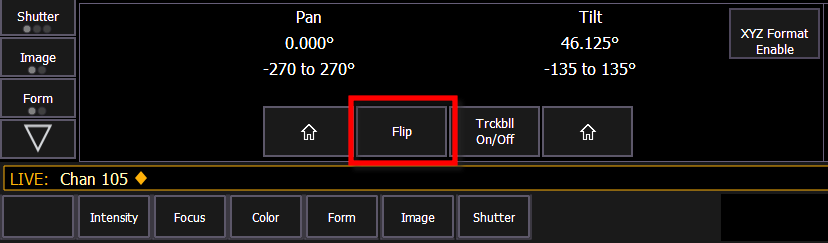
- Test with pan values of -90°, 0°, and +90°. The fixture should point to the left, straight forwards, and to the right, respectively. If so, pan is mapped correctly. If not, follow the steps below to correct the pan range in the Fixture Profile Editor.
Correcting pan range
- First, find the correct zero degree value for pan.
- Set pan to 0° and tilt to +90°.
- Increase or decrease pan, using the smallest value possible, until the optics are pointed away from the UI of the fixture.
- Using About, find the raw DMX values for pan (including course and fine) and note them.

- Set this new raw DMX level as your Pan DMX Home value in the Fixture Editor.
- Set pan to 0° and tilt to +90°.
- Then, using the new DMX Home value, calculate the user minimum and maximums for the pan range.
- Set your pan to the minimum DMX value available (typically DMX 0)
- Select a tilt value that targets a point in your venue. It is helpful to have a gobo or other marker of the exact center of the fixture's beam.
- Increase your pan by spinning your fixture 360° until the fixture is pointing at the same point again.
- Record the Found Pan DMX value after spinning the fixture 360° from DMX 0

- Note the Minimum DMX Value Allowed for Pan (used in step 2a. above) and the Maximum DMX Value Allowed for Pan
- Calculate the User Min and Max Degrees using the following formulas (or by entering the values on the fields in this page and pressing Calculate):
• User Min Degrees = (360 ÷ (Found Pan DMX - Minimum DMX Value Allowed for Pan)) * (Minimum DMX Value Allowed for Pan - Pan DMX Home Value)
• User Max Degrees = (360 ÷ (Found Pan DMX - Minimum DMX Value Allowed for Pan)) * (Maximum DMX Value Allowed for Pan - Pan DMX Home Value)User Min (deg) for Pan User Max (deg) for Pan
- Set your pan to the minimum DMX value available (typically DMX 0)
- Enter the User Minimum, Maximum and DMX Home Values in the Eos Fixture Editor Pan Range:
DMX User Label Min Home Max Min Home Max Quick Actions... Quick Labels... 0 + - Test for accuracy.
Tilt Range
If the tilt direction is correct, but the virtual fixture tilts further in either direction than the real fixture, the fixture's physical tilt range or values may not match its profile.
Testing tilt range
- Aim your fixture at a point on your stage. Press the “Flip” button.
Does the fixture return to the same point?
If so, tilt is mapped correctly. If not, set the fixture's pan and tilt to 0°.
- Pan the fixture in a circle.
Does the fixture beam remain stationary, pointed straight down?
If so, tilt is mapped correctly. If not, follow the steps below to correct the tilt range in the Fixture Profile Editor.
Correcting tilt range
- First, find the correct zero degree value for tilt.
- Set your tilt to 0°. Pan clockwise 360°, then counterclockwise 360°, and repeat.
- Slowly increase or decrease your tilt value until the fixture spins with no wobble in the beam during the sweep.
- Using About, find the raw DMX values for tilt (including course and fine) and note them.

- Set this new raw DMX level as your Tilt DMX Home value in the Fixture Editor.
- Then, using the new DMX Home value, calculate the user minimum and maximums for the Tilt range.
- Set your tilt to your new Tilt DMX Home Value.
- Begin increasing tilt until the fixture head is approximately perpendicular to its base.

- Record the Found Tilt DMX value after tilting the fixture 90° from the Tilt DMX Home Value

- Note the Minimum DMX Value Allowed for Tilt and the Maximum DMX Value Allowed for Tilt
- Calculate the User Min and Max Degrees using the following formulas (or by entering the values on the fields in this page and pressing Calculate):
- User Min Degrees= (90 ÷ (Found Tilt DMX - Tilt DMX Home Value)) * (Minimum DMX Value Allowed for Tilt - Tilt DMX Home Value)
- User Max Degrees= (90 ÷ (Found Tilt DMX - Tilt DMX Home Value)) * (Maximum DMX Value Allowed for Tilt - Tilt DMX Home Value)
User Min (deg) for Tilt User Max (deg) for Tilt - Enter the User Minimum, Maximum and DMX Home Values in the Eos Fixture Editor Tilt Range:
DMX User Label Min Home Max Min Home Max Quick Actions... Quick Labels... 0 + - Test for accuracy.
Fixture Defects
If none of the troubleshooting or profile correction steps help, there may be an issue with the fixture itself.
Certain mechanical defects may cause a moving fixture to behave inaccurately when compared to their profile or other fixtures of the same model. Unless a custom profile is created that matches the specifications of the fixture, it will not work correctly.
If you correct inaccuracies in a fixture profile, please report the necessary updates via the ETC Augment3d forums at community.etcconnect.com. When possible, please include a copy of the fixture manual.
Related Links/References