Electronic Theatre Controls Inc

How to Edit an Existing Fixture Profile to Visualize Shutters in Augment3d Correctly

Important-Icon.png

Augment3d does not utilize Eos' Shutter Ordering tool information and therefore all fixtures must match this orientation to visualize shutters properly.

Augment3d uses the following orientation of shutters: Hung Fixture: A-Top B-Right C-Bottom D-Left; Desk Fixture: C-Top D-Right A-Bottom B-Left

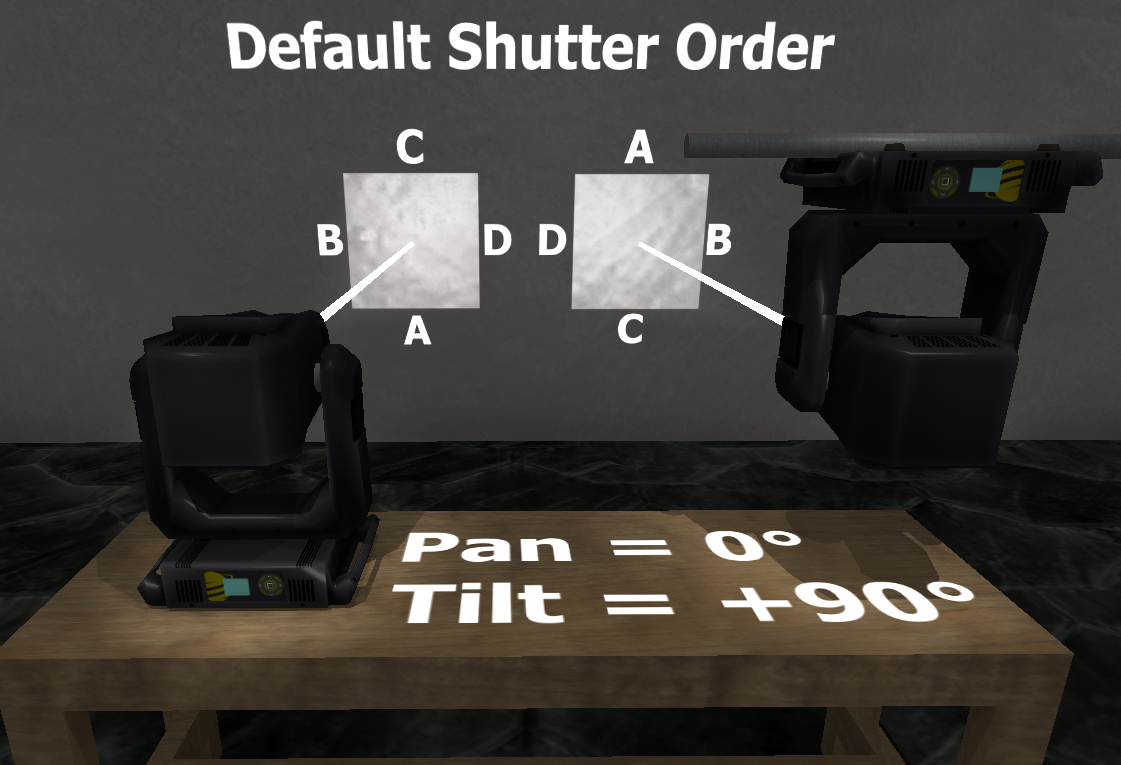
When the fixture is at Pan 0° and Tilt is +90°, the orientation of the shutters for a hung fixture is A-Top B-Right C-Bottom D-Left. For a fixture sitting on the desk (Y-Rotation 180°), the orientation of the shutters is C-Top D-Right A-Bottom B-Left.

Positive shutter rotation angles are always counterclockwise.

How to Edit an Existing Fixture Profile to Visualize Shutters in Augment3d Correctly

Important-Icon.png

WARNING: Existing fixture profiles should be edited before programming has begun. Editing existing profiles after a show has been programmed will lead to incorrect shutter data and require updating the show's programming.

Lonestar-Default-Edit-sized.gif

Determine the Fixture's Shutter Order

Note-Icon.png

This process can only be accomplished with a real fixture. It is not possible to determine visualization differences in Augment3d alone as Augment3d always uses the shutter order above.

  1. Set the fixture in an area with a wall or other plane perpendicular to the base of the fixture in the direction of positive tilt.
  2. Set the fixture to Pan 0° and Tilt +90°
  3. Adjust the zoom and/or edge parameters so that the shutters are clearly in focus
  4. If the fixture has a shutter assembly rotation parameter, home this parameter.
  5. Individually for each shutter:
    1. Insert the shutter (thrust) so the blade is clearly visible in the beam
    2. Note which blade was inserted compared to the default shutter order image above
      1. Example: The Eos control for Shutter A actually controls Default Shutter Order D
      2. You can fill out the Eos Shutter Control Shutter Letter column in Shutter Table - Step 1 (future steps are grayed out)
  6. Check the rotation direction of the shutter by adjusting the angle to positive degrees
    1. If the shutter blade rotated clockwise instead of counterclockwise, the DMX range will need to be inverted
  7. Retract the shutter from the beam (thrust = 0) to move on to the next shutter
Shutter Table - Step 1
Eos Existing DMX Address Eos Shutter Control Shutter Letter Default Shutter Order Shutter Letter Default Shutter Order DMX Address
    A  
    B  
    C  
    D  

Edit the Fixture Profile

  1. Navigate to Patch>Fixtures to see the fixture profile used in the show
  2. Select the fixture profile to show the parameters of the fixture
  3. Determine if the fixture has frame a/b numbers or thrust and rotation as parameters with DMX addresses
    1. Note: Fixtures with frame numbers will have virtual parameters for Frame Thrust and Angle
  4. If the fixture has Frame a/b numbers, use the following guide to map to the Shutter Letters.
    ("a" and "b" lower case refer to the push rod for each shutter not the shutter letter)
    • #1 = Shutter A
    • #2 = Shutter B
    • #3 = Shutter C
    • #4 = Shutter D
  5. Note the DMX addresses of the current shutter parameters
    1. You can fill out the Eos Existing DMX Address column in Shutter Table - Step 2 (future steps are grayed out)
Shutter Table - Step 2 
Eos Existing DMX Address Eos Shutter Control Shutter Letter Default Shutter Order Shutter Letter Default Shutter Order DMX Address
Frame a _:
Frame b _:
---or---
Thrust:
Angle:
  A  
Frame a _:
Frame b _:
---or---
Thrust:
Angle:
  B  
Frame a _:
Frame b _:
---or---
Thrust:
Angle:
  C  
Frame a _:
Frame b _:
---or---
Thrust:
Angle:
  D  
  1. Calculate the changes required based on your test performed in step 5b in Determine the Fixture's Shutter Order above.
    1.  For example, if Eos' existing control of Shutter A is Default Shutter Order D, note the DMX addresses that Eos currently uses for shutter A in the Default Shutter Order D fields
    2. You can fill out the Default Shutter Order DMX Address column in Shutter Table - Step 3
  2. In Eos, update the DMX addresses to match each parameter listed in the Default Shutter Order DMX Address column of the table in step 6b
  3. If rotation for each shutter is not counterclockwise for positive degrees, correct this in the following manner:
    1. For fixtures with Frame a/b numbers: Swap the DMX addresses between the "a" frame and "b" frame of the same number.
    2. For fixtures with Thrust/Angle: Invert the DMX Min/Max of the Angle range

clipboard_e736096cedd4170b740fcd29c7aa62433.png

Shutter Table - Step 3
Eos Existing DMX Address Eos Shutter Control Shutter Letter Default Shutter Order Shutter Letter Default Shutter Order DMX Address
Frame a _:
Frame b _:
---or---
Thrust:
Angle:
  A Frame a 1:
Frame b 1:
---or---
Thrust A:
Angle A:
Frame a _:
Frame b _:
---or---
Thrust:
Angle:
  B Frame a 2:
Frame b 2:
---or---
Thrust B:
Angle B:
Frame a _:
Frame b _:
---or---
Thrust:
Angle:
  C Frame a 3:
Frame b 3:
---or---
Thrust C:
Angle C:
Frame a _:
Frame b _:
---or---
Thrust:
Angle:
  D Frame a 4:
Frame b 4:
---or---
Thrust D:
Angle D:

Revolution Example:

Here, the real world shutter numbers are displayed on the right while the Augment3d default is displayed on the left. Hover over each screenshot of the profile table to see it displayed bigger. Augment3d will visualize both the same because it always uses the default shutter order despite which shutter is inserted in the real world.

Revolution Wide Shot.pngRevolution Wybron Real World Revolution Real World Revolution Wybron.png Revolution Wybron.png
Note-Icon.png

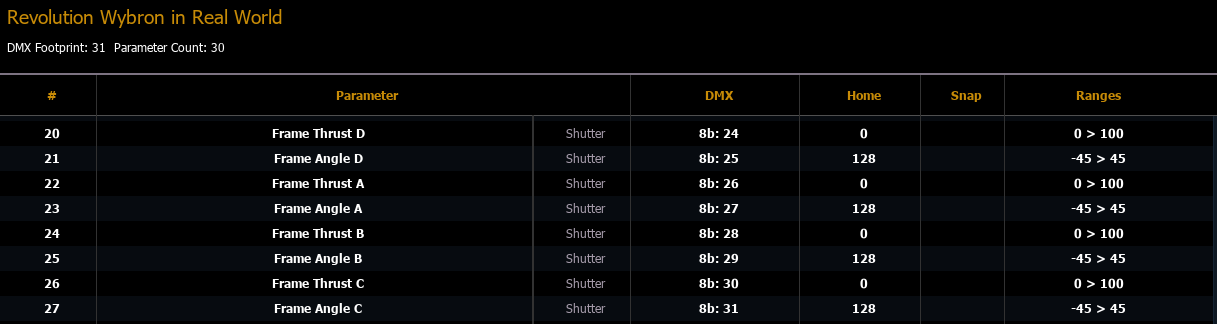
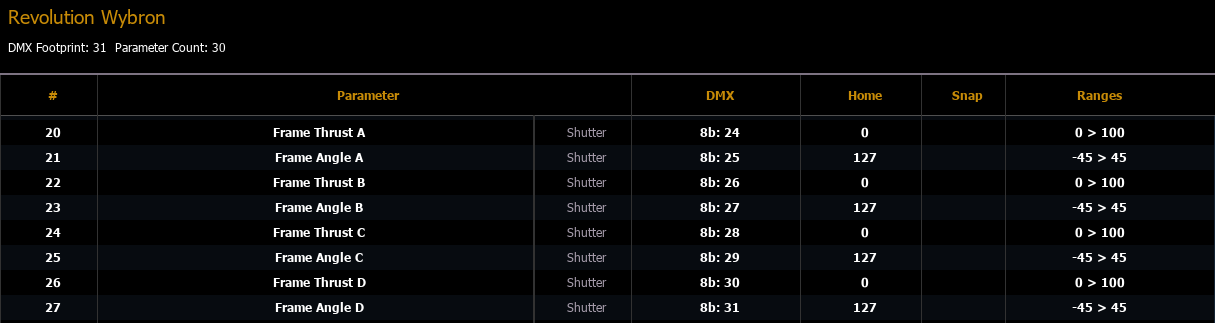
Note: In this example, instead of changing the DMX address column, the parameter names were changed to keep the DMX column in ascending order. This has the same effect as changing the DMX numbers as described above but can be trickier to remember what was changed and what still needs to be changed.


  • Was this article helpful?