iRFR Classic: Getting Started with Eos/Ion/Element
I. Connecting to Your Console
NOTE: If you have not already setup your console's wireless network and configured your iPhone/iPod to use that network, you need to start here: iRFR: How to Setup Your Wireless Network
- On your console, you will need to enable iRFR support (off by default). In the Shell, select Settings, then navigate to the Network tab and make sure "WiFi Remote" is checked. In earlier versions of software this was on the RFR tab and titled "Enable WiFi Remote" (in software 1.9.8+) or "Enable iPhone/iPod RFR" (in software before 1.9.8).


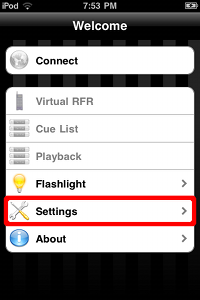
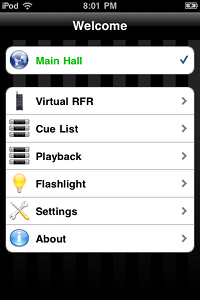
- Launch the iRFR app on your iPhone/iPod. At the Welcome screen, select Settings:
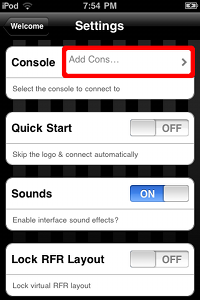
- The Console settings shows the selected console, which the iRFR will connect to. The first time you use the iRFR app, you will need to provide at least one console to connect to by clicking on "Add Console". More detailed information on network setup can be found here: iRFR: How To Setup Your Wireless Network
- Choose a Display Name for the connection, then enter the console's IP address. The Password is the case-sensitive name of the console, which you can find in the Shell under Settings>General:
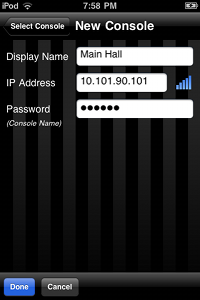


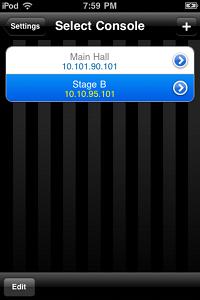
- When you are finished entering the console information, click the Done button at the bottom of the screen. You will now see a list of all the consoles you can choose to connect to. Select a console from the list to return to the main Settings screen. Then press Welcome to return to the Main Menu.
- Press Connect to establish a connection with the console. Once connected, you will see a the type of console your are connected to as well as the version of software it is running. The Virtual RFR, Cue List, and Playback menu items will become available:
II. Using the Virtual RFR
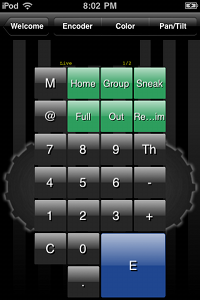
- At the Welcome screen, select Virtual RFR:
- The Virtual RFR is designed to work exactly as the actual Net3 RFR. Please refer to the RFR section in your console's manual for instructions on general RFR use. You can download your console's manual here.
Tip 1: To turn the encoder wheels, simply drag with your finger. To press the encoder wheels, one quick tap will do the trick.
Tip 2: Tap the Virtual RFR screen to cycle through different interface layouts. (You can also lock the layout in the Settings screen)
III. Using the Eos Attribute Encoder
NOTE:
This feature is available when connected to a console in the Eos/Ion/Element family.
Congo consoles use the standard encoder wheels in Device mode to control attributes.
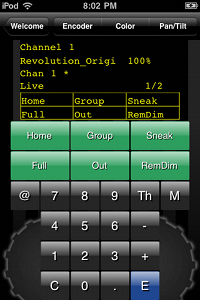
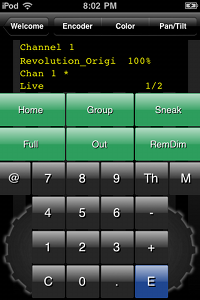
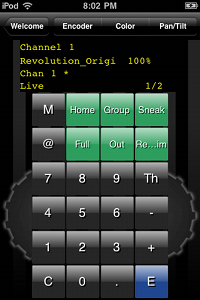
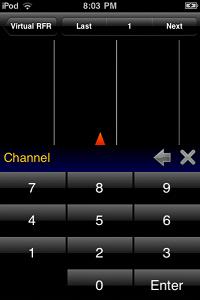
- At the Virtual RFR screen, select the channel(s) for which you want to adjust parameter values
- Select the Encoder button at the top of the Virtual RFR screen to open the Encoder screen. You can return to the Virtual RFR anytime by pressing the Virtual RFR button in the top left corner:

- From the top down... First you will find your selected channel(s). Use the Next/Last buttons to change the channel, OR select the channel number to enter a channel directly (tap anywhere else on the screen to cancel) To select a new set or range of channels, simply return to the Virtual RFR and use the standard channel selection commands.
- Next is the encoder itself. Everytime a line moves past the orange needle is one tick. Each tick changes the parameter value by an amount determined by encoder mode (coarse/fine) and the same acceleration algorithm as with actual console encoders. You will see a flash of green or red either side of the needle indicating an increase or decrease in value.
Swipe Right = increase parameter value
Swipe Left = decrease parameter value
Tap = stop encoder from moving. If already stopped, a tap is equal to one tick increasing or decreasing the parameter value depending on which side of the needle you tap on.
Pinch/Pull = adjust line spacing to increase or decrease the frequency of ticks. If you want to change the parameter value more rapidly, pinch the lines closer together. If you want to change the parameter value more slowly, pull the lines farther apart. (encoder mode (coarse/fine) also impacts the speed at which the parameter values change, see below...)
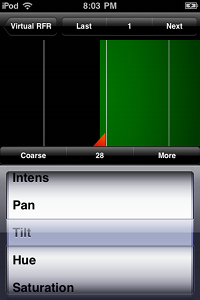
- Below the encoder, you will see a button to adjust the encoder mode, where you can toggle between Coarse and Fine. (In Fine mode, the background will turn dark blue) The number to the right of the encoder mode button is the parameter value. You will see this change as you swipe on the encoder. You can also press the button to enter the absolute parameter value manually:
- The More button will make show the advanced encoder controls: Home, Min, Max, Flip
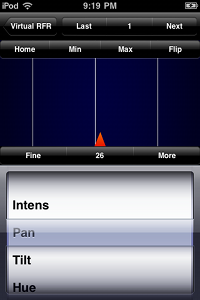
- The last piece of the screen is the parameter selection. This will populate with all available parameters on the first selected channel. Simply select the parameter you want to adjust.
IV. Using the Eos Color Picker
NOTE: This feature is available when connected to a console in the Eos/Ion/Element family or a Congo/CongoJr console running v6.0 software or later. For Congo functionality see: here
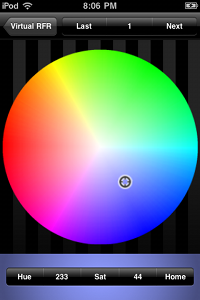
- Channel selection works just like the Encoder screen.
- The current color for the first selected channel is displayed by a small rotating indicator. Press anywhere on the color wheel to change the color, and the indicator will then move to the new color. If the fixture cannot get to the exact color you select, it will find the closest match.
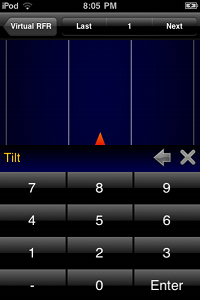
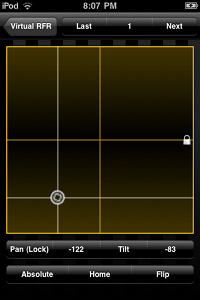
V. Using the Eos Pan/Tilt Encoder
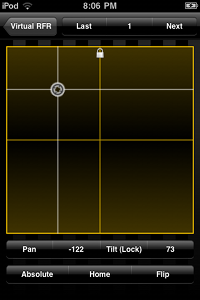
The current Pan/Tilt value for the first selected channel is displayed by the crosshair on the graph. To change the Pan/Tilt values click on the graph. In Absolute mode, the Pan/Tilt value will snap to the location on the graph that you touch. In Coarse and Fine mode, you need to drag your finger to slowly adjust Pan/Tilt values.
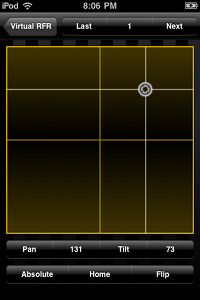

Pressing the Pan or Tilt buttons will allow you to lock movement on that parameter.
VI. Using the iPad Eos Encoder
This display allows you to build a custom encoder layout for any parameters available on the selected channel(s). This display is only available on the iPad. All available parameters are listed as buttons near the bottom of the screen. If there are more parameters than screen space, flick to scroll right and left to see more parameters.
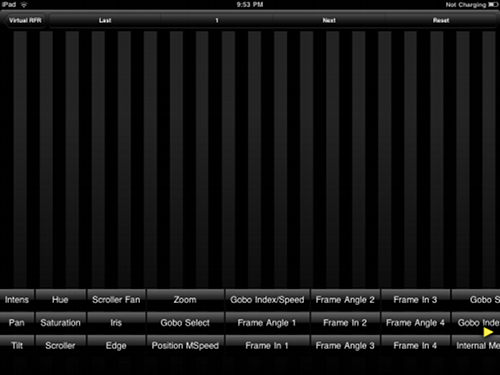
Click the button for each parameter you are interested in controlling, and the parameter's matching encoder will appear above.
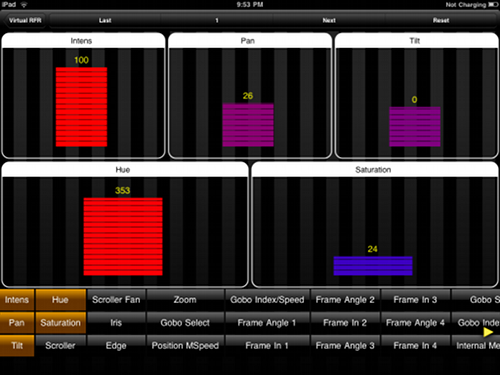
Once you have selected all the parameters you need to control, you can arrange them by dragging the white title bar.
Double Tap with Single Finger: to enter the parameter value directly with a number pad
Double Tap with 2 Fingers: to Home the parameter
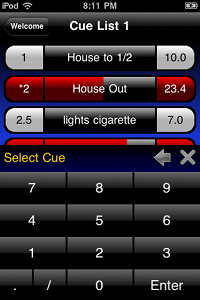
VII. Cue List
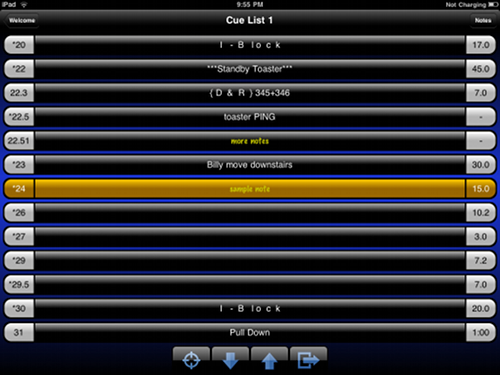
This display will allow you to navigate through all the cues in your show, but will not affect actual playback. By default, the display will follow the active cue. The active cue is centered. Above it are the previous 3 cues, and below it you will find the next 3 cues. The cue number is always displayed on the left side of the bubble. An asterisk(*) indicates that the cue has parts. The total duration of the cue is displayed on the right side of the bubble when the cue is not active. When the cue is active, this will show the time remaining in the fade.
The cue bubbles are color coded as follows:
Black = Inactive cue
Red = Active cue
Gold = Completed cue
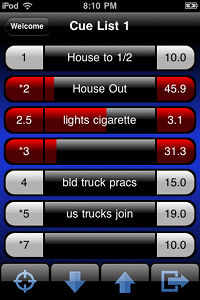
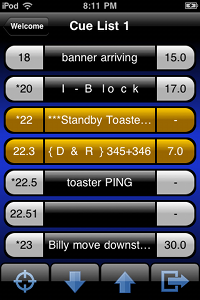
Pressing the Crosshair button will force the display to follow the current cue (keeping it centered). Pressing the arrow buttons will scroll through the current cue list. Pressing the Select Cue button will open a prompt that allows you to type in a specific cue to jump through. You can use the standard Eos command line syntax to navigate to any cue in any cue list.
VIII. Playback
This display is always centered on the current cue, and allows direct playback control. using the Stop/Back button, the Play button, and the Go To Cue button.
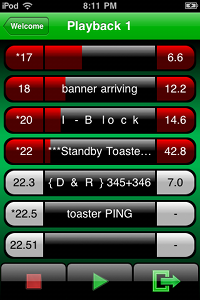
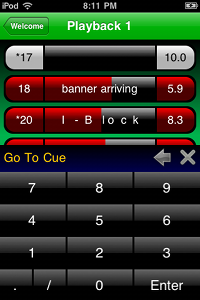
NOTE: the playback buttons are disabled by default for safety. To use the playback buttons, you must enable them in Settings.

IX. Cue Notes
On the iPad, you can touch any cue bubble to add a note. At this time, notes are saved on your iPad device and not transmitted to the console. Notes can later be copy/pasted into emails or any other application that works with text pasting.
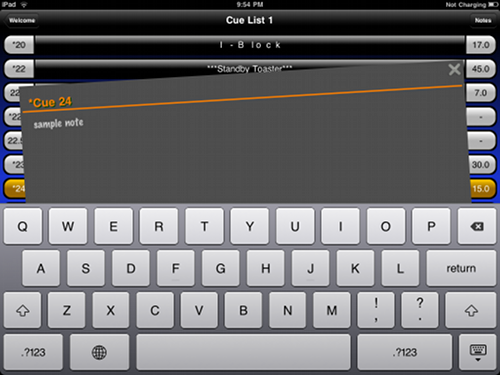
Notes will appear in the cue bubbles in yellow
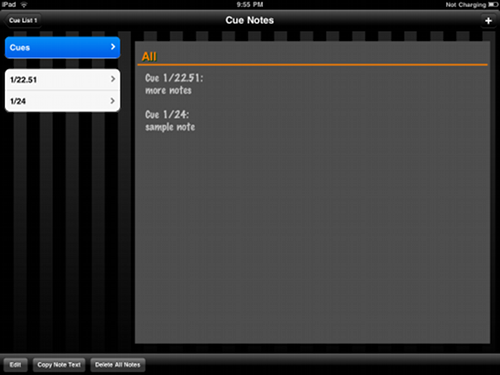
You can manage all Notes by clicking on the Notes button in the top right toolbar. Notes may also be accessed offline or while you are not connected to the console by clicking on the Cue List or Playback from the Main Menu. In the Notes display, clicking the Copy Note Text button will copy the text from the selected note to the clipboard. To copy the text from all notes, select "Cues" to show all notes, then press the Copy Note Text button.
X. Settings
- At the Welcome screen, select Settings to configure the following:
- Console: select which console to connect to.
- Quick Start: when this is turned ON, the iRFR skips past the splash screens and attempts to connect to the console automatically. If a connection is made, it goes straight into the Virtual RFR screen.
- Sounds: when this is turned ON, you will hear various sound effects (button presses, wheel turns, encoder ticks, etc...)
- Lock RFR Layout: when this is turned ON, you cannot cycle through the RFR interface layouts. Instead it remains locked on the chosen layout, and you will see a small padlock icon indicating that the lock is enabled.
- Allow Cue Playback: enable or disable the playback buttons on the Playback screen.
- Sleep Disabled: when this is turned ON, your iPhone/iPod will not automatically go to sleep after a period of inactivity. (This may decrease battery life)
XI. Flashlight
- At the Welcome screen, select the Flashlight for some quick light.
- Tap the screen to reveal 2 sliders which control the hue & brightness of the screen.
XII. About
- At the Welcome screen, select About.
- Here you will find a link to the charity's website, a link to the iRFR support post (what you are reading now), and the version of your iRFR app.