Electronic Theatre Controls Inc

Restore Instructions | Gio @5 Win 10 | From v3.1.0 and Higher

 Want a printable PDF of these instructions?

clipboard_e8113b2c0b9480616267d957471bc5c7d.png

Click the PDF Icon above the Table of contents!

Required Materials

  • USB Flash Drive
    • Used to backup show files and existing settings (if applicable)
  • USB Keyboard
  • USB Mouse
Important-Icon.png

This process will restore your console to the version of Eos that was current when your console left the factory. You will need to download the latest version of software and install it on your console to get it back to the latest version of software.


1) Backup Your Data

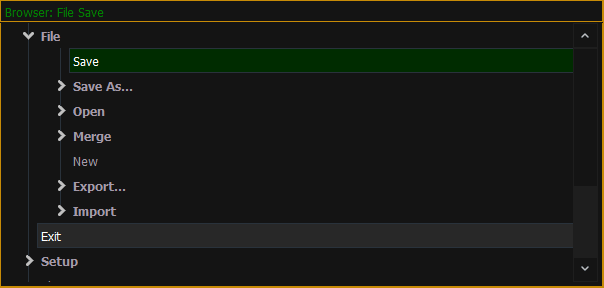
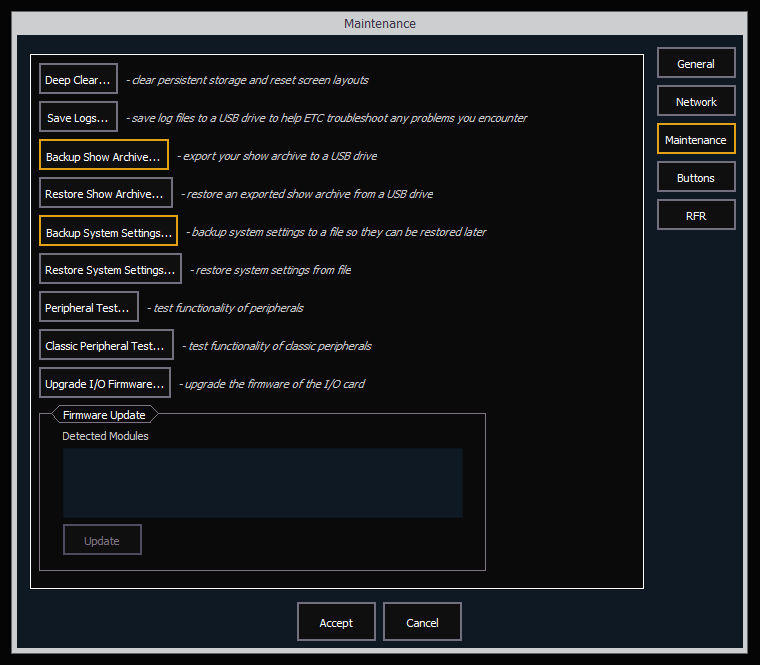
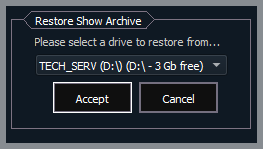
Backup Show Files and System Settings 

  1. Boot up your console and launch into {Primary}.
  2. Save your current show file.
    1. Double-tap the [Displays] key to open the Browser and navigate to File > Save.
  3. Exit out to the Shell.
    1. Within the already-open Browser, double-tap the line that says Exit.
    2. Tap {OK} when prompted.
clipboard_eb8c56db6eec60ff767657c18b41075ef.png
  1. Plug in the flash drive you want to backup your data to. This should be a different drive than the Re-Imaging Drive provided by ETC.
  2. Once in the Shell, tap on {Settings} and navigate to {Maintenance} on the right.
  3. Backup your show files to your flash drive.
    1. Tap {Backup Show Archive}.
    2. You will be prompted to choose the "Latest" show files or "Everything".
      1. Choosing {Everything} will backup all versions of each show while choosing {Latest} will only backup the most current version of each show.
    3. After making your selection, you will be prompted to choose which drive to export to. Be sure to select your flash drive and not the ETC Re-Imaging Drive. Tap {Save}.

clipboard_ed417c7b8faac03c7d8aa99aa8d1b1e09.png

  1. While saving, the console may appear unresponsive. Be patient and wait for the confirmation your files have been successfully processed. This may take several minutes.
  2. Tap {OK} once the files have been processed.
  1. Backup your system settings.
    1. Tap {Backup System Settings}.
    2. You will once again be prompted to choose which drive to export to. Be sure to select your flash drive and not the ETC Re-Imaging Drive. Tap {Accept}. Then tap {OK}.
clipboard_e900f65f6ae50e2503ea9da740a8b5798.png


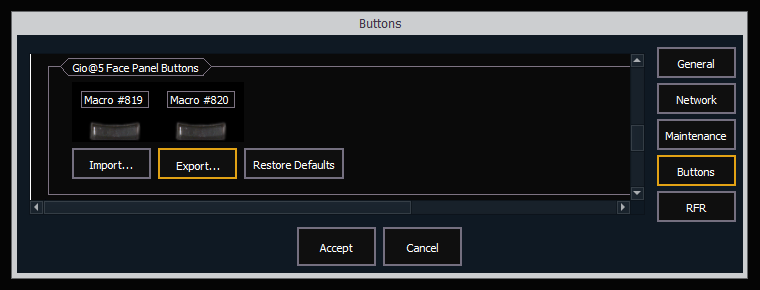
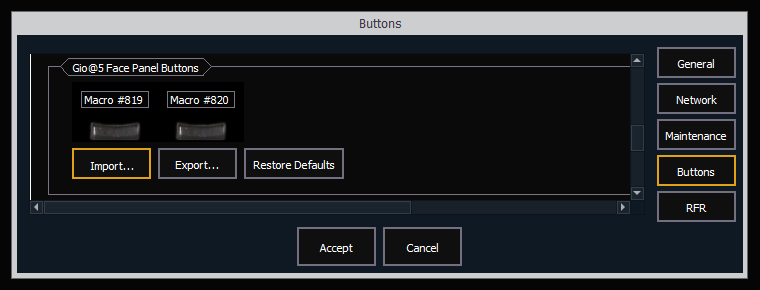
Export Button Configuration
  1. Tap {Buttons} on the right side of the Shell.
  2. Scroll to the bottom of the section titled "Gio@5 Face Panel Buttons" and tap {Export}.
  3. You will once again be prompted to choose which drive to export to. Be sure to select your flash drive and not the ETC Re-Imaging Drive. Tap {Accept}. Then tap {Ok}.
clipboard_ecf2452e9c306963a7bbb615032055559.png

2) Restore Your Console

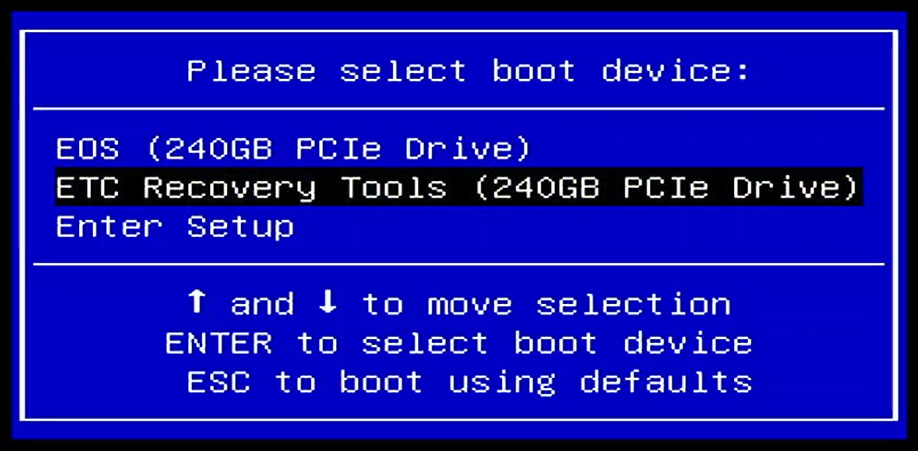
 One Time Boot into ETC Recovery Tools

  1. Power off your console.
  2. Ensure your USB keyboard is plugged into one of the blue USB ports on the back of your console.
  3. Begin repeatedly tapping the [F11] key on your USB keyboard. While repeatedly tapping [F11], power on the console. Continue to tap [F11] until the console boots to the blue "Please select boot device" screen.
  4. Use the [Down] arrow key on your USB keyboard to highlight the "ETC Recovery Tools" in white and press [ENTER] on your USB keyboard.
clipboard_e5dfdb09e12352b00ef94afbccbc3b52f.png
  1. The console will boot to the "ETC Console Image Utility". It may take 5-10 minutes for the tool to initialize
  2. Once prompted, press [Enter] on your USB keyboard to continue.
clipboard_eadf3381131a22320a24a3e594be627e2.png


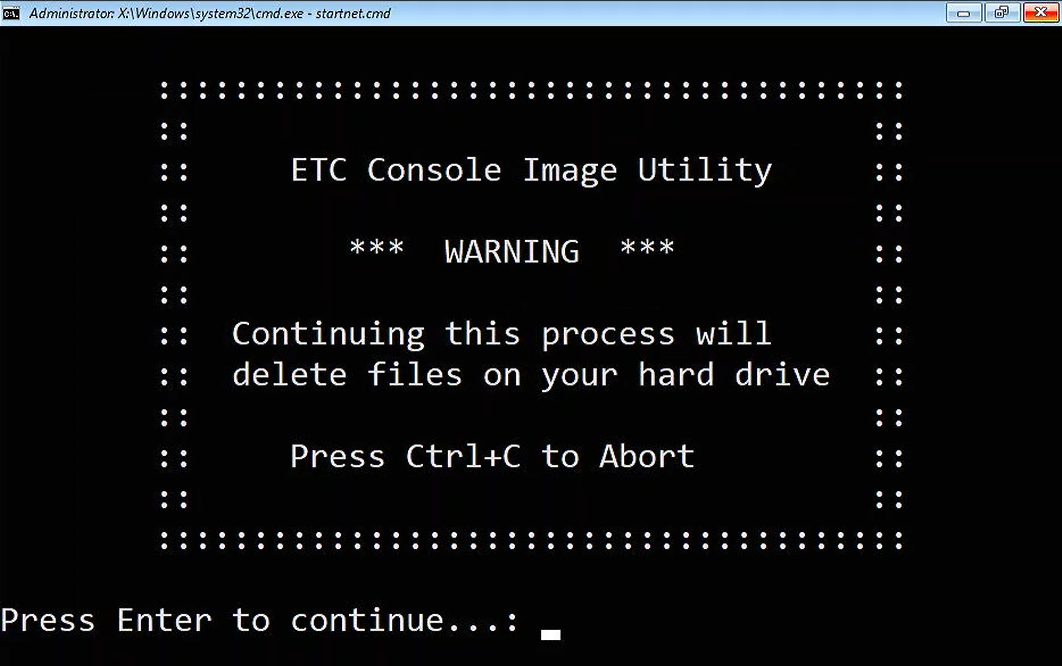
Restore the Disk Image

  1. You will be presented with several options in the Recovery Menu screen.
    1. Option 1 will restore only the C Drive.
      1. This will factory restore the console to the version of Eos that it shipped with and restore all settings to default, but will leave your show files intact.
    2. Option 2 will restore only the D Drive.
      1. This will factory restore the console's Show File Archive, Media Archive, and Model Archive to factory defaults but leave Eos and any settings on the console intact.
    3. Option 3 will restore both drives to factory default.
      1. This is the recommended option.
clipboard_e94d78098c1053aa9aeab6a246fcbccc1.png
  1. Type the number corresponding to the option you want to select on your USB keyboard and then tap [Enter]
    1. For example, [3] [Enter] will restore both drives to default.
  2. Confirm you want to proceed with re-imaging by typing [Y] [Enter] on your USB keyboard.


clipboard_ee7d14cd79b7b08b7bba9d1c1723f3fd0.png
  1. The console will then restore your selected drives. This process will take 5-10 minutes.
  2. Once complete and presented with the green screen, press [Enter] to proceed with the reboot.
clipboard_e4c4d2ca5ae9cec38b051599f7fbce0f5.png
  1. Your console should reboot into Eos and will be restored to the version of Eos your console shipped with.
  2. Use this article to download the latest version of Eos and update your console:
    1. Updating Software on an Eos Family Console
clipboard_e73650d5068bfb9f6a027ab2eaebf4ee2.png

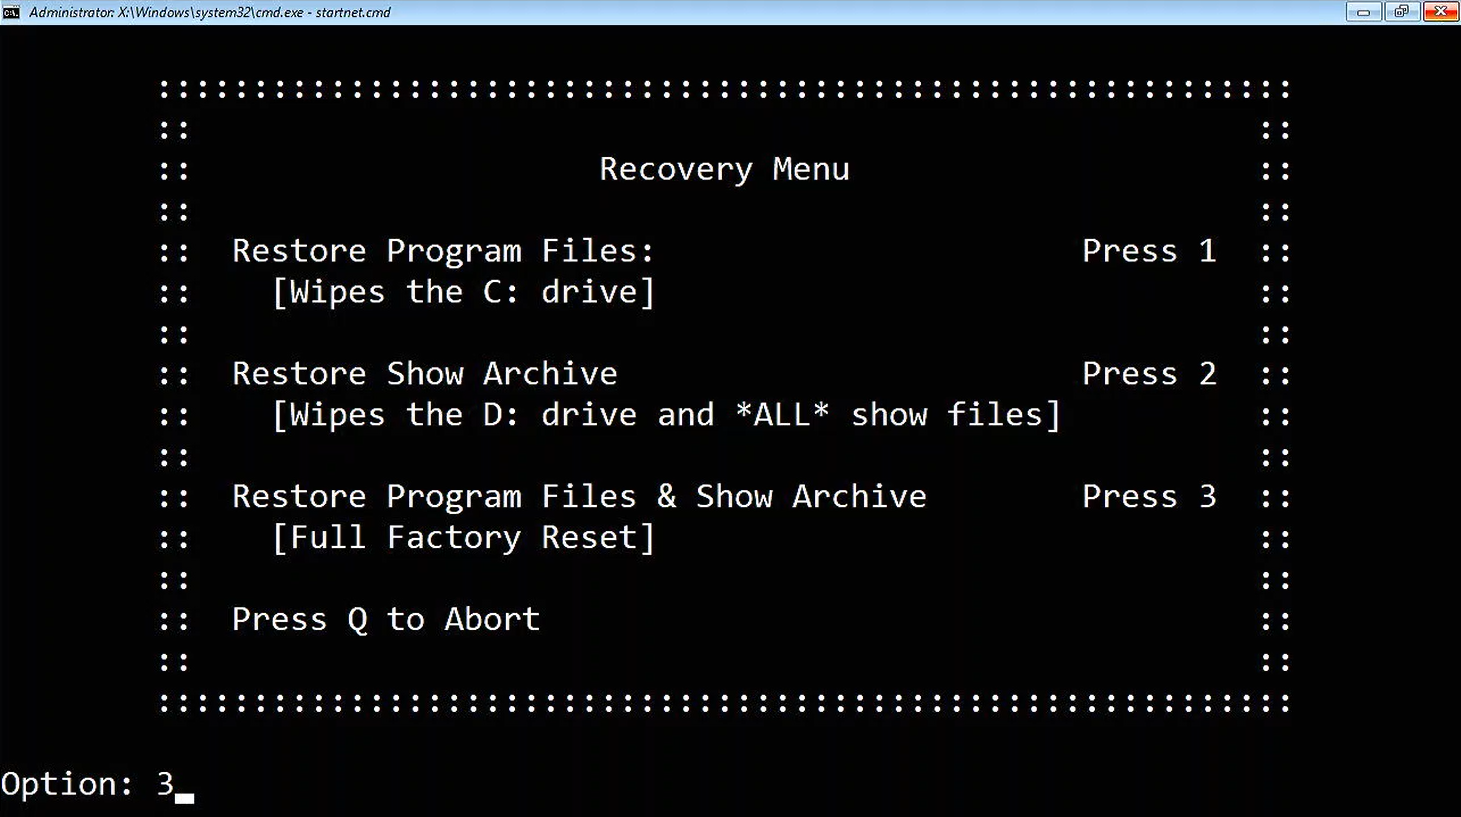
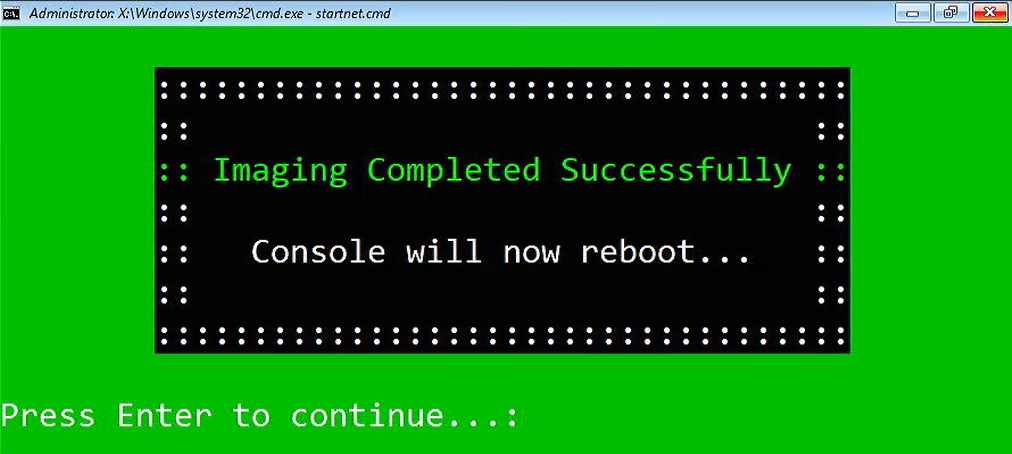
3) Restore Your Data

  1. Exit out to the Shell.
    1. Double-tap the [Displays] key to open the Browser and double-click the line that says Exit.
    2. Tap {OK} when prompted.
clipboard_e762421a4d28ef73e7f220b1f9b9a21b1.png
  1. Plug in the flash drive you originally used to back up your data.
  2. Once in the Shell, tap on {Settings} and navigate to {Maintenance} on the right.
  3. Restore your Show Archive from your flash drive.
    1. Tap {Restore Show Archive}.
    2. You will be prompted to choose which drive to import from. Be sure to select the flash drive you originally used to back up your data. Tap {Accept}.

clipboard_e46ea20fd29cff2f8a11b4335c9763669.png

  1. You will be prompted to choose the "Latest" show files or "Everything".
  2. Choosing {Everything} will restore all versions of each show from your flash drive while choosing {Latest} will only restore the most current version of each show.
  3. After making your selection, you will be presented with a prompt to select the shows you wish to restore. By default, all shows will be selected. Tap {Save}.
  4. You will be presented with a prompt explaining your files have been successfully processed. Tap {Ok}.
  1. Restore your system settings from your flash drive.
    1. Tap {Restore System Settings}.
    2. You will be prompted to select the .ini file you originally backed up to your flash drive. Once selected, tap {Ok}.
    3. You will be presented with a prompt explaining the system settings have been restored. Tap {Ok}.


clipboard_e907274c1ec731f3cfb3cd32673bf9a33.png


Import Button Configuration
  1. Tap {Buttons} on the right side of the Shell.
  2. Scroll to the bottom of the section titled "Gio @5 Face Panel Buttons" and tap {Import}.
  3. Eos should automatically detect the button settings on your flash drive. Tap {Yes} to confirm import, then tap {Ok}.
clipboard_e02d5265e48d933a1c6233710983e3151.png
  • Was this article helpful?