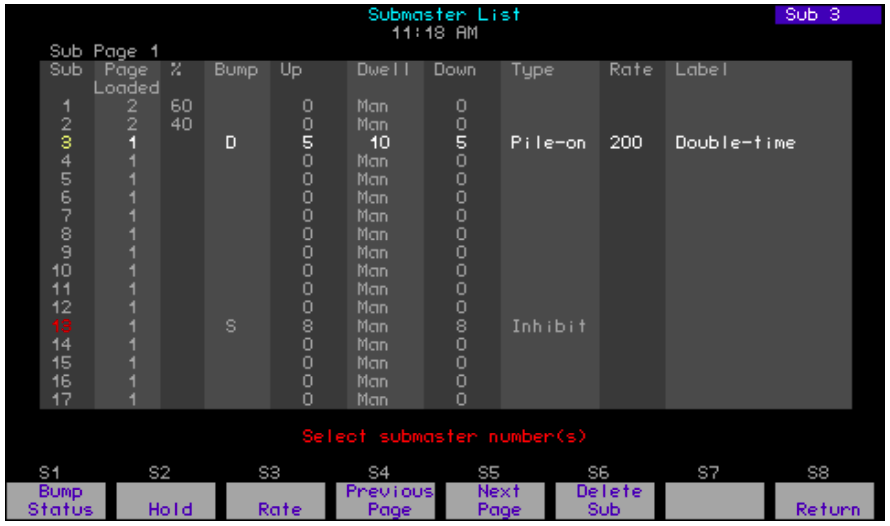
Submaster List in Express
Enter the Submaster List from softkeys in either Blind or Stage. In Blind, press [Sub] [S2], Sub List. In Stage, press [Sub] [S7], More Softkeys, [S2], Sub List.

The first 17 submasters are shown initially in the Submaster List. Page through the rest of the submasters using the [S5], Next Page and [S4], Previous Page, keys.
Unrecorded submasters are shown with a gray number in the Sub (first) column. A recorded pile on submaster has a green Sub number; an inhibitive submaster has a red Sub number; an effect submaster has a white Sub number. The Submaster List on the playback monitor has the same color coding.
The currently selected submaster page is shown following the words “Sub Page” at the top left of the display. Change submaster pages as explained in Specifying a submaster’s page, page 161. In general, the Page Loaded shown in column two will agree with Sub Page except for those submasters that were on stage when the current Sub Page was selected (see Submaster pages, page 154). The column marked “%” shows the submaster’s current level on stage as determined by its slider.
76 Use keyboard equivalent “B” in Expression Off-Line to assign labels. See Expression Off-Line, for details.
Note the following with regard to defaults in the Submaster List display:
- Pile-on is the default type for a newly defined submaster.
- Bump status does not display unless changed from the default, which is “enabled.”
- Dwell time defaults to “manual.”
- Rate does not display unless changed from the default, which is 100.
| Navigation and Feedback - Submaster List | ||||||
|---|---|---|---|---|---|---|
 |
 |
 |
 |
 |
||
| Select a submaster |  |
 |
 |
|||
| Select a field |  |
 |
||||
| White row | selected submaster | |||||
| Yellow field | selected field | |||||
Editing submasters
Changes made to a submaster in the Submaster List are immediately recorded. Edit in the Submaster List as follows.77
| Keystrokes: | Actions: |
|---|---|
| 1. Press [Blind]. | Selects Blind display |
| 2. Press[Sub] [S2], Sub List | Displays Submaster List Select submaster number(s) |
| 3. Press [1][3] [Enter]. | Selects submaster 23. Prompt reads: Select bump status and press ENTER (1=enabled, 2=disabled, 3=solo) |
| 4. Press [1] [Enter].a | Enables bump status for the submaster. Prompt reads: Enter upfade time |
| 5. Press [5] [Enter]. | Specifies 5 second upfade time Prompt reads: Enter dwell time (For hold or manual operation, press CLEAR until desired setting appears) |
| 6. Press [1][5] [Enter]. | Specifies 15 seconds dwell time Prompt reads: Enter downfade time |
| 7. Press [5] [Enter]. | Specifies 5 second downfade time Prompt reads: Select submaster type (1=Pile-on, 2=Inhibitive, 3=Effect) |
| 8. Press [2] [Enter]. | Specifies inhibitive type. Prompt reads: Use keypad to select submaster rate (0-2000, 100=Normal) |
| 9. Press [2][0][0] [Enter].a | Specifies rate 200. Prompt reads: Select submaster numberType submaster label (F6=clear to end, F7=previous submaster level, F8=next submaster label) |
| 10. Enter your label on the keypad, then press [Enter]. | Labels submaster 23 |
a If not changing the bump status, for example if the submaster is already enabled, you may just press [Enter].
77 Alternatively, you may press [Type] or [Time] keys to reach the field you want.
a You cannot gain access to the label field from the console. In Expression Off-Line, type the keyboard equivalent “B” here instead of [Enter] to produce the prompt shown in Step 9 and to enter the label field.
Deleting submasters
All recorded information can be removed for one or more submasters using the Submaster List. Follow the procedure below.
| Keystrokes: | Action: |
|---|---|
| 1. Press [Blind] [Sub] [S2], Sub List. | Displays Submaster List. Prompt reads: Select submaster number(s) |
| 2. Press [S6], Delete Sub. | Prompt reads: Top delete submaster(s), select number(s) and press ENTER to cancel, press CLEAR |
| 3. Press [5][And][7] [Enter]. | Specifies submasters 5 and 7 to be deleted. Prompt reads: To confirm, press ENTER To cancel, press CLEAR |
| 4. Press [Enter]. | Deletes submasters 5 and 7 |
