Obsession 1 CMOS Battery and BIOS settings
Problem
If your main screens never leave the ETC splash screen (or are just blank), always check the diagnostic port (directly off of the motherboard on the far left) for output. If you see a "media not detected" or "drive not ready" error on the diagnostic port, you may need to replace the dead CMOS battery and change the settings.
The Obsession I motherboard (486) had two different manufacturers over the life of the product. The first motherboard was made by Sigma, and the other was manufactured by Teknor. Please see the attached document for complete BIOS settings based on your BIOS version and/or manufacturer as well as the type of hard drive on the last page.
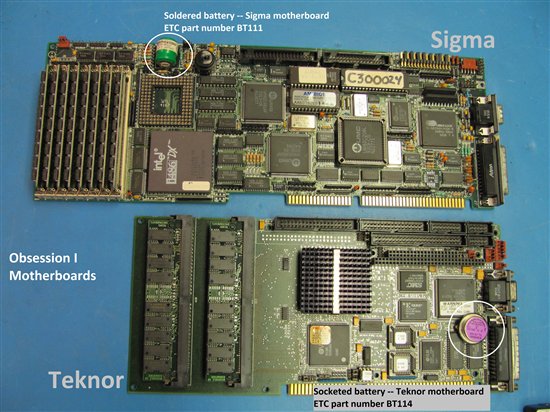
See the picture below for the actual location of the battery on the two motherboards.
Sigma Motherboards
The Sigma motherboard was the first board used in the Obsession I console. Sigma boards are identified by the length of the board taking up the entire depth of the console, front to back, and a soldered on battery on the left side next to the 8 sticks of RAM. If your board is a Sigma board, take note of the BIOS version on the chip with a shiny label marked, "AMIBIOS." Its CMOS battery is a 3.6v Lithium-ion barrel-shaped battery with solder mount leads. The ETC part number for Sigma board batteries is BT111.
Teknor Motherboards
The Teknor motherboard can be identified by its 2 sticks of RAM, being shorter than the depth of the console by about 2 inches, and having a disk battery at the back of the console. Its CMOS battery is a 3.6v Lithium-ion flat, silver, circular shaped 2-pin mount located near the rear of the 486 card sitting above. This battery can be pulled off of the board and replaced in the field, although care should be taken to lift it evenly off of the board from UNDER the black plastic, as the plastic is part of the battery. The ETC part number for Teknor boards is BT114.
The Obsession I motherboard (486) had two different manufacturers over the life of the product. The first motherboard was made by Sigma, and the other was manufactured by Teknor. Please see the attached document for complete BIOS settings based on your BIOS version and/or manufacturer as well as the type of hard drive on the last page.
Changing the CMOS or BIOS settings
A keyboard and a monitor plugged into diagnostics port is required
- Boot console - You will be prompted to hit DEL to enter setup
- Select Standard CMOS settings <Enter> <Enter>
- Set Time, Date, Year (page up/dwn).

You may experience issues with saving shows with years up until 2023. Please see this article for more details.
- Select hard drive type 47 (page up/down) and enter Cyln=1017, Head=16, Wpcom=0, Lzone=1017, Sect=63. This is the most common hard drive setting. If this doesn't work, check the model of the drive against the last page in the attached document for the correct setting. Sometimes there will be a tag inside on the hard drive with the correct settings as well. If that doesn't work, you may have a bad drive.
- Change floppy type to 1.44 (page up/down)
- Change video type to EGA/PGA/VGA (page up/down)
- <ESC> to main menu
- Select Advanced CMOS settings <Enter> <Enter>
- Check these settings against the attached document. You usually only need to change the typematic rate and disable the memory parity error check.
- Change boot sequence to C:,A: (page up/down) This will make sure that it boots from the hard drive first.
- <ESC> to main menu
- Save CMOS Settings and exit - Yes you want to save settings and exit
The console should now boot into Obsession software properly. If not, please contact a service center to coordinate a repair.