What are all the Playback Options, and what do they mean?
Issue
Every playback (cuelist, scene, or batch) has numerous functions for each key in the Master Control and Main Control sets. What does everything do?
Description
- Every cuelist, scene and batch has five master control set configurations: Standard, Intensity, Playback Rate, Effect Rate, and Effect Size
- By default, Standard and Intensity have the same settings
- To change the master control set used by a cuelist, scene, or batch when it is attached to a physical master, hold the Choose key for the physical master and select a different control set using the on screen button menu located above the fader. The active control set is highlighted in blue
- The name of the configuration by no means limits what functions may be assigned; all functions are available under every configuration
- Each cuelist, scene, or batch also allows the Main control set to be reconfigured
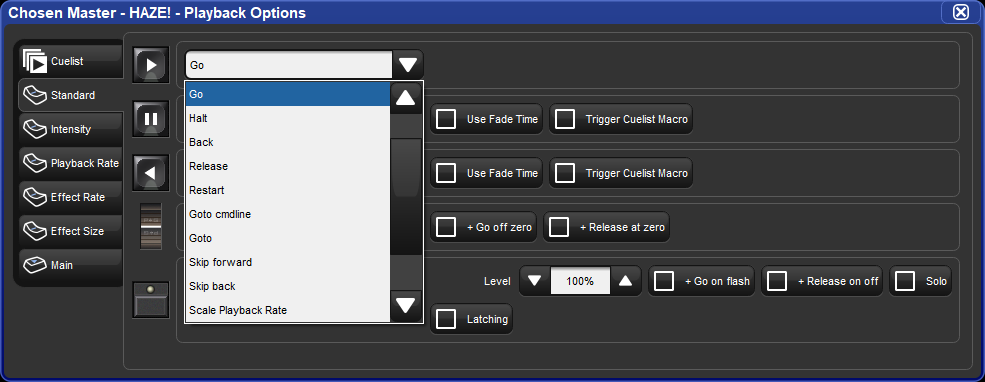
- To edit the control sets, open the Playback Options window for the applicable playback (cuelist, scene, or batch), and go into the appropriate tab
.JPG?revision=1&size=bestfit&width=50&height=150)
.JPG?revision=1&size=bestfit&width=50&height=100)
.JPG?revision=1&size=bestfit&width=50)
.JPG?revision=1&size=bestfit&height=150)
- The following options are available for the Go, Halt, and Back buttons for a playback's master control set, and the Assert, Release, Skip forward, Skip backward, Back, Halt and Go buttons for a playback's main control set:
- None: disables the control
- Assert: asserts the master
- Use Cuelist Time: disable to enter your own assert time for the master, overriding the cuelist's assert time
- Go: go's the master
- Halt: halts the master, stopping any fades that are in progress
- Use Fade Time: enable to use the previous cue’s fade time when going backwards instead of the cuelist’s Back Time
- Trigger Cuelist Macro: enable to trigger the previous cue's macro when going backwards
- Back: reverses the currently running crossfade
- Use Fade Time: enable to use the previous cue’s fade time when going backwards instead of the cuelist’s Back Time
- Trigger Cuelist Macro: enable to trigger the previous cue's macro when going backwards
- Release: releases the master
- Use Cuelist Time: disable to enter your own Release Time for the master, overriding the cuelist's release time
- Restart: goes to the first cue in the cuelist
- Goto cmdline: enters the Goto command into the command line, so that you can enter a cue number and press Enter to go to that cue
- Goto: enter a cue number to go to in the Target Cue cell
- Use Cuelist Time: disable to enter your own fade time for the master, overriding the cuelist's fade time
- Skip forward: go instantly to the next cue
- Skip back: go instantly to the previous cue
- Scale Playback Rate: adjusts the Playback Rate of the master by applying a scaling value to the base Playback Rate of the master
- Temporary: when temporary is turned on scaling will be applied when button is pressed down and released when button is released
- Action and Value: when action is set to "Multiply" then button press will multiply scaling value by the value specified; when action is set to "Set" then button press will change rate scaling value to value specified
- Scale Effect Rate: adjusts the Effect Rate of the master by applying a scaling value to the base Effect Rate of the master
- Temporary: when temporary is turned on scaling will be applied when button is pressed down and released when button is released
- Action and Value: when action is set to "Multiply" then button press will multiply scaling value by the value specified; when action is set to "Set" then button press will change rate scaling value to value specified
- Scale Effect Size: adjusts the Effect Size of the master by applying a scaling value to the base Effect Size of the master
- Temporary: when temporary is turned on scaling will be applied when button is pressed down and released when button is released
- Action and Value: when action is set to "Multiply" then button press will multiply scaling value by the value specified; when action is set to "Set" then button press will change rate scaling value to value specified
- Scale Fader Assignment: Adjusts scaling based on fader's control assignment. (i.e. if fader is assigned to "Scale Playback Rate" then a button assigned to "Scale Fader Assignment" will scale the Playback Rate)
- Temporary: when temporary is turned on scaling will be applied when button is pressed down and released when button is released.
- Action and Value: when action is set to "Multiply" then button press will multiply scaling value by the value specified; when action is set to "Set" then button press will change rate scaling value to value specified
.JPG?revision=1)
- The following options are available for a playback's fader:
- None: disables control
- I fader: The fader controls fixture intensities being output by the master
- Go off zero: the cuelist is triggered when the fader is moved from zero, as if you had pressed the Go key
- Release at zero: the cuelist is released when the fader returns to zero
- Manual crossfader: the fader controls the crossfading between cues manually: move the fader to the bottom to ‘pick up’ the next cue, then move it up to start the crossfade
- IPCB crossfader: the fader manually controls the crossfading of the intensity, position, colour, and beam parameters of the current cue. When the fader is at the top of its travel the current cue will be 100% crossfaded onto stage. When the fader is at the bottom of its travel the current cue will be completely released
- Scale Playback Rate: the fader adjusts the Playback Rate of the master by applying a scaling value to the base playback rate of the master
- Upper Bound: determines the amount of scaling applied to the master when the fader is at top of travel (Full)
- Lower Bound: determines the amount of scaling applied to the master when the fader is at bottom of travel (0)
- Scale Effect Rate: the fader adjusts the Effect Rate of the master by applying a scaling value to the base effect rate of the master
- Upper Bound: determines the amount of scaling applied to the master when the fader is at top of travel (Full)
- Lower Bound: determines the amount of scaling applied to the master when the fader is at bottom of travel (0)
- Scale Effect Size: the fader adjusts the Effect Size of the master by applying a scaling value to the base effect size of the master
- Upper Bound: determines the amount of scaling applied to the master when the fader is at top of travel (Full)
- Lower Bound: determines the amount of scaling applied to the master when the fader is at bottom of travel (0)
.JPG?revision=1)
- The following options are available for a playback's Flash key:
- None: disables the control
- Flash intensity at: brings the intensity to a specified level regardless of the assignment of the fader
- Level: proportion of the programmed intensity that contents are flashed to
- Go on flash: goes the master when the Flash key is pressed
- Release on off: releases the master when the Flash key is released
- Solo: sends intensity output of all other physical and virtual masters to zero while the Flash key is held
- Latching: action of the Flash key is maintained until it is pressed a second time
- Flash Fader at: flashes fader assignment to level specified in the options
- Level: proportion of the programmed intensity that contents are flashed to
- Go on flash: goes the master when the Flash key is pressed
- Release on off: releases the master when the Flash key is released
- Solo: sends intensity output of all other physical and virtual masters to zero while the Flash key is held
- Latching: action of the Flash key is maintained until it is pressed a second time
- Flash Fader Full: flashes the command assigned to the fader to its highest level
- Go on flash: goes the master when the Flash key is pressed
- Release on off: releases the master when the Flash key is released
- Solo: sends intensity output of all other physical and virtual masters to zero while the Flash key is held
- Latching: action of the Flash key is maintained until it is pressed a second time
- Flash Fader Zero: flashes the command assigned to the fader to its lowest level
- Go on flash: goes the master when the Flash key is pressed
- Release on off: releases the master when the Flash key is released
- Solo: sends intensity output of all other physical and virtual masters to zero while the Flash key is held
- Latching: action of the Flash key is maintained until it is pressed a second time
- Flash Fader Opposite: flashes the command assigned to the fader to either is highest or lowest level depending on the position of the fader. If the fader level is at 50% or higher then flash level is 0%. If the fader level is below 50% then the flash level is 100%
- Go on flash: goes the master when the Flash key is pressed
- Release on off: releases the master when the Flash key is released
- Solo: sends intensity output of all other physical and virtual masters to zero while the Flash key is held
- Latching: action of the Flash key is maintained until it is pressed a second time
- It also does the following commands listed above: Assert, Go, Halt, Back, Release, Restart, Goto cmdline, Goto, Skip forward, Skip back, Scale Playback Rate, Scale Effect Rate, Scale Effect Size and Scale Fader Assignment
- These may be edited on each cuelist, scene, or batch, or they may be set in your Preferences for each type of playback