Creating Syrcadia Function Blocks
This article describes how to use, modify or create your own Syrcadia Function blocks in v2.2 and above.
What are Syrcadia Function Blocks?
Syrcadia function blocks are scripts running in the background that can be easily configured by a definable User Interface (UI) dialog, embedded in Syrcadia.
These function blocks can be used to, for example: read sensor values then make decisions and control equipment based on the data received.
Static configuration parameters for these scripts can be entered by a user.
Dynamic input parameters can be received from settings in a day plan (Setpoints).
This data can be combined with data coming from other input sources such as sensors.
The function blocks can control items defined in Outputs.
More advanced scripting methodology allows to listen to data and send out control parameters to 3rd party equipment on the network or even in the cloud (e.g. 3rd party sensors, weather-report, 3rd party output devices).
The scripting technology (Python) provides a very powerful tool to extend and modify the functionality of the control system for e.g. highly custom features without needing to request a specific feature and waiting for it to make it into a released core code of Syrcadia.
The API or main communication methodology for data and control in and out of Syrcadia happens via the MQTT protocol, but a provided Syrcadia library handles the communication and subscription and encoding to this type of data.
How Do I Use an Existing Function Block?
In Syrcadia, navigate to Settings > Functions and select the green (+) icon to select a script template for a new function block.


A pop-up dialog will first ask you to name the function block, do not use Spaces use underscores.

Once the script is saved, this puts it in the working file of the configuration and is saved with the configuration here: C:\Users\yourusername\AppData\Local\RAYN\Syrcadia\Workspace\Scripts

Now, you can pause/resume the function. The function's status is indicated by the colored circle icon to the left of its name. Green indicates the function is running, red indicates that it is paused. The Setup column will let you know if the function is ready for use (Complete) or further configuration is required (Setup needed). Icons on the right-hand side of allow you to edit (pencil), delete (trash can), or view a description (question mark) of the function template.
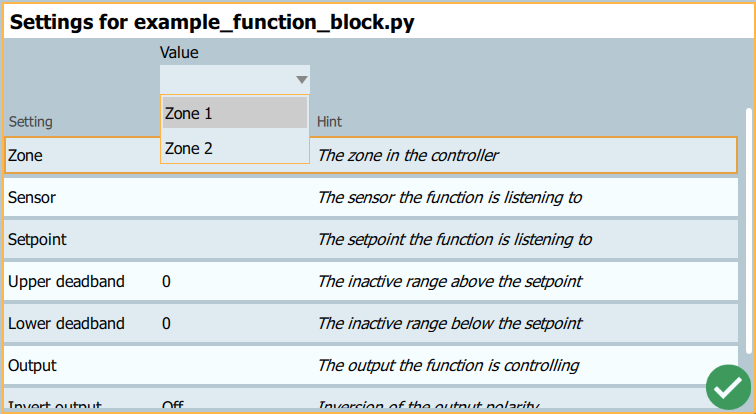
Click on the edit icon (pencil) on the right. This is the UI, where you will enter the user data for the function block, such as:
- The Syrcadia Zone to which the function will apply (create a new function block for each zone in your configuration that requires one)
- The Sensor (EnOcean or MQTT) from which data will be used
- The Setpoint the function will listen to--this must have been created prior to configuring the function block in Settings > Setpoints
- Deadband is the inactive range above/below the setpoint
- The Output (light fixture or other environmental control equipment) that the function is controlling
- Invert output
-
Off (default):
-
If sensorValue is > setpointValue + upperDeadband, then output is "off"
-
If sensorValue is < setpointValue - lowerDeadband then output is "on"
-
-
On:
-
If sensorValue is > setpointValue + upperDeadband then output is "on"
-
If sensorValue is < setpointValue - lowerDeadband then output is "off"
-
-
Select each setting and choose a Value from the pop-down menu that appears:
Once all configuration UI settings have had their value field populated, press the green check icon to save. Now, you can tap the start button next to name. If it turns Green then its running. A pop up message will appear if something has not been configured correctly and there is an error. If this happens, check the script's log file, found in the same directory location that the script was saved in above.

Current Default Function blocks
2_Point_Regulator.py
Watches a setpoint that is set to a level in Day Plan from a sensor. When above and below this setpoint (+/- deadband), the output state changes.
Setpoint is defined in Setting > Setpoints. The rest of the settings are in the Function block settings (Settings >Functions) accessed by selecting the pencil icon to the right of the function block name.
3_Point_Regulator.py
Watches a setpoint to control 2 output states. For example, whenever temperature > Setpoint + upperDeadband, the air-conditioning unit is turned ON, and when the temperature < Setpoint - lowerDeadband, the heater is turned ON. These outputs are turned OFF again once the opposite condition is met for each.
What Do I Need to Make My Own?
In order to develop your own function blocks, you need a few items to get started:
- Knowledge of the Python programming language
- Knowledge of MQTT is a bonus, especially if connection to 3rd party gear is required
- A PC with a Syrcadia Dongle and Syrcadia installed
- Python installed on the computer
- PyCharm, a Python Integrated Development Environment (IDE), download here: https://www.jetbrains.com/pycharm/download/
Where Do I Start?
The best place to start is to use an existing function block that is close to what your are trying to do and start to modify it. Syrcadia includes a base template that may be a convenient starting point, located here: C:\Program Files (x86)\RAYN\Syrcadia 2.3.0.20\ScriptTemplates\development. Make a copy of the base_template folder to work off of so that you preserve the format of the original template.
Syrcadia Function Blocks consist of two files, a UI configuration file (.config) and a the script itself (.py).
How Do I Create/Configure a Syrcadia Function Block Configuration User Interface?
The function block configuration user interface allows a user to easily configure the parameters of the function block. It is accessed in Syrcadia via Settings (gear icon) > Functions tab and then clicking on the pencil icon of a previously-created function block.
This UI is configured by editing the corresponding JSON file.
Example File:
[
{
"displayName": "Template",
"hint": "<i>Script template</i>",
"type": "template",
"value": "2_Point_Regulator"
},
{
"displayName": "Description",
"hint": "<i>Description of the script</i>",
"type": "description",
"value": "A simple switch regulator, allowing to control a single device capable of manipulating the property that is measured and move the property towards a set-point.<br><br>For example:<br>Sensor = Temperature-Sensor<br>Setpoint = Desired-Temperature<br>Output = Air-Conditioning<br><br>\r\n\t\tWhenever the measured temperature exceeds the (Setpoint + Upper_Deadband), the air-conditioning unit is turned on.<br>Once the measured temperature is below the (Setpoint - Lower deadband), the air-conditioning unit is turned off again."
},
{
"displayName": "Controller",
"hint": "<i>The name of the Syrcadia controller</i>",
"type": "controller",
"value": "Syrcadia_38895A"
},
{
"displayName": "Zone",
"hint": "<i>The zone in the controller</i>",
"type": "zone",
"value": ""
},
{
"displayName": "Sensor",
"hint": "<i>The sensor the function is listening to</i>",
"type": "sensor",
"value": ""
},
{
"displayName": "Setpoint",
"hint": "<i>The setpoint the function is listening to</i>",
"type": "setpoint",
"value": ""
},
{
"displayName": "Upper deadband",
"hint": "<i>The inactive range above the setpoint</i>",
"type": "number",
"value": "0"
},
{
"displayName": "Lower deadband",
"hint": "<i>The inactive range below the setpoint</i>",
"type": "number",
"value": "0"
},
{
"displayName": "Output",
"hint": "<i>The output the function is controlling</i>",
"type": "output",
"value": ""
},
{
"displayName": "Invert output",
"hint": "<i>Inversion of the output polarity</i>",
"type": "bool",
"value": "Off"
},
{
"displayName": "MQTT Broker",
"hint": "<i>The IP address to the MQTT Broker</i>",
"type": "ip",
"value": "127.0.0.1"
},
{
"displayName": "Version",
"hint": "<i>Script version number</i>",
"type": "version",
"value": "1.0.0"
}
]
Description:
displayName is the name of the template that will appear in the 'Select a Template for a new Function Block' pop-up dialog

hint is a string that provides some guidance to the user about what this setting is
type is the data type of the value, supported types are:
- Number
- String
- Bool
- IP (4 Bytes IP address or e.g. localhost)
- Zone (the name of the zone where the data is coming from, this will be converted by the Syrcadia library into a respective UUID)
- Sensor (the name of the sensor in that zone where the data is coming from, this will be converted by the Syrcadia library into a respective UUID)
- Input (the name of a setpoint input, coming from the day-plan in Syrcadia)
- Controller (the name of the controller the script should listen to, this will be converted by the Syrcadia library into a respective UUID)
- Output (the name of the output unit, defined in "devices", this will be converted by the Syrcadia library into a respective UUID)
value is a sensible default value for the setting that will populate the Value column, which can always be changed to a user's preferred value.

Add any parameters that your script will all the user to configure, ensuring you match the format of the existing parameters. The value of the 'Description' parameter will be displayed when the function block is selected in the New Function Block Template pop-up window, and can give the user an idea of the intended purpose of the custom template.

This description can also be accessed after the function block has been created by clicking on the question mark (?) icon to the right-hand side of the function's name in Settings > Functions:

This configuration file needs to be stored in the \Scripts\yourfunctionname directory with the same filename as its accompanying .py file.
How Do I Create a Syrcadia Function Block Script?
This file is responsible for doing the actual "hard work" and processing.
The script is written in Python and requires a number of blocks to run correctly:
Example:
# Load the syrcadia module with support functions for various tasks
import syrcadia
# Deactivate buffered mode for print function
flush = True
# Define global values for sensors and setpoints
sensorValue = None
setpointValue = None
# Define callback for sensors. This function will be called if there are incoming sensor values
def onSensorChanged(controllerName, zoneName, parameter, value):
if controllerName == controller and zoneName == zone:
print("onSensorChanged: " + controllerName + " " + zoneName + " " + parameter + " " + str(f"{value:.0f}"))
if parameter == sensor:
global sensorValue
sensorValue = value
print("New sensor value: " + str(f"{sensorValue:.0f}"))
# Define callback for setpoints. This function will be called if there are incoming setpoint values
def onSetpointChanged(controllerName, zoneName, parameter, value):
if controllerName == controller and zoneName == zone:
print("onSetpointChanged: " + controllerName + " " + zoneName + " " + parameter + " " + str(f"{value:.0f}"))
if parameter == setpoint:
global setpointValue
setpointValue = value
print("New setpoint value: " + str(f"{setpointValue:.0f}"))
# Define callback for settings. This function will be called if the config file settings change
def onSettingsChanged(settings):
print("Settings changed")
# Update settings from .config file
# Set-up variables for all settings
global ip
ip = syrcadia.settingValue(settings, "MQTT Broker")
global controller
controller = syrcadia.settingValue(settings, "Controller")
global zone
zone = syrcadia.settingValue(settings, "Zone")
global setpoint
setpoint = syrcadia.settingValue(settings, "Setpoint")
global upperDeadband
upperDeadband = float(syrcadia.settingValue(settings, "Upper deadband"))
global lowerDeadband
lowerDeadband = float(syrcadia.settingValue(settings, "Lower deadband"))
global sensor
sensor = syrcadia.settingValue(settings, "Sensor")
global invertOutput
invertOutput = syrcadia.settingValue(settings, "Invert output")
global output
output = syrcadia.settingValue(settings, "Output")
# Define callback for non-Syrcadia mqtt messages. Only necessary if you have used the syrcadia.subscribeMqtt call
def onMqttMessage(message):
print("Received message: " + message.topic + " " + str(message.payload.decode("utf-8")))
# To turn this into a json variable, use something like this:
# "jsonData = json.loads(message.payload)"". Needs "import json"
# Define callback for regular ticks. Here you can define any regular action you want to perform
def onTick():
# print("Tick")
global sensorValue
global setpointValue
global invertOutput
# Example of a simple on/off switch with a sensor and a setpoint that controls an on/off output
if sensorValue is not None and setpointValue is not None:
if invertOutput == "On":
if sensorValue > setpointValue + upperDeadband:
syrcadia.setOutputValue(controller, zone, output, "on")
print("Invert: Output status: on")
elif sensorValue < setpointValue - lowerDeadband:
syrcadia.setOutputValue(controller, zone, output, "off")
print("Invert: Output status: off")
else:
if sensorValue > setpointValue + upperDeadband:
syrcadia.setOutputValue(controller, zone, output, "off")
print("Output status: off")
elif sensorValue < setpointValue - lowerDeadband:
syrcadia.setOutputValue(controller, zone, output, "on")
print("Output status: on")
# Set callbacks for sensor, setpoint and settings changes
syrcadia.setSensorCallback(onSensorChanged)
syrcadia.setSetpointCallback(onSetpointChanged)
syrcadia.setSettingsCallback(onSettingsChanged, __file__)
# __file__ is used to tell the settings handler the base name of the script to be able to find the related .config file
# Set callback for non-Syrcadia mqtt messages. Only necessary if you have used the syrcadia.subscribeMqtt call
# syrcadia.setMqttCallback(onMqttMessage)
# Main script
print("Starting Python script 2-Point-Regulator...")
# Start Mqtt handler using the ip address from the config file and the default MQTT port number
syrcadia.initMqtt(ip, 1883)
# Subscribe to non-Syrcadia topics. If you use this, you need to define a callback function, like onMqttMessage above,
# and set it with syrcadia.setMqttCallback
# syrcadia.subscribeMqtt("sensors/LOCATION/SENSOR_NAME")
# Define tick callback that will be execute once per tick
syrcadia.setTickCallback(onTick)
# Start execution, the parameter defines how many seconds there will be between calls
syrcadia.execute(5)
The script is structured in several sections / building blocks:
- The first thing to do is to include the Syrcadia library [import syrcadia]. This library will take care of mapping human readable sensor and zone names into low-level UUID references and will take care of delivering the right values from the correct sources back to the script. It also triggers callbacks to the script if certain values have changed.
- The onSetpointChanged and onSensorChanged functions allow the function to extract the right setpoint/sensor data and store them in local variables.
- The onTick function is where the entire processing of data happens and where output data is created. This function is called every number of seconds defined in the syrcadia.execute(n) call.
This script needs to be stored in the \Scripts\yourfunctionname directory with the same filename as its accompanying .config file.
Storing the Function Block Script
In order to ensure your new function block script is available to you to utilize in Syrcadia, the script must be stored as follows:
- Ensure that both your .config and .py files have the same file name aside from the extension
- Save both of these files within a single folder that has the same name as the files it encloses
- Save this folder in the following directory the computer that has Syrcadia installed: C:\Program Files (x86)\RAYN\Syrcadia 2.x.x.x\ScriptTemplates\development
- If Syrcadia was open, close and relaunch
Importing Configuration Files With Custom Function Blocks to RAYN Touch
Currently, the only method for including custom function blocks in a system controlled by RAYN Touch is to build the function blocks into the configuration file via Syrcadia for PC, and then import the config to the RAYN Touch via USB flash drive. Use the following workflow to best achieve this:
1. If you are adding custom function blocks to an existing configuration file that is currently running on RAYN Touch, first ensure that the config is saved going to Settings > Files > Save and ensuring that the configuration file name appears in the upper right-hand corner of the screen in GREEN text. A RED config name with an asterisk (*) next to it indicates a save is needed.


2. Insert a FAT-32 formatted USB thumb drive into the slot on the side of the RAYN Touch and navigate to Settings > Files > Config Files (only available on RAYN Touch software) > Export. Confirm export file to USB via the pop-up dialog that appears.
3. Insert the USB drive into your PC that has Syrcadia software installed and open Syrcadia if it is not already running.
4. Navigate to Settings > Files > Open and load the configuration file. Note that all config files *must* be located within a folder called 'RAYN Configurations' in the root directory of the USB drive.
5. Now you can access custom function block templates and configure whatever you need for your system functionality. Once complete, save the configuration in the same location on the USB drive.
6. Re-insert the USB drive into the slot on the RAYN Touch and navigate to Settings > Files > Config Files > Import. Choose the updated config file from the list that appears and select the green check mark to confirm and load.