Triggering Eos from QLab using OSC
This article is about sending triggers from QLab to Eos. For the reverse scenario, see this article
Description
When playing back lighting and sound cues simultaneously, it is often desirable to have these execute at exactly the same time. This can be achieved using Open Sound Control (OSC), which allows sound to trigger lighting, or vice versa, using only a network connection between the devices - no additional hardware required. In this article, we will look at how to send triggers from the popular show control software QLab to an Eos family console.
This article is designed to get the new user up and running as fast as possible. There is also a series of articles on the et cetera blog which covers these topics in much more detail - these are linked in line, and in full at the end of the article.
This article is based on Eos software version 3.2.8 - in earlier versions, the show control and network settings were laid out differently
Setup and Shell Setting Changes in Eos v3.2 - Electronic Theatre Controls Inc
This article is also based on QLab 5
QLab is not an ETC product, and its layout and functions may change without warning
What is OSC?
OSC is an open protocol which allows the sending and receiving of human-readable messages between sound, lighting and other entertainment technology systems. For example, Eos can understand commands like "/eos/chan/1/out", which would turn off channel 1, or "/eos/cue/1/fire" to run Cue 1. Other devices implement OSC in different ways; for example, QLab would understand the incoming command "/cue/1/start".
In general, OSC messages can be sent either by UDP (User Datagram Protocol) or by TCP (Transmission Control Protocol).
- UDP messages do not have guaranteed-delivery - they may be dropped by a network switch without acknowledgment
- TCP messages are guaranteed-delivery - they must be forwarded by a network switch and they must be acknowledged by the receiving device
- If the sending device does not receive a timely acknowledgement from the receiver, it will re-send the message
QLab v4 only supports UDP messages. QLab v5 supports both UDP and TCP, but with important caveats; see below for more details.
Part of the trick in getting different devices to talk to each other is to have them speak each other's language. If the sound software can only output in the format "/cue/1/go", but the lighting console can only understand in the format "/lights/cue/1/fire", we have a problem. Luckily, both Eos and QLab are flexible enough to avoid this.
Formerly, the MIDI protocol was commonly used for this purpose. The advantage of OSC is that no additional MIDI hardware is required, as everything happens on the network, and that OSC is much more powerful. The trade-off is that OSC can be more time-consuming to set up.
et cetera: Introduction to OSC
For an in-depth look at how OSC is implemented in Eos, see the Eos Manual.
Setting Everything Up
There are 3 main steps we need to take to successfully trigger Eos from QLab via OSC:
- Set up a working network connection between both devices
- Configure Eos correctly to receive OSC
- Configure QLab correctly to send OSC to Eos*
*Please note you need to config QLab to work with the primary console in your system, it will not work if you point it at the backup or a client
The Network
A quick note on IP addresses
Each device on a network must have an IP address, which must be unique within that network. An IP address consists of 4 digits between 0 and 254 separated by decimal points. So with two Eos family consoles, one could have the address 10.101.100.20, and the other 10.101.90.101 - so far so simple.
But the IP addresses of two devices must be in the same subnet, if those devices want to talk to each other. Subnets are complex, but we can keep it simple for now:
- Set the Subnet Mask on every device to 255.255.0.0
- Consequently, for 2 devices to be on the same subnet, their first 2 numbers must be the same (10.101...), but the remaining numbers can be different (and at least one of them must be)
In the example above, the two Eos family consoles can talk to each other because they share the 10.101... Another device with the IP address 192.168.1.55 could not talk to them.
This is all you need to know for a basic network setup between Eos and QLab - for more detail, see the et cetera blog post on IP addresses and subnets.
Cooperating with the Sound Department
ETC uses default IP addresses per product type, as detailed in this article. Consoles with 1 network port (Windows XP consoles and ETCnomad Puck) use a default IP address in the 10.101.x.x range. Consoles with 2 network ports (Windows 7 or 10 consoles) use the 192.168.x.x range for their second port by default.
If you have full control over all devices on the network (including the sound computer), or the sound department also use the 10.101.x.x range, it is easiest to stick with these defaults, and ensure the IP address of the QLab computer is in the same range.
But often, someone else is running sound, and they may have their own network, with their own IP address scheme. In that case, here are your options:
- If your console has 2 network ports (see below), use the second port to connect to the sound department, and choose an (unused!) IP address in the same subnet as their QLab computer.
- If your console has 1 network port, you will need to come to an arrangement so that the console and the QLab computer end up on the same subnet. This may depend who has the fewest devices to readdress! Of course, if you don't use your console's network port (because you use DMX only), you can follow option 1 above.
Eos Network settings
To edit the network settings on a console, click [displays] to open the file browser and navigate to Setup>Device Settings>Network

The IP address for each port is set at the top of this window. If you need to change it from the default, do so - a reboot will be required.
Once this is set, scroll down to the Interface Protocols section. Ensure that UDP Strings & OSC is ticked for the port you want to use.

If you're connecting to sound using your port 2, you may want to turn off sACN and Artnet for this port, to avoid spamming the sound network with level data.
For this article, we'll assume we're using Port 1 on an Eos Ti, with an IP address of 10.101.92.101.
et cetera blog post on network settings
Note: If you're running Eos ETCnomad on a laptop, you will have to set the IP address in Windows or macOS, rather than in Eos.
If using Windows, search the web for "setting a static IP in [your Windows version]"
If using a Mac, use the same method as detailed below under "QLab Network Settings"
QLab Network Settings
QLab only runs on macOS, so head to the Apple menu (top left of the screen) > System Preferences > Network. Choose the relevant network interface from the list (usually either wired Ethernet or a Thunderbolt adapter) and assign and IP address and subnet mask. These are the settings we're using in this example:
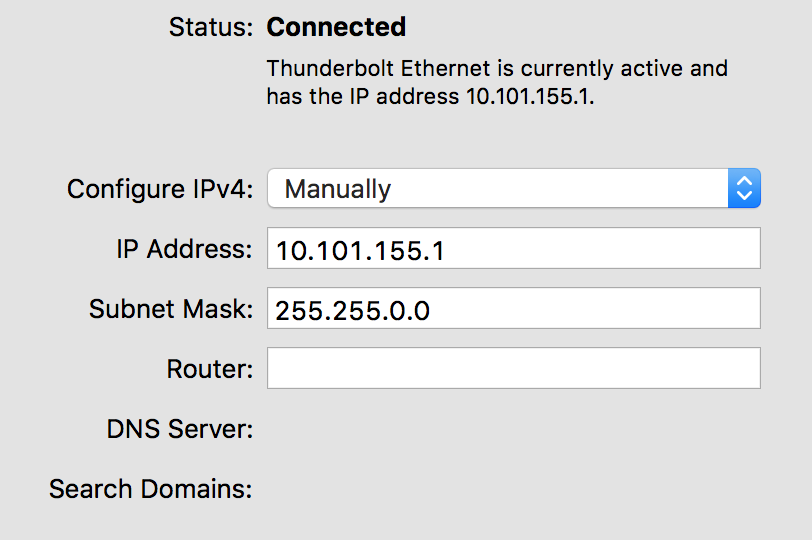
Hit Apply and exit System Preferences
Configuring Eos to Receive OSC
To edit the network settings on a console, click [displays] to open the file browser and navigate to Setup>System Settings>Show Control, then OSC.
The OSC options are divided into RX (receiving) on the left, and TX (transmitting) on the right. We're interested in RX, as Eos will be the receiving device.
Set the following:
OSC RX: Enabled
OSC RX Port: 8000 (this is an arbitrary number, it just needs to match QLab)
OSC Cue Recv String: leave blank, see the Notes section for how this field is used
OSC TCP Mode: leave at Packet Length (v1.0) as seen below
Your window should now look something like this:

Eos is now set up to receive OSC on IP address 10.101.92.101, port 8000. Now let's configure QLab.
Configuring QLab to Send OSC
Next, we need to tell QLab where to send its OSC commands. Open up a QLab workspace, then click on the gear symbol (bottom right) for Workspace Preferences. Choose Network in the left-hand menu.
Workspace Settings
QLab 4 and earlier
QLab supports multiple network patches. We'll create one in Patch 2. Give it the name "Eos", and choose the Ethernet connection in the Network dropdown (in this case: Thunderbolt Ethernet - 10.101.155.1). This tells QLab which of the Mac's network interfaces to transmit from.
In the destination field, type the Eos console's IP address (10.101.92.101 in this example), and the port number (8000) in the next field. No need for a passcode. Your window should now look like this:

Hit Done.
QLab 5
QLab 5 introduces a new network system, which allows you to create a specific patch for Eos family consoles. The setup is much the same as above, but telling QLab you're sending to an Eos family console will simplify cue creating later

Great! Now both devices have enough information to talk to each other.
Sending the OSC Commands
Creating an OSC Cue in QLab
Now that we've set everything up, it's time to send some OSC.
QLab works on the basis of cue elements that are inserted into a list, including sound, video, fade and other types of cue. We need to insert a Network cue, which looks like a little bullseye target (QLab 4) or a snowflake (QLab 5). Drag one of these into the workspace, and select it.
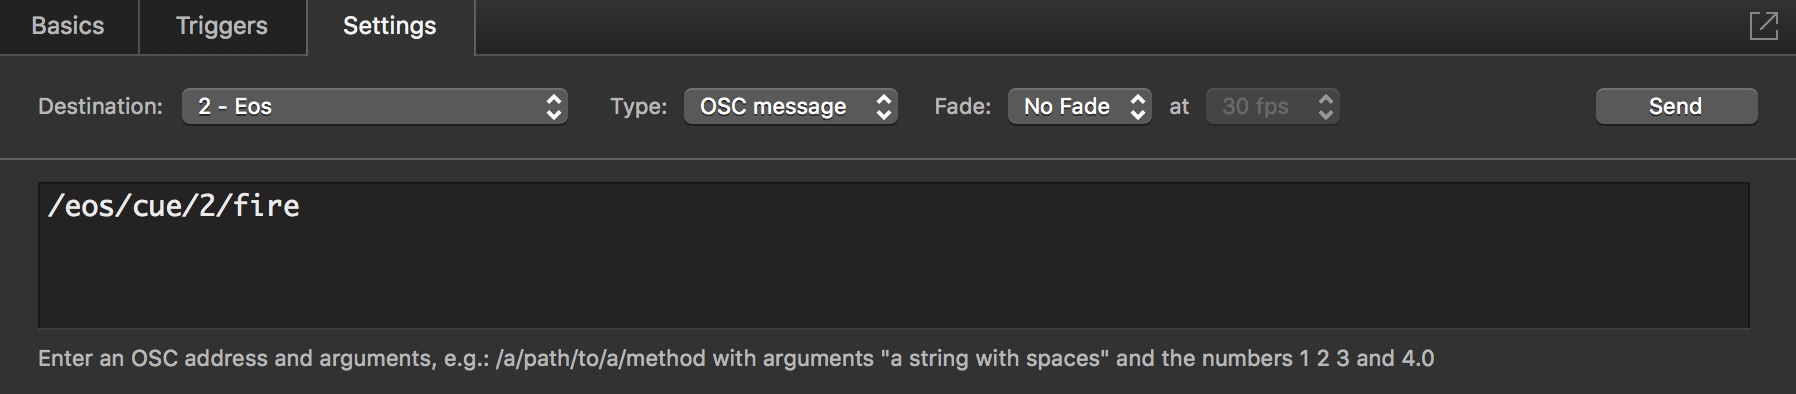
In the Inspector dock, you will see some options for the cue. Click on the Settings tab. First, we must choose the Eos patch we created earlier in the Destination dropdown.
QLab 4 and ealier
The Type should be set to OSC message.
The field below this is where you can enter your OSC message - and it can be anything, so we can have QLab send strings that Eos natively understands. Let's get it to fire Cue 2. Type in:
/eos/cue/2/fire
QLab 5
QLab 5's new interface has specific options relating to Eos family's OSC implementation to send messages via UDP. Simply select the Type of Eos target; Create the Network Patch to target Eos' Destination IP Address and Port; then choose which Command you want to do , and enter the relevant values. QLab will create the correct OSC syntax for you.

You can test this out by hitting the Send button in the Inspector dock, or by selecting the Cue and hitting GO (or spacebar).
If all went well, your Eos should have fired the cue at this point. If so, congratulations! If not, see below for troubleshooting tips.
Note that in Network Patch, QLab 5 adds support for sending messages via TCP. To use this feature, add the IP address of Eos and either Port 3032 or the Third-Party Port of 3037. See this support article for more details: TCP port for OSC communication with Eos Software - Electronic Theatre Controls Inc
At least as of v5.4.7, QLab creates a TCP connection each time it sends Network-type OSC messages to a Server (such as Eos) but then closes the connection after 3 seconds of inactivity. Once the connection is closed, Eos software cannot send messages back to QLab any longer until QLab re-establishes the connection by sending another OSC message. As such, it is not practical to have Eos software trigger QLab over a TCP connection.
What can I send?
The most common scenario is probably to trigger a specific cue, as above, but there are many other options. Some examples include:
/eos/cue/3/9/fire - fires cue 9 from cuelist 3
/eos/key/go_0 - presses the GO button
/eos/sub/1/full - sends Submaster 1 to full
For a full list of supported inputs, see the OSC section of the Eos Manual.
Turning OSC On and Off
At times you may want to turn the OSC link between lighting and sound off, especially during tech rehearsal. Rather than going into the Setup menu every time, you can create a pair of macros to enable and disable OSC RX, and put these on a magic sheet.
This is done half in live, and half in blind.
- From Live, start recording a macro using [Learn] [Marco] [1] [Enter]
- Hit [Displays] {Setup}, navigate back to the Show Control > OSC menu, and click on the OSC RX cell (it doesn't matter what state it's in)
- Hit [Learn] to finish learning
- Enter the macro list using [Macro] [Macro]
- Your macro will contain several unwanted things. Hit {Edit}
- Use the {Delete} softkey to remove all commands from the macro except OSC_RX and the final Enter (diamond)
- Using the "Common" tile in the CIA, insert the word "Enable" after OSC_RX, before the Enter
- Hit {Done} to finish editing your macro
The macro should now simply read OSC_RX Enable ♦
Within the macro list, copy this macro using [1] [CopyTo] [2], and edit the new macro to read OSC_RX Disable ♦
You can test these out from live, and create magic sheet objects to fire them.
It's Not Working!
If you followed the steps above, but the Eos cue won't fire, don't despair. There are many variables in a network system, and sometimes a little fault finding is required.
The Eos Diagnostics Tab
Eos has a built-in diagnostics tab, which shows you what's happening on the console in real time. To access it, hold down the [Tab] key, and type in 99, then release the [Tab] key. In the window at the top, you will see a live stream of events within Eos.
On the right-hand side, ensure the Incoming OSC option is set to On. Now fire the Network cue from QLab. If the OSC is reaching Eos, you should see the following message.

This confirms that the OSC command made it. If you see this but nothing happens, check that you actually have a Cue 2, and that the cuelist is loaded on the master.
If you don't see this, the OSC message isn't getting through.
First, check a few basics:
- Are the Eos OSC RX port and the QLab network patch port definitely the same?
- Does Eos definitely think that the correct IP address is online? With an empty command line, press [About], and check that the expected IP appears here
- This is especially important if running Eos on a laptop, which may have many network interfaces.
- Is this IP address correctly entered in the QLab network patch?
Network Connection Troubleshooting
If all of this is fine, we should confirm that the Mac and Eos can talk to each other at all. To do this, we will Ping the Eos from the Mac.
- Open the Terminal app on the Mac (Finder > Applications > Utilties > Terminal)
- Type in the following and hit Enter (with the IP address of your Eos):
ping 10.101.92.101 - You should see the reply "64 bytes from 10.101.92.101"
- If not, you will get the failure message "Request timeout for icmp_seq"
If your ping fails, investigate the cabling between your devices. Ensure both devices think the relevant network interface is online. If there's a switch in the mix, make sure it's happy (powered on, network lights blinking). If it's a managed switch, there may be settings preventing the message getting through. Managed switches are beyond the scope of this article; consult your favourite network expert.
If you're running Eos on a laptop, Windows or third-party firewall rules may be preventing the connection. Ensure that the Eos application is permitted free access to the relevant network interface.
If it still doesn't work, please contact ETC Technical Services in your region, who will be happy to help.
Notes and Additional Information
Now you have a basic overview of how to make QLab talk to Eos, and use OSC to fire a cue. There are other possibilities; most aspects of Eos control are exposed to OSC, so you could use QLab to raise a submaster, bring up a channel, or fire a macro. See the OSC section of the Eos Manual for details on how to access these functions.
QLab 4 does not natively support TCP client connections
While we have recommended TCP as the best way to send OSC from Eos, QLab doesn't support TCP connections natively as a client. Both programs can receive OSC via TCP but neither program is able to initiate the TCP connection due to both Eos and QLab acting as a server in a TCP connection, leaving them unable to communicate. For this reason it is best to use UDP OSC when communicating with QLab.
QLab 5 supports TCP client connections but closes them after 3 seconds of inactivity
In v5 QLab added support to create TCP connections: Network Cues | QLab 5 Documentation
In v5 QLab creates a TCP client connection when sending Network-type OSC messages to a Server (such as Eos) but then closes the connection after 3 seconds of inactivity. Once the connection is closed, Eos software cannot send messages back to QLab any longer until QLab re-establishes the connection. As such, it is not practical to have Eos software trigger QLab over a TCP connection.
Triggering Eos from other OSC Software
The same principles apply if you're using a different program to send OSC - simply set the correct IP address, port and string to send. However, some software may not allow you to send arbitrary strings (such as /eos/cue/2/fire), but instead restrict you to its own list of commands.
For example, let's say we're using the fictional software "Soundzz", which outputs OSC when you fire a cue, but only in the form "/soundzz/q/number/8/start". Obviously this is not in the format that Eos expects. In the OSC system settings, there is a field called OSC Cue Recv String. This allows you to type in the format of the message, with a variable where the cue number will be. In this case, click on the box, and type in
/soundzz/q/number/%1/start

Eos will then look out for messages in this format, take the number in the %1 position as a cue number, and fire that cue in Eos.
If required, you can use %2 to represent the cuelist number.
Further Reading
As stated, this article is intended as a quick (ish) guide to get you up and running, using a common but simple scenario. We have barely scratched the surface of the concepts discussed here - OSC can do many more things than just trigger cues, and there is no limit to how large and complex a lighting network can be. See the following links for more information.
- Triggering QLab from Eos using OSC - the reverse scenario
- The et cetera blog mentioned in the article, in full:
- In-depth introduction to OSC from opensoundcontrol.org
- About OSC Cues in QLab from figure53.com