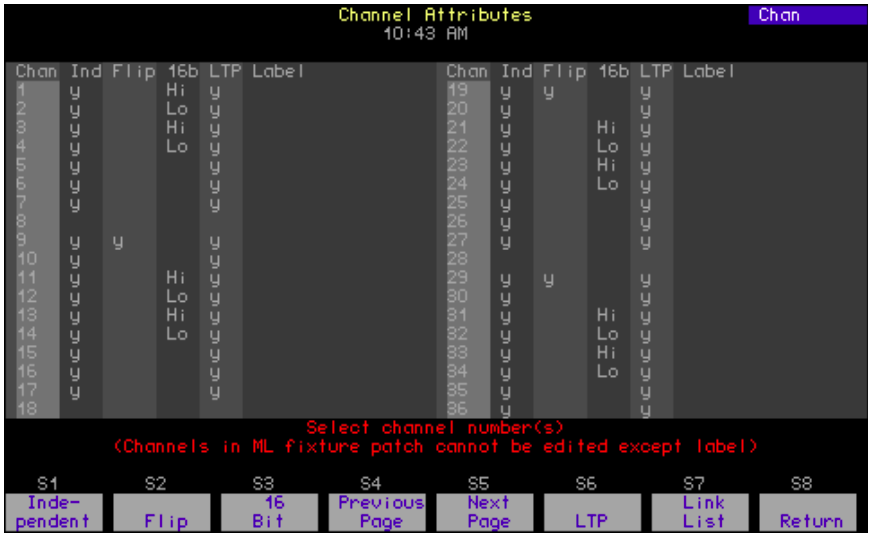
Channel Attributes display in Express consoles
The Channel Attribute display shows the following settings for every console channel.
- Independent
Designates whether a channel is dependent upon or independent of Grandmaster, Flash, Release, Solo, and Blackout control. Indepen- dent channels have a “y” in the Ind field, while all others have no en- try in the Ind field. You must press [Rel] twice, or in some cases, three times to release independent channels. - Flip
Means that the channel’s output is reversed. A flipped channel’s DMX output is at full when the channel is set to zero and at zero when the channel is set to full. In this display, a flipped channel is identified with a “y” in the Flip field, while unflipped channels have no entry in the Flip field. - 16-bit
Designates whether a channel is used for 8-bit or 16-bit data. For 8-bit data, there is no entry in the 16b field. For 16-bit data, the 16b field can have a “Hi” or a “Lo” label signifying whether the channel sends the higher or lower bits of a 16-bit control signal. - LTP
Designates whether a channel obeys the Highest Takes Precedence (HTP) or the Latest Takes Precedence (LTP) convention. HTP chan- nels have no entry in the LTP field of the display, while LTP channels are identified by a “y” in the LTP field. - Label
You cannot assign labels to channels with an Express console. How- ever, you may make labeling assignments for Express in Expression Off-Line and those assignments will remain when the show is read into an Express console. See Expression Off-Line.
Editing in the Channel Attributes display
Channels not patched to fixtures may be fully edited in the Channel Attributes display.26 Use [Thru], [And] and [Except] if you wish to select multiple channels.
Independent channels
A channel is normally controlled by the Grandmaster, Flash, Release, Solo, and Blackout functions but can be made independent of them.27 Use the procedure below to make one channel or a range of channels independent.
| Keystrokes: | Action: |
|---|---|
| 1. Press [Setup] | Selects Setup menu |
| 2. Press [1][1] [Enter]. | Selects Channel Attributes display |
| 3. Enter channel number(s) | Selects channel(s) |
| 4. Press [S1], Independent | Prompt reads: Enable/disable independent channel(s) (1 = Enable, 0 = Disable) (Channels in ML fixture patch cannot be edited except label) |
| 5. Press [1] [Enter]. | Each selected channel is set as independen |
Flipped channels
Two lights can be made to work in opposite directions if the output of one of them is flipped. For example, if a flipped conventional light and a normal conventional light both are recorded to a submaster, one will brighten and the other darken as the submaster slider is moved. Use the procedure below to flip one channel or a range of channels.
| Keystrokes: | Action: |
|---|---|
| 1. Press [Setup] | Selects Setup menu. |
| 2. Press [1][1] [Enter] | Selects Channel Attributes display. |
| 3. Enter channel number(s) | Selects channel(s) |
| 4. Press [S2], Flip. | Prompt reads: Enable/disable flipped channel(s) (1 = Enable, 0 = Disable) (Channels in ML fixture patch cannot be edited except label) |
| 5. Press [1] [Enter] | Each selected channel is set as flipped. |
26Use the Expression Personality Editor to edit fixture attributes.
27See Captured channels, for information about releasing channels on stage when they’re independent.
Channel data type
Channels normally contain 8-bit data but may be enabled to contain 16-bit data. Enabling for 16-bit data always involves the next channel in order as well. The enabled channel is called the “HI” channel because it holds the high-order bits of the 16-bit data. The subsequent channel is called the “LO” channel because it holds the low-order bits. Either may be reassigned to 8-bit data, but when you do that, both channels of a 16-bit pair are reassigned at once. Use the procedure below to enable one channel or a range of channels for 16-bit data.
| Keystrokes: | Action: |
|---|---|
| 1. Press [Setup]. | Selects Setup menu. |
| 2. Press [1][1] [Enter]. | Selects Channel Attributes display. |
| 3. Enter channel number(s) | Selects channel(s) |
| 4. Press [S3], 16b. | Prompt reads: Enable/Disable 16 bit channel(s) (1=Enable, 0=Disable) (Channels in ML fixture patch cannot be edited except label) |
| 5. Press [1] [Enter]. | Each selected channel is set for 16-bit use |
Channel convention
Channels normally operated in HTP mode but may be enabled to operate in LTP mode.28 Use the procedure below to enable one channel or a range of channels for LTP mode.
| Keystrokes: | Action: |
|---|---|
| 1. Press [Setup] | Selects Setup menu. |
| 2. Press [1][1] [Enter]. | Selects Channel Attributes display. |
| 3. Enter channel number(s). | Selects channel(s) |
| 4. Press [S6], LTP | Prompt reads: Enable/Disable “last takes precedence” channel(s) (1=LTP, 0= Normal) (Channels in ML fixture patch cannot be edited except label) |
| 5. Press [1] [Enter]. | Each selected channel is set as LTP |
28 See Output level conventions, for a comparative discussion of HTP and LTP channels.