How to Load a Configuration File to a Paradigm Architectural Control Processor (P-ACP) via web UI
Goal
After completing this how-to you will have loaded a configuration to a Paradigm Architectural Control Processor (P-ACP) via the processor's web user interface (UI). You may need to load a configuration because a change was made by an ETC Authorized Service Provider, because you have a loaner P-ACP installed from ETC Technical Services, or you had to replace your Compact Flash (CF) card.
Even if your P-ACP is part of a multi-processor system, or Paradigm Server system, uploading a config via a P-ACP's web UI is only intended to upload the configuration to a single processor: the one whose web UI you're accessing. This method cannot be used for sending configs to other P-ACPs or a P-CCS.
In a Server system it is recommended to upload configs to the entire system, or load the config via the network at the P-ACP's face panel. In a multi-processor non-Server system, you may have to upload the config to each P-ACP via their web UIs, or use the load from network option on a P-ACP's face panel.
NOTE: This functionality was added in Paradigm 5.0.1. If your P-ACP is running 4.2.x or lower, the Upload Project button does not exist.
First Step - Backing up Existing Config
Begin by backing up any configuration which may be in your processor. Please see our article on saving configurations here: How to save Config File from a Paradigm Architectural Control Processor (P-ACP).
This step can be skipped if you're loading the configuration to a loaner P-ACP, or if the CF card has been replaced, as either will not have a configuration to backup.
Second Step - Loading the new Config
- Make sure the config file (.pcf) is accessible on a computer which is connected to the lighting network, and in the same IP scheme as the other devices.
- Open an internet browser of choice, and navigate to the P-ACP's web UI by entering its IP address into the address bar.
- The default IP address for P-ACPs start at 10.101.10.101 for non-Server systems, and 10.101.11.11 for Server systems.
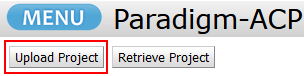
- Click the Menu button in the top left corner of the page, and choose Network from the menu.
- Click the Upload Project button.
- Click the Browse button, navigate to the .pcf file on your computer, and click Open.
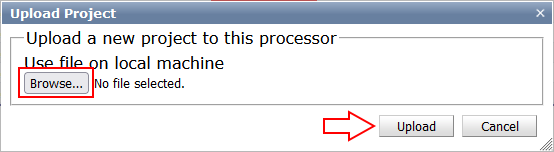
- Confirm the proper file is show next to the Browse button, and click Upload.
- It may take several minutes to finish, but once the upload is completed the web UI should indicate that all devices are online and in sync.
- NOTE: In a multi-processor or Server system, processors may report Offline or Out of Sync. This means the config should be uploaded to the other processors as well.
- Test the system at your stations to confirm everything is functioning as expected.
Related Links/References
- How to load a configuration file to a Paradigm Architectural Control Processor (P-ACP) via USB or SD
- How to load a configuration file to a Paradigm Architectural Control Processor (P-ACP) via Network
- How to save config file from a Paradigm Architectural Control Processor (P-ACP)
- How to change the IP address of a Paradigm Architectural Control Processor (P-ACP)