How to Setup a Stream Deck and Hog 4
Table of Contents
Description
This guide will describe the steps to connect a Stream Deck to a Hog 4 Console or Hog 4 PC using the 3rd party companion software.
The stream deck can be used to trigger OSC commands via companion software.These OSC Commands can be used to trigger physical buttons, and playback items on Hog 4. Companion software can be used with a PC or a Raspberry PI. The Stream Deck does not have any functionality if directly plugged into a console or Hog 4 PC.
A Raspberry PI can be used to run Companion software. The RPI Is not required but recommended to use in lieu of a PC. Many users like the RPI because of the low cost, small size, and due to the fact it can be used as a dedicated computer to run the companion software.
DISCLAIMERS
- This article was written by a High End Systems Support Specialist who uses the stream deck for external freelance work, this is not a feature or a directly supported piece of hardware to the Hog 4 system. The service team is not responsible nor qualified to support and troubleshoot 3rd party products.
- Normal Stream Deck software/USB input does not work with Hog 4 or Hog 4 PC, Companion software has to be used to send OSC commands.
Several 3rd party software and hardware devices are needed for this to work, they can stop working at anytime. Use at your own risk.
Some networking knowledge is required to set up the system.
Some OSC knowledge is helpful.
Some image creation and editing knowledge is helpful.
Hardware Requirements
-
Console or Hog 4 PC
-
Stream Deck (6, 15, or 32 key
-
Computer
-
Raspberry PI (Optional)
-
(Specific model used for creating this guide "CanaKit Raspberry Pi 4 4GB Starter PRO Kit - 4GB RAM")
-
(4GB Minimum to work with Companion software)
-
-
USB Keyboard (If using RPI)
-
HDMI Monitor (If using RPI)
-
Network cables
-
USB to Ethernet Adaptor (Optional)
-
Recommended to use as a dedicated network adaptor to HogNet
-
-
Network Switch (Optional)
Companion Setup
Elegato Stream Deck software needs to be completely closed in order to run Companion on a computer. This can be done either by Task Manager or Windows Task Bar (Closing the software with the "X" at the top will not completely shut down the program)
It Is recommended to disable Stream Deck software from startup programs, to prevent it from overiding Companion after a restart
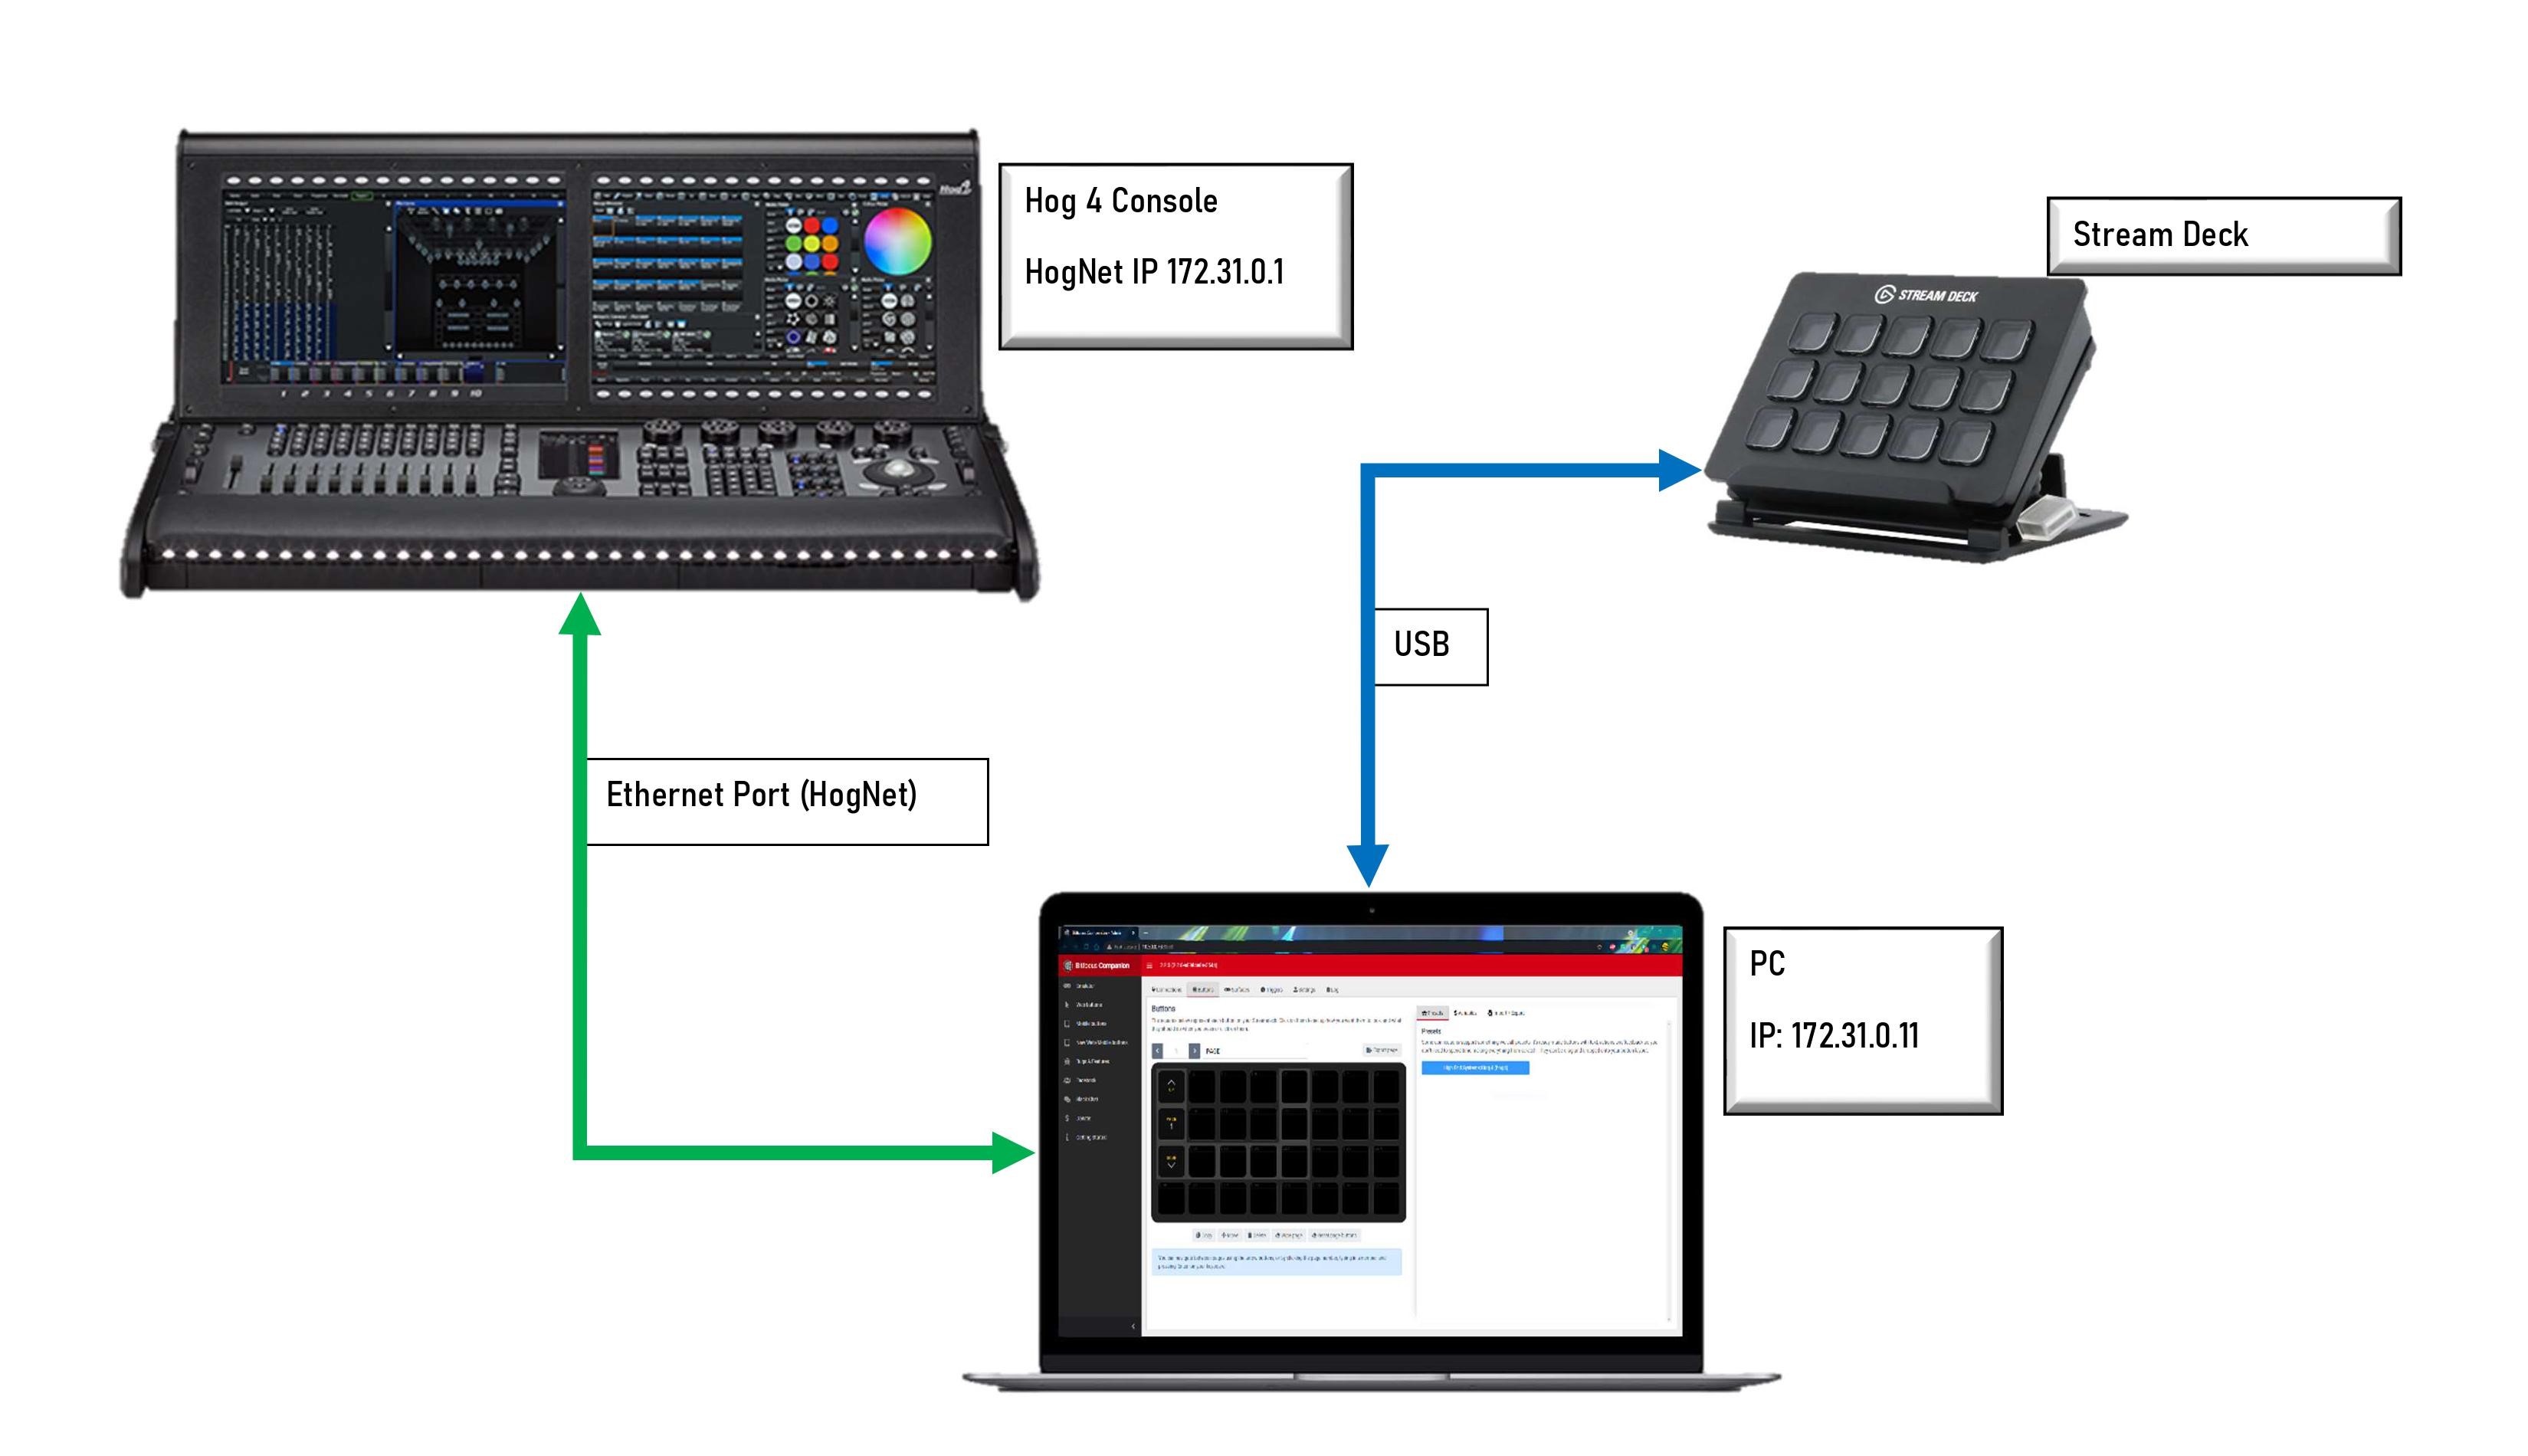
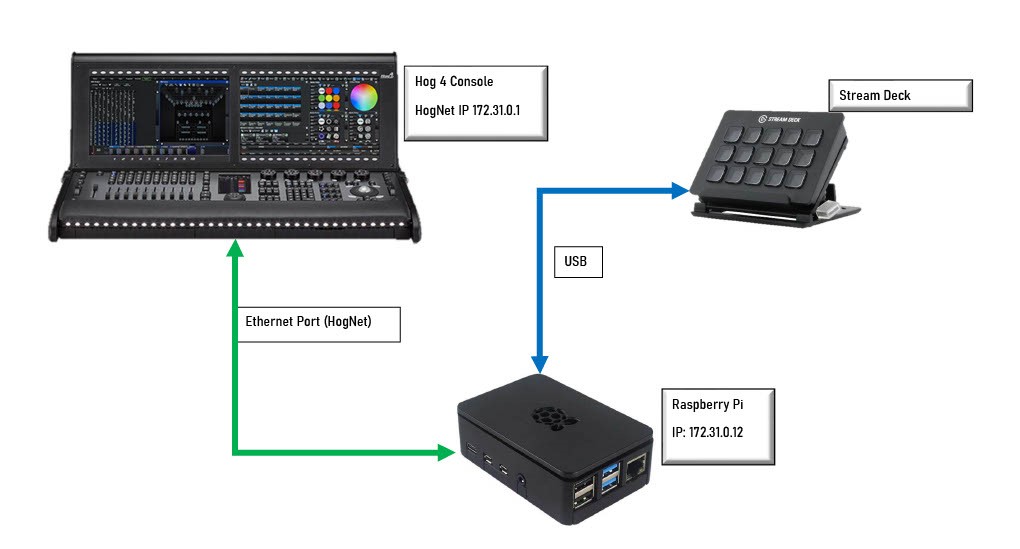
Network Map
Startup
- Connect the Computer to a Hog 4 console (HogNet port) or Hog 4 PC (Any ethernet port) via an ethernet patch cable.
-
Connect the Stream Deck to the computer via USB
-
Ensure Elegato Stream Deck software is not running in the background
-
Launch Companion software
-
Select the network interface you intend to use (Likely an "Ethernet" Adaptor)
-
If running Hog 4 PC and Companion on the same computer select a loopback or local host adaptor (127.0.0.1)
-
-
Launch the GUI, This will open the interface in your default browser
Scan for Connected Stream Decks
- Select the "Surfaces" tab
- Select "Rescan USB"
- Your Stream Deck should show up as a surface
Setup Hog 4 Connection
-
Select the connections tab
-
Search for the "High End Hog4 Module"
-
Press "Add"
-
Press "Edit"
-
Set the Target IP to the IP Address of the HogNet Adaptor on your console or Hog 4 PC
-
Default IP of HogNet is 172.31.0.1
-
Default OSC port is 7001
-
-
Change the IP address of the computer running Companion to be in the same range
-
How to Change IP Address on Windows 10 for Use with ETC Networks
-
Recommended to set the computer running Companion to:
-
IP: 172.31.0.11
-
Netmask:255.255.0.0
-
Gateway: 172.31.0.1
-
(A restart of the software might be required after changes are made)
-
-
Create Layout
- Select the "Buttons" Tab in Companion
- Select Presets
- Select High End Systems: Hog 4
- Select and drag keys from the preset panel to the desired buttons on the stream deck
Hog Setup:
- Ensure the HogNet port is in the same range of the computer running companion software
- [SETUP] (Control Panel) (HogNet) to configure these settings, Recommended to set the Console running Companion to:
- IP: 172.31.0.1
- Netmask:255.255.0.0
- Gateway: 172.31.0.1
- [SETUP] (Control Panel) (HogNet) to configure these settings, Recommended to set the Console running Companion to:
- Configure OSC Input
- [SETUP] (NETWORK)
- Right-click on "Console", press "Settings"
- Select the (Open Sound Control) tab
- Enable OSC Input
- Ensure the grayed out IP address is the output address in Companion
- Ensure the Port is 7001
- Enable OSC Output
- Input the IP address of the device running Companion
- Ensure the Port is 7001
- Press "OK"
The Computer running Companion should now be able to send OSC commands to Hog
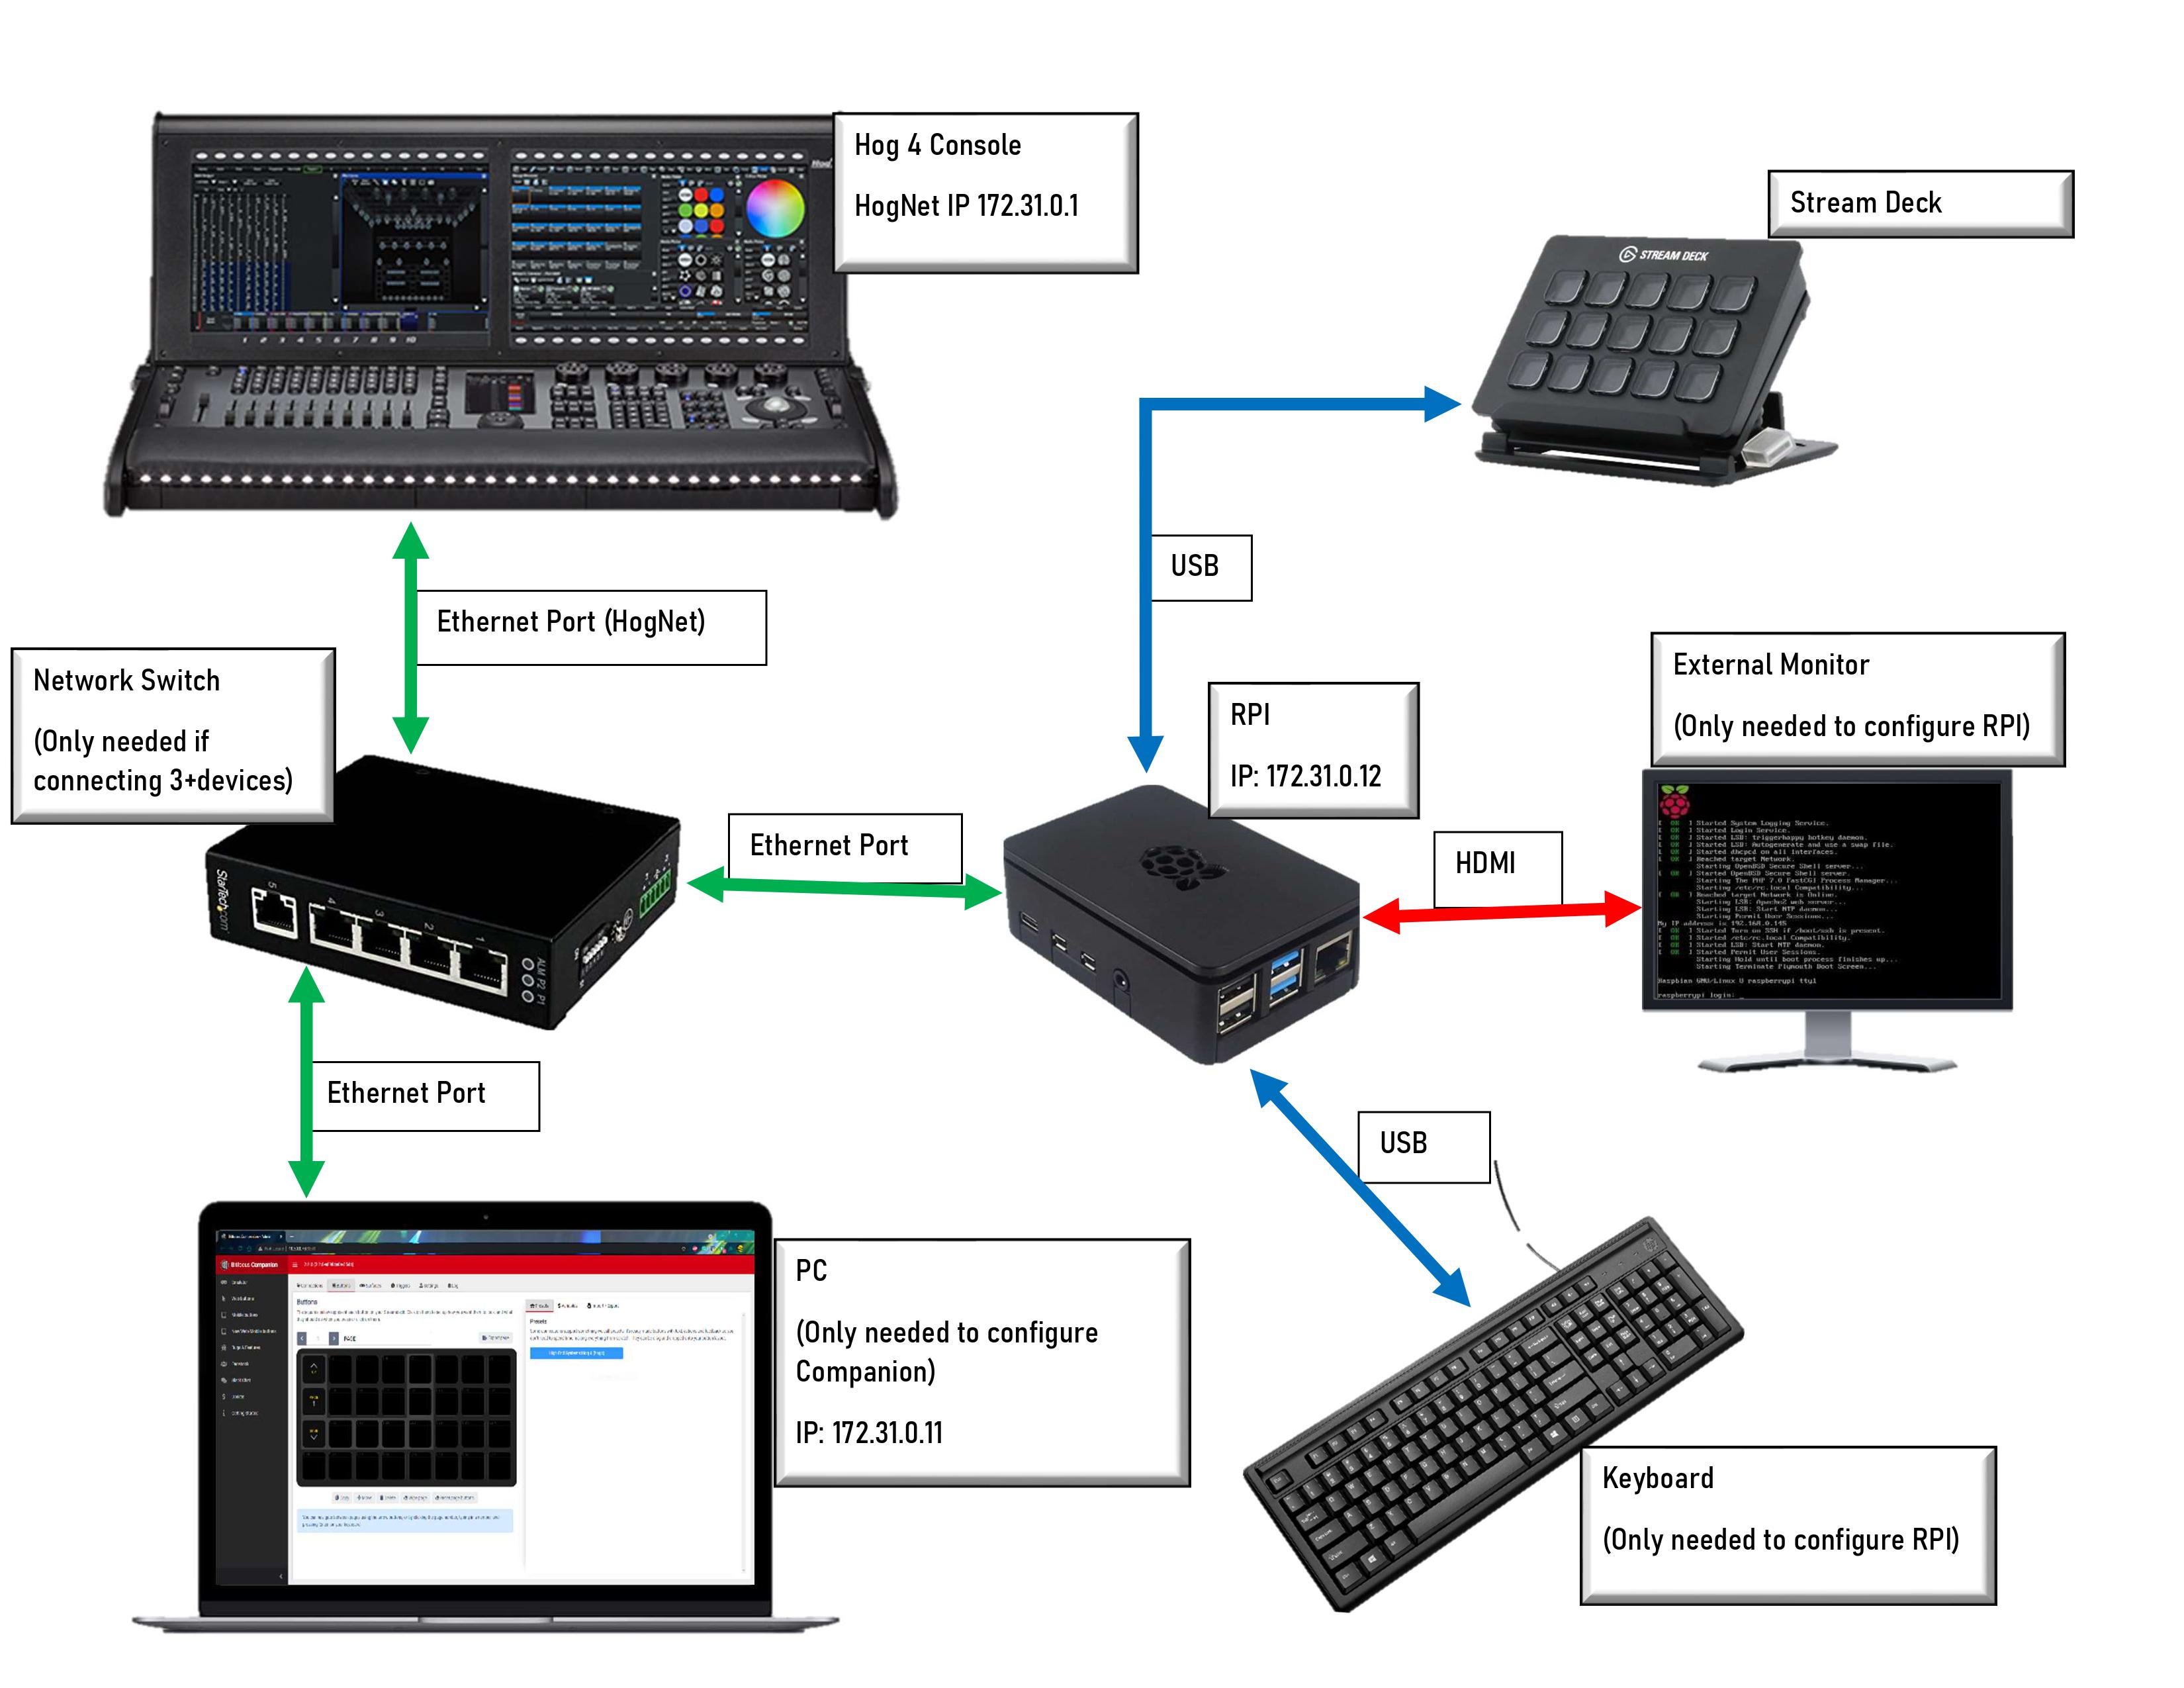
Raspberry Pi setup (Optional)
A Raspberry Pi can be used in lieu of a computer to run the companion software. The Raspberry Pi can be run "headless" (no monitor, keyboard, or mouse attached once configured)
Specific model used for creating this guide "CanaKit Raspberry Pi 4 4GB Starter PRO Kit - 4GB RAM"
Make sure to fully assemble the RPI before powering it on, follow any instructions found inside the box, including installing heat sinks and fans!
Network Map (Configuration)
Network Map (Compact)
Burn Companion to RPI SD card
Setup Companion on RPI
- Insert the burned SD card to the SD slot on the RPI
- Connect the RPI to an external monitor
- Connect a USB Keyboard to the RPI
- Connect an ethernet patch cable to a separate computer
- Turn on power to the RPI
- Lots of text should run on screen wait until the text stops scrolling
- Note that the RPI will have an IP address shown as "My IP Address Is XXX.XXX.XXX.XXX"
- This IP address will be used to configure the Companion application
- Open a web browser on the attached computer from step 4
- Enter in the IP address from step 6-A followed by ":8000"
- Example "192.168.0.101:8000"
- This can take some time to load the browser interface
- Follow the steps from Companion Setup earlier in this guide
- Ensure Target IP address and port is set to the HogNet IP of the console
- Ensure to scan for the Stream deck via USB
- It is highly recommended to set a static IP address in range with the hog 4 console you are using
- How to give your Raspberry Pi a Static IP Address
- Recommended to use IP address: 172.31.0.12
A layout can be created on one computer and exported to the RPI running Companion.
More detailed instructions can be found on the GitHub page for the RPI Companion program
A video guide can also be found below: